Features
- Intended for use with Track Saw cutting systems
- Replacement part for glide strip on Track Saw tracks
- Installs on the topside of Track Saw tracks
Specifications
| Color | Black |
| Is It A Set? | No |
| Product Height (In) | 0.1 |
| Product Length (In) | 118 |
| Product Weight (Oz) | 291.2 |
| Product Width (In) | 0.75 |
| Warranty | 90 Day Limited Warranty |
Related Tools
Related Articles

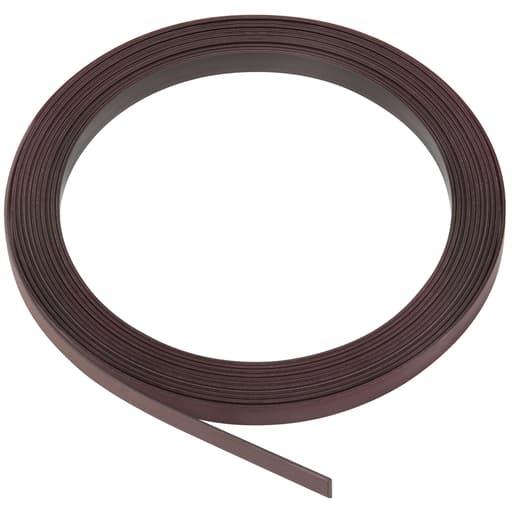
Replacement glide strip designed to attach to the topside of track sections used in a Track Saw cutting system. Provides a low‑friction surface for the saw to run on.
DeWalt Track Saw Replacement Glide Strip Review
Why a simple strip can make a big difference
Track saws live and die by smooth, consistent travel. If the saw base drags or snags, your cut quality takes the hit. After years of use, the top glide surface on my rail had gone from slick to scuffed, and I was getting that subtle stutter when pushing through sheet goods. Swapping in the DeWalt glide strip transformed the feel of the system more than I expected. It’s not a flashy part, but it’s one that quietly does its job every time you set the saw on the rail.
What the glide strip is—and isn’t
This is a replacement, low‑friction strip that installs on the top side of the track, where the saw’s base rides. It’s not the splinter guard on the cutting edge, and it’s not the anti‑slip rubber on the rail’s underside. Its job is simple: give the saw an even, slick surface so you can push with one hand and keep your attention on the line.
The strip I used is black, about 0.1 inches tall and roughly 0.75 inches wide, sized to fit snugly within the track’s top channel. At 118 inches long, it’s plenty to handle a long rail and trim to fit. It’s a straightforward component, but precision matters here—too soft and it’ll gum up, too hard and it won’t feel slick.
Installation: straightforward if you take your time
I set aside 30 minutes for the install, and that was enough to do it right. The most important steps all happen before the new strip goes on.
Here’s the process that worked well for me:
- Remove the old strip and any lingering adhesive. A plastic scraper kept me from gouging the aluminum.
- Deep-clean the channel. I used isopropyl alcohol on a lint-free cloth, followed by a dry wipe. Any dust or oil will fight adhesion.
- Dry fit the strip to understand the path and where you’ll trim.
- Peel the backing a foot at a time, press the strip into the channel, and work along the rail. I kept tension light to avoid stretching.
- Use a small roller (or the rounded handle of a screwdriver) to seat the strip evenly, paying extra attention at the ends.
- Trim with a sharp utility blade against a straightedge, then press the ends again.
- Let it sit a bit before heavy cuts; I gave it an hour while I set up material.
The adhesive grabbed nicely without being so aggressive that I couldn’t reposition a section within the first few seconds. On a warm day, adhesion felt immediate; in cooler conditions, a bit more pressure helped. The ends are the usual failure points on strips like this, so I made sure they were fully pressed in, and they stayed put.
How it feels on the rail
The difference in glide was obvious. With the new strip in place, the saw’s base rode in a way that felt controlled but friction-light. Push effort dropped, and the feed rate became easier to maintain. I wasn’t fighting micro-stops or chatter, especially noticeable when crosscutting veneered ply where any hesitation can show up in the surface.
I didn’t see any change in accuracy per se—the track alignment handles that—but it’s easier to keep a consistent speed, and that consistency does help with cut finish. I also found plunge actions smoother because there’s less tendency for the saw to shift as you initiate the cut.
One practical bonus: the glide strip is forgiving of fine dust. With the strip installed, I didn’t need to baby the rail between every cut. A quick brush kept it clean and slick.
Fit and compatibility
On DeWalt tracks, the fit was exact: the width filled the channel without bulging, and the height kept the saw base just off bare aluminum. That slight elevation is what protects both the rail and your saw’s base over time. I installed mine on a full-length rail and trimmed the remainder; a single strip has enough length to cover a long section, and the clean cut at the end looked factory once burnished down.
If you use rail connectors to join sections, running the strip continuous across the joint helps maintain the same feel as you cross the seam. I aligned my connectors first, then installed the strip right over the junction. No hitch there.
Durability so far
After several weeks of shop and on-site cutting—including ripping dense hardwood ply and trimming doors—the strip hasn’t lifted or curled. The surface has stayed slick without developing a gummy feel, even after a couple of hot afternoons in the sun. I did notice that pitch and resin can build up if you’re ripping prefinished stock; a quick wipe with a mild cleaner brought it back. I avoid solvents that might soften adhesives; isopropyl alcohol has been safe.
Like any wear component, this will eventually need replacing again, but it’s holding up. The edges haven’t nibbled or frayed, and the top surface hasn’t polished in a way that changes the push feel.
Tips that helped
- Clean prep is everything. Any dust under the strip will telegraph as a bump you feel on every pass.
- Don’t stretch the strip during install; lay it in relaxed to prevent end shrink-back.
- Use a hard roller to seat it. Even pressure beats thumb presses.
- Let the adhesive settle before you start heavy rips or plunge cuts.
- Keep your saw base plate clean—no strip will compensate for a gritty sole.
What I liked
- Noticeably smoother, more consistent travel with less push effort
- Clean, exact fit on the track’s top channel
- Generous length that trims easily for a custom finish
- Adhesive that grabs confidently and hasn’t lifted at the ends
- Simple maintenance—stays slick with minimal fuss
Where it could be better
- You’ll need patience on the first install to avoid bubbles and misalignment; a second set of hands helps with long rails.
- Adhesive-backed strips are sensitive to temperature; very cold conditions can make install fussy, so plan accordingly.
- It’s another consumable to monitor. If you’re rough on your rails, expect periodic replacement.
None of these are deal-breakers, but they’re worth noting so you get the best result the first time.
Who benefits most
- Cabinetmakers and trim carpenters who live on sheet goods and care about edge cleanliness
- Anyone noticing the saw base dragging, especially on older or heavily used rails
- Users who want to protect their saw’s base from direct contact with aluminum
If your track saw already feels glassy-smooth and your rail’s top surface is pristine, you won’t see a night-and-day difference. But if you’re beginning to feel that hint of resistance—or your current strip is nicked or lifting—this replacement brings the system back to form.
Bottom line
The DeWalt glide strip does exactly what it’s supposed to: it restores a slick, even running surface on the rail and keeps the saw moving predictably. Installation is easy with a bit of care, the fit is spot-on, and once in place it stays put. I recommend it because it meaningfully improves the day-to-day feel of a track saw setup for a modest investment of time, and it protects both your rail and saw base over the long run. If smooth, controlled feed is important to you—and it should be—this is a small part that pays off every time you pull the trigger.
Project Ideas
Business
Mobile Track Saw Tune‑Up Service
Offer on‑site maintenance for contractors and cabinet shops: replace glide strips, clean and de‑gum tracks, check connector squareness, refresh splinter guards, and calibrate saw bases. Sell service tiers (single track, full crew set, quarterly maintenance) and minimize client downtime by stocking common strip lengths.
Aftermarket Glide Refresh Kits
Bundle pre‑cut glide strips for popular track lengths (e.g., 55", 75"), plus cleaning wipes and a small install roller. Sell on Etsy/Shopify with clear instructions and a QR‑linked video. Upsell add‑ons like splinter guards, track connectors, and non‑slip base strips to increase AOV.
On‑Site Panel Breakdown Service
Provide precision panel cutting for remodelers and designers who don’t have a full shop. Market the benefits of freshly refreshed glide strips for smoother, chip‑free cuts on site. Price per sheet or per cut list, and add delivery of labeled parts to cabinetmakers or installers.
Content + Affiliate Funnel
Create short videos and blog posts on diagnosing worn glide strips, replacing them, and building jigs that leverage the strip. Monetize through affiliate links to strips and related accessories, sponsor spots from tool brands, and downloadable cut lists for DIY guides that use the glide strip.
Creative
Ultra‑Long Sheet Breakdown Station
Join multiple track sections and replace all worn glide strips for a uniform, low‑friction ride across the full length. Build a foldable torsion‑box table with dog holes and stop blocks so the track saw glides effortlessly over 8–10 ft rips without stutter. The fresh 118" glide strip lets you refresh two standard 55" tracks and a connector span, ensuring consistent cut quality on cabinet panels and long rips.
Shop‑Made Straightedge Glide Guide
Bond offcuts of the glide strip to a hardwood or aluminum straightedge to create a slick, low‑friction runner for a circular saw, trim router, or laminate trimmer. Add anti‑slip backing and a replaceable zero‑clearance edge. The glide strip provides a smooth travel surface that mimics a track saw feel even on homemade guides.
Router Slab‑Flattening Sled Upgrade
Apply the glide strip to the underside of a router sled’s runners or the tops of the rail beams so the sled slides smoother with less chatter while surfacing live‑edge slabs. The low‑friction interface reduces push force and helps maintain a consistent feed rate, improving surface finish and reducing tear‑out.
Camera Slider for Shop Content
Use aluminum angle or extrusion as rails and line the contact surfaces with glide strip to create a DIY camera slider/dolly for filming builds. The low‑friction strip delivers buttery movement without bearings, and the 118" length supports both compact desktop sliders and longer wall‑mounted tracks for sweeping shots.