Features
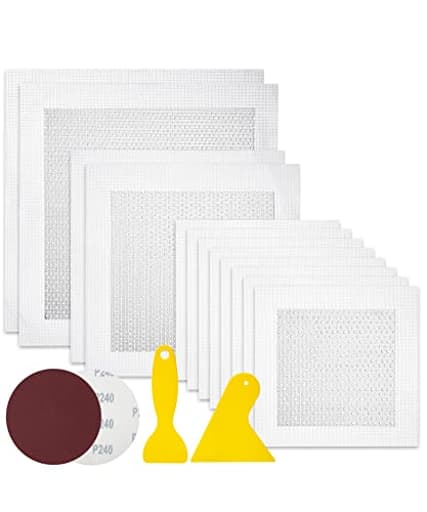
- Package includes 12 pieces of drywall repair patch in three different sizes (8 pieces of 4-inch, 2 pieces of 6-inch and 2 pieces of 8-inch), 2 pieces of sandpaper (240 grit), and 2 plastic scrapers.
- Bates drywall repair patches are made from quality aluminum, making them lightweight yet strong and durable for long-lasting performance.
- The self-adhesive backing makes it easy to apply the patch to the wall, ensuring good adhesion to nearly any kind of surface.
- Bates wall repair patch is suitable for repairing most damaged surfaces around the home, kitchen, or office building, as well as factories and other industrial facilities.
- To use this product effectively, first clean and dry out the hole you want to patch before peeling back the backing and applying the drywall patch. Evenly spread out plaster with a scraper afterwards for a more seamless look.
Specifications
| Color | Metal |
| Size | 16 pcs, 4", 6", 8" |
| Unit Count | 1 |
Related Tools
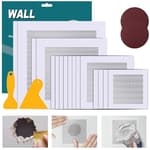
A drywall repair kit with 12 aluminum self-adhesive patches (eight 4", two 6", two 8") plus two 240-grit sandpapers and two plastic scrapers for patching holes and damaged drywall. After cleaning and drying the hole, peel off the backing and apply the patch, then spread plaster or joint compound with a scraper and sand for a flush finish.
Bates Choice - Drywall Repair Kit, 16pcs, Dry Wall Patch Kits, Wall Repair Patch Kit, Wall Patch Repair Kit, Drywall Hole Patch, Drywall Patch Kit, Wall Hole Repair Kit, Drywall Patch Hole Review
Why I Reached for This Kit
A recent weekend project left me with a handful of holes—everything from a doorknob ding to a jagged 4-inch opening where I relocated a thermostat. I wanted a quicker, cleaner solution than cutting fresh drywall, screwing in a backer, and taping seams. That’s what led me to the Bates drywall repair kit. It promised quick reinforcement with self-adhesive aluminum patches, plus a couple of scrapers and sandpaper to keep things simple. I used it across smooth and lightly textured walls, on both painted drywall and primed surfaces, to see where it shines and where it falls short.
What You Get
The kit includes:
- Twelve aluminum patches: eight at 4 inches, two at 6 inches, and two at 8 inches
- Two plastic scrapers
- Two sheets of 240-grit sandpaper
The patches are perforated aluminum discs with a surrounding fiberglass mesh and a peel-and-stick adhesive. The aluminum adds stiffness so the patch doesn’t sag into the hole, while the mesh gives compound something to anchor to at the edges. The inclusion of a range of sizes matters: 4-inch patches cover most common accidents (like door handle dents), 6-inch handles small access holes, and the 8-inch patches are handy for larger mishaps where a traditional cut-in patch would otherwise be required.
Setup and Application
My process for each repair was roughly the same:
1. Prep the area: I squared off ragged edges with a utility knife, removed any loose paper, and wiped down dust. On glossy paint, I gave the area a quick scuff with 120-150 grit to help adhesion.
2. Stick the patch: I chose a patch so the aluminum disk fully spanned the hole with at least a 1-inch margin of mesh on solid drywall. Pressing from the center out helped avoid bubbles. The adhesive grabs quickly on clean paint and primed surfaces.
3. First coat: I applied a thin layer of joint compound, pressing it through the perforations so the paste keys into the aluminum and across the mesh. For speed, I sometimes used a setting-type compound (hot mud) for the first coat; otherwise, all-purpose premix works fine but needs more drying time.
4. Build and feather: After the first coat dried, I knocked down high spots with a light sand and applied a wider second coat, feathering at least 6–10 inches past the patch. On the larger patches, a third skim coat helped erase edges.
5. Sand and finish: The included 240 grit is appropriate as a final pass, but I often started shaping with 120 or 150 grit before finishing at 220–240. I primed before paint to avoid flashing.
On a lightly textured wall, I set the first coat flat to lock down the patch, then matched the texture with the final coat using a roller and a bit of watered compound. The mesh and aluminum stayed put during sanding, which is crucial to keeping the repair smooth.
Performance in Practice
- Adhesion: The mesh border sticks well to clean, dust-free surfaces. On chalky paint or dusty gypsum, adhesion drops. A quick wipe and scuff improved reliability. On heavily textured surfaces, I got better results by knocking down the peaks or using a slightly thinned first coat to “wet out” the mesh immediately after sticking it.
- Strength: The perforated aluminum provides real rigidity. Even over a 4-inch hole, there was no flex once the first coat cured. That stiffness helps prevent compound cracking and makes sanding easier because the substrate doesn’t give.
- Blending: On flat walls, I could make the 4-inch patches disappear with two coats and a prime. The 6- and 8-inch patches generally needed a wider feathering zone and a third skim coat to hide the transition. As with any repair, the broader you feather, the better it disappears.
- Speed: Compared with a traditional drywall cut-in patch, this approach is faster and less messy. There’s no cutting scrap drywall, no screwing in a backer, and no taping seams. If you use a setting compound for the first coat, you can realistically get to paint the same day on smaller repairs.
Where It Works Best
- Small to medium holes (thumb-sized up to about 4 inches) are the sweet spot. You’ll get excellent results quickly.
- For 6–8 inch openings, it still works, but plan on larger feathered coats to avoid a visible “halo.”
- Painted drywall, primed surfaces, and lightly textured walls respond well, provided the area is clean and scuffed if glossy.
- Odd shapes are no problem—cutting the patch to fit with tin snips or strong scissors worked fine. I notched around a corner bead once without issues.
Limitations to Consider
- The scrapers are serviceable but flimsy. They’ll get you through, but a wider, stiffer 6–8 inch taping knife makes the job easier, especially on the larger patches.
- The included 240-grit sandpaper is only for finishing. Keep some 120–150 grit on hand for shaping heavier coats.
- The self-adhesive works, but it’s not magic. Dust, chalky paint, or heavy texture will compromise grip. You can still succeed, but prep matters. I also found that pressing compound through the perforations right after sticking helps “lock” the patch mechanically.
- This is not a substitute for a proper drywall replacement when the hole is large enough to undermine wall integrity or when edges are missing over a stud bay. Over about 8 inches, I’d switch to a backer board and a cut-in patch.
- In high-impact areas (behind doors without stops, kids’ play zones), the patch holds up, but the finish coat can still dent if hit hard. Consider adding a door stop or reinforcement as needed.
Practical Tips for Best Results
- Pre-fill deep cavities: If the cavity behind the hole is more than an inch deep, butter in a bit of setting compound first to avoid a sunken center later.
- Feather wide: Especially on the 6- and 8-inch patches, use a broad knife and feather at least the radius of the patch to avoid a visible ring.
- Prime every time: Even if the repair looks smooth, primer prevents flashing and improves topcoat adhesion. A stain-blocking primer helps if the original paper was torn.
- Cut with care: If you need to trim a patch, cut the aluminum disk and mesh cleanly, then round sharp corners; rounded edges telegraph less under compound.
- Match texture last: Focus on a flat base first. Then add texture to the final skim to blend.
Build and Quality
The aluminum itself is thin but stiff—ideal for keeping a low profile under compound while resisting flex. The mesh is standard fiberglass; the adhesive is aggressive enough for clean paint but not so strong that repositioning tears the wall surface. The included accessories are basic: fine for a one-off repair, but regular DIYers will prefer their own knives and a sanding block. I also appreciated that the 4-inch patches dominate the pack; that’s the size I used most.
Value and Use Cases
If you have a list of small to medium repairs, this kit is cost-effective. The convenience of having multiple sizes in one pack saves repeat trips, and the speed of aluminum-backed patches can turn a multi-day taping job into a single afternoon with the right compound. For landlords turning units, homeowners prepping to sell, or anyone tackling post-project cleanup (new cable runs, smart home upgrades, wayward door handles), this kit fits nicely into a light-maintenance workflow.
Bottom Line
The Bates kit does exactly what a good patch system should: it sticks reliably on prepped surfaces, adds structural support so compound doesn’t slump, and finishes flat with a few sensible coats. It isn’t a cure-all—large structural repairs still call for traditional methods, and the included tools are bare-bones—but as a fast, clean solution for everyday wall damage, it’s effective.
Recommendation: I recommend this kit for small to medium drywall holes when you want a durable repair without cutting new drywall. It offers sensible size options, genuinely helpful aluminum reinforcement, and an easy workflow. Just supplement it with a better taping knife, some coarser sandpaper, and the joint compound of your choice, and you’ll get professional-looking results with minimal fuss.
Project Ideas
Business
Quick-Turn Patch Service for Landlords/Short-Term Rentals
Offer a rapid drywall-repair service focused on small holes and dents for landlords, Airbnb hosts, and property managers. Use the patch kit for same-day fixes between tenants to avoid costly painting or replacement. Price jobs by the unit (per hole) or offer monthly retainer plans for frequent turnovers. Promote speed, neatness, and cost savings compared with full repairs.
Branded DIY Repair Kits + Video Course
Package the patches into a branded kit with printed instructions and a short how-to video (or QR code) that teaches proper patching and finishing. Sell online (shop, Etsy, Amazon) and in local hardware stores. Upsell premium kits that include joint compound, mini putty knives, and a finishing sponge, or offer a subscription refills service for contractors and landlords.
Hands-On Workshops for New Homeowners
Host in-person or livestreamed workshops teaching homeowners how to repair common wall damage using the kit. Charge per attendee and sell starter kits at the event. Partner with real estate agents, moving companies, and co‑working spaces to reach first-time buyers or renters. Workshops build trust and drive product sales and referral business for repair services.
Small-Batch Metal Goods Business
Create and sell finished goods made from the aluminum patches—coasters, magnets, art panels, branded signage or corporate gifts. Use platforms like Etsy, local craft fairs, and wholesale to boutiques or staging companies. Market the line as upcycled/industrial-chic and offer customization (logos, colors, finishes) for event or corporate orders.
Creative
Aluminum Mosaic Wall Panels
Use the 4", 6" and 8" self-adhesive patches as metal 'tiles' to create industrial-style mosaic panels. Trim patches into shapes with tin snips or heavy-duty scissors, arrange on a plywood backing or reclaimed wood, stick them down, then use joint compound or grout between seams for contrast. Finish by distressing with the included 240-grit sandpaper for a patina effect. Hang as a single focal piece or several panels for a gallery wall.
Custom Metallic Coasters & Magnets
Cut the aluminum patches into coaster-sized discs or small shapes for refrigerator magnets. Affix cork or felt to the underside (for coasters) or magnetic strips (for magnets). Seal with epoxy resin or clear spray to make them waterproof and durable. Personalize by painting, stamping, or chemically aging the metal for unique gift items or craft-market inventory.
Industrial Picture Frames and Trim
Use whole patches or trimmed strips to create metal trim around small frames, mirrors, or shadowboxes. The adhesive backing makes placement easy; press and then use the plastic scrapers to smooth edges and seat the metal. Lightly sand edges for an antiqued look. These make striking, low-cost frames for photography or prints with a modern, industrial aesthetic.
Reusable Paint Shields & Stencils
Turn patches into reusable paint shields and stencils for crisp lines and shapes on walls or furniture. Their rigid aluminum holds shape better than paper stencils. The included scrapers double as squeegees for removing excess paint. Because the patches are durable, you can cut intricate patterns and reuse them for multiple projects.