Features
- With this professional kit, you can permanently repair drywall
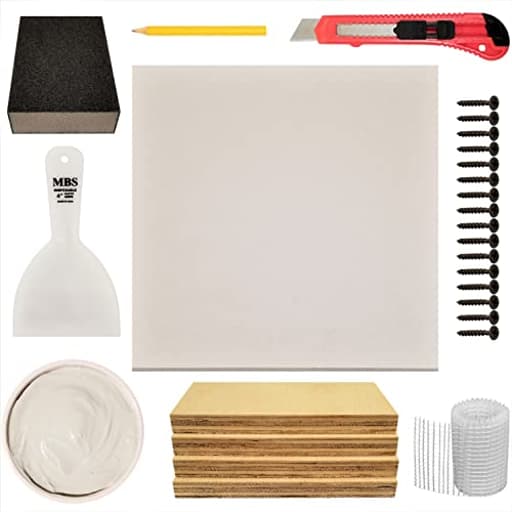
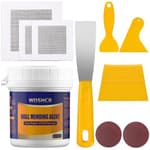
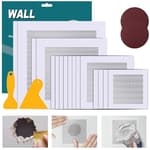
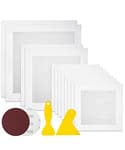
- The kit comes with a drywall panel, instructions, putty, wood pieces, screws, sanding block, cutting knife, putty knife, and drywall tape
- The drywall panel’s size is 12” x 12” x 0.5”
- The only tool you need to complete the repair is a Phillips head screwdriver
- If you have any questions about the kit, please contact Dlh Western
Specifications
| Color | 12" Professional Kit |
| Unit Count | 1 |
Related Tools
This drywall repair kit includes a 12" x 12" x 0.5" drywall patch and materials to repair a hole or damaged section of drywall. It contains putty, drywall tape, wood backing pieces, screws, a putty knife, sanding block, cutting knife, and instructions; the only additional tool required is a Phillips-head screwdriver.
Dlh western Drywall Repair Kit 12 Inch Review
A fist-sized hole in my hallway finally forced my hand. Rather than piecing together supplies aisle by aisle, I tried this all-in-one drywall repair kit from Dlh Western. After using it on two repairs—a 3-by-3-inch puncture and a larger, rough opening from a removed low-voltage box—here’s how it handled the job and where it fits.
What’s in the box
The kit is built around a 12 x 12 x 1/2-inch drywall panel, sized for common interior walls. Alongside that you get:
- Joint compound (labeled putty) in small containers
- Drywall tape
- Four wood backing strips
- Screws
- A plastic putty knife
- A sanding block
- A small cutting knife
- Step-by-step instructions
The idea is that you shouldn’t need to make a supply run or overbuy gallons of mud, a full roll of tape, or a stack of patches. For a single repair or two, that convenience is real. The only outside tool the instructions call for is a Phillips screwdriver. In practice, I found a drill driver made life easier, and I used a stud/jab saw for one cutout, but you can get by with the included knife if you’re patient and make several scores.
Setup and workflow
I started by squaring the hole with a level and the knife, tracing a patch cut from the included panel. The 1/2-inch thickness matched my wall, which is important: if you’re patching a ceiling (often 5/8-inch) or an older wall, check thickness before you commit. The wood strips serve as cleats behind the opening. I fished one through, held it with a temporary screw as a handle, and fastened it top and bottom with the included screws. That step took the most time with just a hand screwdriver, so consider a drill driver if you have one.
For the smaller hole, I used a “California patch” technique: I cut a square from the panel and peeled the gypsum from around the edges, leaving the paper face as built-in tape. The kit’s tape works fine too; the built-in-paper approach simply speeds blending on small patches.
The compound comes pre-mixed in small pots. It’s lightweight, spreads easily, and doesn’t slump off the knife. I applied a thin coat to bed the patch, added tape where needed, and skimmed a wider coat to feather the edges. After drying, I sanded lightly with the included block and did a second skim. Two coats were enough for a paint-ready finish on both repairs.
Performance and finish
The finish quality is what matters, and this is where the kit does its best work. The compound sands cleanly without clogging the block, and dust is moderate—still wear a mask. Shrinkage was minimal in thin coats, but as with any patch, don’t try to fill deep voids in one pass. The tape bonded well and didn’t bubble when I worked it into a properly thin bed of mud.
Feathering the patch is easier with a wider, stiffer knife than what’s included. The plastic knife works and won’t gouge the paper face, but it flexes more than I prefer. I would have loved a 6-inch or 8-inch metal knife for the second coat. That said, I still achieved a seamless blend after some extra sanding.
Dry times will vary with temperature and coat thickness; my first coat was sandable after a couple of hours, the second by the end of the day. If you’re on a tight timeline, keep coats thin, and don’t chase perfection on the first pass.
Component quality
- Drywall panel: Square, consistent, and true 1/2-inch. No crumbling edges out of the box.
- Compound: Lightweight, spreads smoothly, and sands predictably. The containers are a sensible size—you’re not opening a gallon just to use a cup.
- Tape: Adequate for seams and cracks. It’s generic but perfectly serviceable for a patch this size.
- Wood cleats: Straight and dry. Four pieces give you flexibility to brace a larger opening or conserve for a second job.
- Cutting knife: Sharp enough for scoring and trimming paper; less ideal for aggressive plunge cuts. Plan to score multiple passes rather than force it.
- Sanding block: Comfortable, medium-fine grit. It’s good for flattening ridges and feathering edges; you might add a finer grit if you’re picky.
- Putty knife: Usable, but the weak link. It flexes under pressure, which makes wide feathering slower.
Nothing feels premium, but nothing feels like a corner cut either. The kit is designed for a complete small repair—not outfitting a drywall crew—and the choices make sense.
Where it fits best
If you’re tackling a single patch or two, this kit hits the sweet spot: it’s faster and, in many cases, cheaper than buying full-size materials you’ll barely dent. It’s especially good for:
- Holes from accidental impacts (doorknobs, furniture, missed studs)
- Old outlet or cable box cutouts
- Small water-damage sections where the source has been fixed
The included panel caps your repair to around 12 inches square. Bigger than that, you’ll need extra material and likely want to tie into studs or larger cleats. For textured walls, you’ll also need a separate texture product—this kit gives you a smooth finish only.
Limitations and caveats
- The “screwdriver-only” claim is a bit optimistic. It’s doable, but a drill driver speeds the cleat installation and reduces the risk of tearing paper when you muscle screws by hand.
- The plastic putty knife works, but a wider, stiffer metal knife improves feathering on your second coat. If you already own one, use it.
- Wall thickness matters. The included panel is 1/2-inch; some basements, garages, and ceilings use 5/8-inch. You can shim behind a thinner patch, but matching thickness is cleaner.
- No texture solution in the box. If your wall has orange peel, knockdown, or heavy texture, plan for an additional step.
- Not moisture-rated. Avoid bathrooms with ongoing humidity issues or anywhere near active leaks until the source is corrected.
Value
Individually buying a panel, tape, mud, knife, sanding block, screws, and cleats for a single patch usually means overbuying and spending more overall. The value here is packaging just enough of each item to finish the job, plus clear instructions that flatten the learning curve. For pros and frequent DIYers with a shop full of supplies, the kit is less compelling. For a homeowner who needs to fix a hole and move on, the math adds up.
Tips for a cleaner result
- Square the hole and match the patch. Stray shapes are harder to blend.
- Bevel patch edges slightly with your knife to accept compound.
- Keep the first coat thin—just enough to bed the tape and fill gaps.
- Step up the feathering width on each coat; think 6 inches, then 10–12 inches.
- Let it dry fully between coats, and sand with light, broad strokes to avoid divots.
- Prime before painting. Even “paint-and-primer” products benefit from a dedicated primer over fresh compound.
Safety and prep
Cutting into walls is never trivial. Before you enlarge a hole, check for wires and plumbing, especially near outlets or bathrooms. Score gradually rather than forcing the blade. Wear eye protection and a dust mask while sanding, and lay down a drop cloth to keep grit contained.
The bottom line
The Dlh Western kit takes the friction out of small drywall repairs. It bundles exactly what a one-off patch needs, the compound is easy to work, and the instructions are clear enough for a first-time repair. You sacrifice a bit in tool quality—mainly the flexy plastic knife—and the promise of “only a screwdriver” is more aspirational than ideal. But the finish I achieved was clean, the process was straightforward, and I had enough materials left to tackle a second small patch without another purchase.
Recommendation: I recommend this kit for homeowners and casual DIYers who want a complete, no-guesswork solution for small to medium drywall patches up to about a foot square. It’s convenient, cost-effective for one or two repairs, and produces a paint-ready finish with minimal fuss. If you already own drywall tools or need to match thicker boards, you might prefer sourcing individual components—but for most one-off wall fixes, this kit is the simplest path to a solid, invisible repair.
Project Ideas
Business
Quick-Repair Service for Landlords & Renters
Offer a fixed-fee on-call drywall repair service using the 12" kit for common tenant damages (holes, dings). Market to property managers and landlords as a rapid-turnover solution between tenants; price per patch job plus travel, or bundle monthly maintenance contracts for recurring revenue.
Hands-On DIY Workshops + Kit Sales
Run local evening or weekend workshops teaching tenants and homeowners how to use the kit for permanent repairs. Charge per attendee and sell take-home kits (standard or deluxe). Upsell video access, tool sets, and follow-up repair credits to build customer lifetime value.
Custom-Branded Repair Kits for Property Managers
Package the kit with custom labeling, instructional QR codes, and bulk-pricing for apartment complexes, Airbnb hosts, and handyman services. Sell in volume with subscription replenishment (every X repairs), making it easy for on-site staff to complete consistent repairs quickly.
Content & Affiliate Channel
Create how-to videos, short social clips, and step-by-step blog posts demonstrating fast drywall fixes with the kit. Monetize through ad revenue, affiliate links to the kit and complementary tools, and paid downloadable guides or mini-courses aimed at DIY renters and small landlords.
Upcycled Home-Decor Product Line
Produce and sell finished decorative items made from repaired/finished drywall panels (textured art, small shelf backings, tile sets). Market as sustainable, handmade home decor on Etsy or at local markets—price items to cover labor, materials, and a healthy margin, and offer custom commissions.
Creative
Patch-to-Canvas Wall Art
Turn the 12" drywall panel into a textured mini-canvas: apply layers of the included joint compound to build relief, use the putty knife and sanding block to shape and smooth, then paint or stencil. The wood backing and screws make a ready-to-hang frame; create a series of 3–6 pieces for a gallery-style wall display.
Mini Shadow-Box Planter Backing
Use the drywall patch as the back of a shallow shadow box planter: cut openings with the included knife, reinforce with the wood backing and screws, seal with primer/waterproofing (purchase separately), and attach small succulent pots or faux plants. The finished piece is a lightweight, modern vertical planter for entryways or kitchens.
Customized Bulletin / Organizer Board
Convert the patch into a small wall organizer: glue cork or thin plywood to the front (or cover with fabric), use the putty and tape to finish edges, and mount hooks or small holders to the wood backing. Ideal for kitchen notes, keys, and mail; offer personalized fabric/paint options for gifts.
Acoustic/Decorative Wall Tile
Cut the 12" panel into smaller tiles with the cutting knife to create a set of decorative wall tiles. Add thin sound-absorbing batting behind each tile, wrap in fabric, and seal edges with putty for a custom-looking acoustic panel array—useful over desks, media walls, or nurseries.
Faux-Tile Mosaic Accent
Score and break the drywall panel into tile-like shapes, finish edges with putty and sanding, then paint/glaze to mimic stone or ceramic. Arrange and mount several finished pieces as a small backsplash, headboard accent, or gallery wall for a textured, handcrafted look.