Features
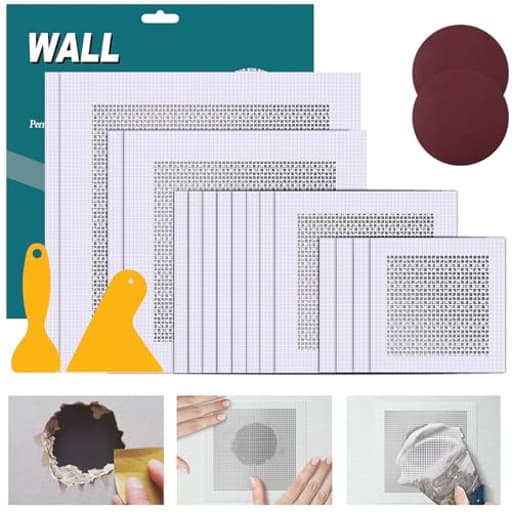
- Wall Repair Patch Kit: Are you still confused about the size? Our combination perfectly solves your problems of various sizes. 8 pcs* 4×4inch aluminum repair patch, 2 pcs* 6×6 inch aluminum repair patch, 2 pcs* 8×8 inch aluminum repair patch.
- Material: This self adhesive screen patch is made of quality aluminum, light weight and high strength, the drywall repair patch with self-adhesive backing for easy application, good adhesion, suitable for repairing most damaged surface, it will stay for a long time.
- Easy to Use: First clean and dry the wall hole, tear the backing and apply the drywall patch into the hole area,evenly apply plaster with a scraper.It's very easy to use.
- Widely Applied Use: This drywall repair patch is used for all kinds of holes in home kitchen, office building, factory etc.
- Quality Guarantee: Any quality with our drywall repair patch please contact us,we will help you solve problem as soon as possible.
Specifications
| Color | 12 Pcs |
| Unit Count | 2 |
Related Tools
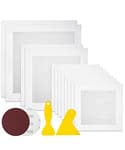
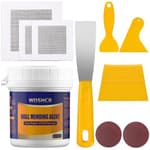
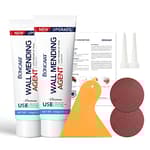
Self-adhesive aluminum wall repair patches with an extended fiber-mesh backing, designed for repairing holes and damaged areas in drywall and plaster. Patches are supplied in multiple square sizes (including 4×4, 6×6, and 8×8 inches) and are applied by cleaning the area, removing the backing, pressing the patch in place, then covering with joint compound or plaster.
WDSHCR Drywall Repair Kit 20 Pack Aluminum Wall Repair Patch Kit, 2/4/6/8 inch Fiber Mesh Over Galvanized Plate, Dry Wall Hole Repair Patch Metal Patch with Extended Self-Adhesive Mesh Review
Why I reached for this kit
I keep a small stash of wall repair supplies for the inevitable “oops” moments—doorknob holes, cable runs, and the aftermath of moving a TV mount. Recently I tackled a handful of those fixes in one go and gave the WDSHCR drywall patch kit a proper workout. It’s a set of self‑adhesive aluminum plates with an extended fiberglass mesh backing, in a mix of square sizes (4, 6, and 8 inches). The premise is simple: clean the area, peel, stick, and bury the patch under joint compound. In practice, the results depend on preparation and technique—but this kit makes the process faster and more predictable than old‑school methods.
What’s in the kit and how it’s built
The WDSHCR patches are aluminum plates laminated to a fiberglass mesh with a pressure‑sensitive adhesive. The mesh extends beyond the plate on all sides. That extension matters: it bridges onto sound drywall and gives your first coat of compound something to grab, reducing the risk of cracks along the patch perimeter.
- Sizes: Mixed pack with 4", 6", and 8" squares
- Construction: Thin aluminum plate bonded to fiberglass mesh
- Backing: Peel‑off liner with self‑adhesive on the mesh
The plates are thin and lightweight but rigid enough to span a hole without sagging. They’re also trimmable—heavy scissors or snips will cut them—but the edges are sharp, so gloves are a good idea if you’re shaping them to fit.
My kit arrived as patches only—no mud, knives, or sandpaper—so plan to supply your own joint compound and finishing tools.
Setup and application
On small to medium interior drywall holes (1½" to 6"), these shine. Here’s the routine that consistently gave me clean results:
Prep the opening
- Square or round the hole and remove loose gypsum so the plate sits flat.
- Lightly scuff glossy paint around the hole with 120–150 grit and vacuum the dust. A clean, dull surface helps adhesion.
- For ragged edges or deep voids, prefill with setting‑type compound (hot mud) and let it firm up.
Place the patch
- Choose a patch at least 2" larger than the hole in both directions.
- Peel the liner and center the aluminum over the opening.
- Burnish the mesh perimeter firmly with your knife or a plastic spreader.
Bury the plate
- First coat: A thin layer of setting‑type compound over the plate and mesh. The goal is to lock the mesh and just hide the plate weave.
- Second and third coats: Lightweight all‑purpose compound, stepping up knife widths (6" → 10" → 12") and feathering out 12–16" from center. Keep coats thin; it’s easier to add than to sand off.
Finish
- Sand lightly with a fine block, prime, and paint.
- For textured walls, use a matching spray texture before priming.
The key is thin, wide coats. The aluminum plate, while thin, creates a subtle ridge. If you try to bury it in one heavy pass, you’ll fight ripples and sanding marks.
Performance and finish quality
Small holes (nail pops, cable holes, knob dents): Overkill in many cases—you can repair those with spackle—but the 4" patches make it easy to get a durable, crack‑free repair that resists re‑denting. The finish blended seamlessly after paint.
Medium holes (old thermostat/doorbell cutouts, mis‑drilled boxes): This is the sweet spot. The rigidity prevents sagging that pure mesh patches can suffer, and the extended mesh creates a smooth transition that taping alone rarely achieves. With two or three thin coats and a wide knife, the repair didn’t telegraph under normal lighting.
Larger holes (6–8"): Still workable, but surface prep matters more. If the drywall edges are crumbled or there’s nothing solid behind the wall, I brace the opening with a scrap wood cleat before applying the patch. Without that backer, you can compress the plate while troweling and end up with a slight dish. With a backer, the patch remained flat and durable.
Adhesion was reliable on scuffed, dust‑free paint. On one glossy wall I tested without scuffing, the mesh edges lifted when I pulled a heavy knife across them on the first coat. Lightly sanding the area first (and burnishing the mesh more firmly) solved it. If you’re working in a cold or damp space, let the wall warm and dry before sticking the patch; adhesives don’t love cold, dusty surfaces.
Ceiling and plaster considerations
Ceilings: The patches do work overhead, but gravity makes everything less forgiving. I found setting‑type compound for the first coat essential to avoid sag. Don’t overload the first pass.
Plaster: You can use these on sound plaster, but you’ll likely need an extra coat to feather the plate edge. Mesh adherence to older, chalky plaster improves a lot if you prime with a bonding primer or at least scuff and vacuum thoroughly.
Durability and paint blending
Once buried and primed, the aluminum plate gives a solid repair that resists knocks better than mesh‑only patches. Under raking light, a poorly feathered patch will show—no surprise there—but with wide, thin coats and a final skim, I could not spot the repairs after paint at typical viewing angles.
Paint adhesion over the patched area was normal after primer. If your wall has a distinct texture, plan a little extra time to match it. Light orange‑peel was easy with an aerosol texture; knockdown textures took a bit more testing on scrap first.
Tips that made a difference
- Scuff glossy walls; wipe or vacuum away dust before sticking the patch.
- Use setting‑type compound (20 or 45 minute) for the first coat to lock the mesh and plate.
- Step up knife widths and keep coats thin; feather farther than you think you need.
- Round the corners of your knife slightly with sandpaper to avoid creasing the mesh.
- On 6–8" patches, add a simple wood cleat behind the hole for support if the drywall edges are weak.
- Prime before painting; it hides the mesh pattern and evens porosity.
- Cut patches to custom shapes if needed, but wear gloves—aluminum edges can be sharp.
Where it fits among alternatives
Versus a traditional “California” (butterfly) patch: A California patch in scrap drywall can yield the flattest finish for medium holes if you’re comfortable cutting and taping. It’s also slower. The WDSHCR patches win on speed and simplicity.
Versus mesh‑only patches: The aluminum core prevents sag and dents, especially on holes larger than a few inches. If you’ve had mesh‑only patches crack or dip, the metal‑backed design is an upgrade.
Versus cutting in a new drywall piece with wood backing and tape: That’s the strongest, most permanent approach for large or high‑abuse areas. I still do that for big holes or corners. For everything else, the stick‑on patch is faster and clean.
Limitations
- Not ideal for very large repairs: Beyond about 8", I’d cut in new drywall with backing and tape.
- Adhesion depends on prep: Glossy, dusty, or damp surfaces can cause lifting. A quick scuff and clean fixes most of that.
- Slight ridge risk: The plate edge requires wide feathering to disappear on flat, well‑lit walls.
- Not designed for long‑term exterior use: While the aluminum won’t rust, the adhesive and joint compound are interior products.
Who will like it
- DIYers who want to fix common wall holes quickly with minimal mess.
- Renters or homeowners prepping to sell, where speed and “good as new” appearance matter.
- Pros knocking out punch‑list repairs without setting up a full taping workflow.
If you’re chasing a museum‑grade invisible patch under hard side‑lighting, you’ll still want a cut‑in drywall repair. For everyday living spaces, these patches are more than good enough.
Recommendation
I recommend the WDSHCR drywall patch kit for small to medium interior repairs where speed and simplicity matter. The aluminum‑and‑mesh design is sturdy, the multi‑size pack covers most holes you’ll meet, and with basic prep and technique the finish blends cleanly after paint. It’s not a replacement for cutting in new drywall on very large openings, and you need to scuff glossy paint to get the most from the adhesive. But as a keep‑on‑hand solution for doorknob damage, old cable holes, and relocated devices, it’s a reliable, time‑saving tool that delivers professional‑looking results with straightforward steps.
Project Ideas
Business
Rapid Patch & Paint Service for Landlords
Offer a fast-turn drywall repair and touch-up service targeting landlords and property managers. Use the self-adhesive patches for consistent, quick repairs, then finish with matching joint compound and paint. Package as flat-rate tiers (single hole, multiple holes, full-room touch-up). Market through local property management groups, Craigslist, and Airbnb hosts. Benefits: low inventory cost, quick job cycles, high repeat frequency.
DIY Decorative Patch Kits (Etsy/Amazon)
Create curated kits that pair the aluminum repair patches with decorative covers (printed adhesive skins, faux-texture cloths), joint compound, a small trowel, and step-by-step photo instructions or a short video link. Position them as both functional repair and instant decorative accent kits for renters who want to hide damage while improving aesthetics. Sell as bundles by size and finish (matte, metallic, patterned).
Workshops & Online Courses: Repair-to-Decor
Run in-person workshops or short online courses teaching the dual skill of quick drywall repair plus creative finishing (metallic faux, patina, stencil overlays). Use the patches as the learning standard to ensure predictable outcomes. Revenue streams: class fees, sponsored supplies from hardware brands, downloadable guides, and affiliate links to kits.
On-Demand Maintenance App Integration
Build a micro-service or partner integration with local handyperson apps (TaskRabbit-style) that standardizes small-hole drywall repair jobs using the patch kit. Provide subscription plans for small businesses (cafes, salons) and condos for scheduled maintenance. Differentiate with guaranteed same-day fixes and photo-documented before/after evidence.
Upcycled Metal Art Product Line
Produce and sell small home-decor items (coasters, wall panels, trivets) using the patches as structural metal elements. Finish with protective lacquer, add branding, and sell through craft fairs, local boutiques, and online marketplaces. Low material cost and simple production make unit economics favorable; highlight the eco/upcycle angle and the patch's durability as selling points.
Creative
Metal Mosaic Wall Tile Art
Use the aluminum patches as base tiles to create a metallic mosaic wall piece. Trim or overlap different square sizes to form geometric patterns, adhere them to a plywood backing, then paint, patina, or hammer-texture the aluminum for variation. Finish with grout-like joint compound pushed into seams and sealed. Result: a lightweight, modern metallic wall sculpture that highlights the patch's built-in mesh and adhesive for easy assembly.
Steampunk Shadow Boxes
Turn patches into small, industrial-looking panels inside shadow boxes. Attach patches as background plates, rivet or glue found objects (gears, watch parts, LED bulbs) to the aluminum surface, and use the mesh backing to anchor wire or small fasteners. The aluminum base gives an authentic metal look and rigid support without heavy fabrication.
Magnetic Command Centers
Leverage the metallic nature to create small magnetic boards for keys, notes, and tools. Stick a patch to a decorative wooden board or frame, paint the frame, and cover the edges with trim. The patch acts as a durable magnetic surface; add small hooks, Bluetooth trackers, or a chalk label for a functional, stylish organizer.
Textured Mixed-Media Canvases
Use patches as embedded texture areas on stretched canvas artworks. Adhere a patch to the canvas, apply gesso and layers of joint compound or modeling paste to blend edges, then paint or apply inks. The subtle relief from the mesh backing and the metallic sheen add depth and contrast to mixed-media compositions.
Mini Planters & Succulent Frames
Create wall-hung succulent frames using the patches as backing plates. Attach small terracotta pots or faux-planter boxes to the patch, use the mesh for drainage/anchoring, and seal joints. Because the patch is lightweight and adhesive-backed, it's ideal for creating compact, vertical mini-planter displays for balconies or kitchens.