Features
- Up to 1,000 lb clamping force
- 4-piece clutch lock for secure holding
- All cast iron construction
- 1-1/4 in throat depth
- Designed for 1/2 in. pipe
- Limited lifetime warranty
Specifications
| Clamp Type | Pipe |
| Clamping Strength (Lb.) | 1000 |
| Hand Tool Type | Clamp |
| Individual/Set | Individual |
| Material | Cast Iron |
| Maximum Opening (In.) | 0.5 in |
| Jaw Width (In.) | 1.25 in |
| Throat Depth (In.) | 1.25 in |
| Returnable | 90-Day |
| Manufacturer Warranty | Limited Lifetime Warranty |
Related Tools
Related Articles

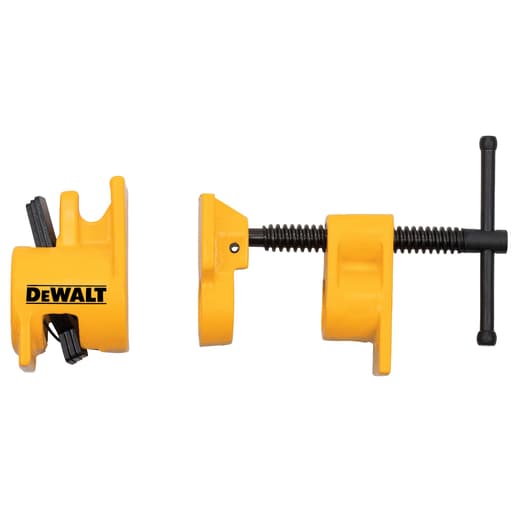
Cast-iron pipe clamp fixture designed for use with 1/2 in. pipe. Provides up to 1,000 lb of clamping force, uses a 4-piece clutch lock to secure the clamp, and has a 1-1/4 in throat depth. Sold as a single clamp and covered by a limited lifetime warranty.
DeWalt 1/2 in. Pipe Clamp Fixture Review
Why I reached for this 1/2-in. pipe clamp
I keep a mix of clamps in the shop—F-style, parallel-jaw, and a pile of pipe clamps that earn their keep during glue-ups. This 1/2-in. pipe clamp won me over because it hits a sweet spot: cheap to scale up, compact on a crowded bench, and strong enough for most small to mid-size assemblies. After several weeks putting it to work on chair repairs, small panels, face frames, and oddball fixtures, I’ve got a solid sense of where it shines and where it asks for a little patience.
Setup and pipe compatibility
As with any pipe clamp, the clamp hardware is only half the equation; the pipe you choose determines the capacity. This clamp threads onto standard 1/2-in. NPT pipe. I’ve used it on both 18-in. and 48-in. lengths without issue. A couple of setup tips that made a difference for me:
- Thread both ends of your pipe. It gives you the flexibility to swap the head to either end or daisy-chain lengths with a coupling.
- Use a decent schedule 40 pipe at minimum. Schedule 80 is nicer for longer spans to reduce flex, but it’s heavier and pricier.
- A few wraps of PTFE tape on the pipe threads add friction and help keep the head snug. Snug it hard; you don’t want the head backing off as you torque down the screw.
- Cap the far end. It protects your hand and keeps the pipe from mushrooming if it gets knocked around.
The sliding rear jaw uses a 4-piece clutch that indexes smoothly on the pipe. It engages positively as long as you seat it cleanly before applying force. If glue squeeze-out or dust builds up on the pipe, the clutch can feel grabby. A quick wipe keeps it moving freely.
Build quality and ergonomics
The clamp is all cast iron, and that’s appropriate here—stiff where it needs to be, with enough mass to stay put during setup without feeling unwieldy. The machining on my unit is clean; the screw runs true and doesn’t bind through the travel. The handle provides enough leverage to bring parts together without straining your wrists, though it’s not as hand-friendly as a big composite handle you’d find on parallel clamps. That trade-off is expected at this price and form factor.
The throat depth is 1-1/4 in., which is typical for a pipe clamp. That limits how far back from an edge you can apply pressure. For panel glue-ups or frames, you’ll want cauls or auxiliary blocks if you need to reach deeper or distribute pressure more evenly.
Clamping power in practice
On paper, it’s rated up to 1,000 lb of force. In the real world of woodworking, you rarely need to push anywhere near that. What matters more: predictable control as you bring joints home. Here the clamp performs well. I’ve used it to pull stubborn mortise-and-tenon joints into alignment on chair repairs and to close up thin panel seams with a clean glue line. The screw action is steady, and the front jaw stays square as long as your workpiece is supported.
That said, pipe stiffness becomes the limiting factor long before the clamp’s screw does. With 48-in. pipe and a single clamp mid-span, you can see a touch of deflection if you crank hard. The fix is straightforward: use more clamps, shorten your spans, or move up to 3/4-in. pipe for large panels. On shorter lengths (18–24 in.), this 1/2-in. setup feels rock solid.
Real-world use cases
- Chair and rocker repair: Excellent. The compact head, modest weight, and quick-adjust clutch let me position pressure exactly where needed without wrestling a heavy bar.
- Face frames and edge banding: Very good. The limited throat depth isn’t a problem, and the screw provides fine control to keep things flush.
- Small panel glue-ups (e.g., shelves, door panels under ~24–30 in. wide): Good, especially if you alternate clamps above and below and use cauls.
- Large tabletops or thick slabs: Not my first choice. It’s doable with enough clamps, but I’d reach for 3/4-in. pipe or parallel clamps.
Tips for best results
- Alternate clamp positions above and below to counteract racking and reduce panel cupping.
- Use cauls to spread pressure, especially on panels. A light wax or tape on the cauls prevents sticking.
- Put painter’s tape on the pipe where it might touch the work. It prevents iron/tannin staining on woods like oak and walnut.
- Keep the pipe clean. Dried glue and dust make the clutch feel sticky and can cause the rear jaw to drag.
- Don’t overtighten. Tight enough to close gaps and keep the joint closed during cure is plenty; overtightening risks misalignment and dents.
Limitations and small frustrations
A couple of quirks showed up in use:
- If you don’t snug the head firmly onto the pipe, it can slowly loosen as you wind in the screw. A firm initial tighten and PTFE tape helped; on one pipe with sloppy threads I added a dab of pipe compound for extra bite.
- The clutch release under load can be stiff. Back the screw off a touch to take pressure off the clutch, then slide. That’s the nature of this style, but it’s worth noting.
- That shallow throat depth means you’ll rely on cauls more than with deeper-throated clamps or parallel-jaw designs.
These aren’t dealbreakers; they’re inherent to the pipe clamp format, and once you adjust your technique, they fade into the background.
How it stacks up to alternatives
- Versus 3/4-in. pipe clamps: 1/2-in. is lighter, cheaper, and great for short- to mid-length work. 3/4-in. wins on stiffness and reach for big glue-ups. If you routinely build wide panels, step up to 3/4-in.
- Versus F-style clamps: F-styles are faster one-handed but can twist more under high load. This pipe clamp applies more linear force with fewer surprises once set.
- Versus parallel-jaw clamps: Parallel clamps distribute pressure better and resist racking, but they cost several times more and take up space. I use them for dead-flat, wide panels; the 1/2-in. pipe clamp handles nearly everything else.
Durability and maintenance
The cast-iron bodies feel ready for the long haul. Threads and clutch plates are the wear points on any clamp. A light wipe of paste wax on the screw keeps it smooth and resists glue. If glue gets into the clutch, a brass brush clears it quickly. The limited lifetime warranty is reassuring for a tool that’s going to see glue, dust, and the occasional drop to the concrete floor.
Value and who it’s for
Pipe clamps remain one of the most cost-effective ways to build out clamping capacity. Buy a handful of these clamp fixtures and a few lengths of pipe, and you can cover a lot of ground for less money than a small set of parallel clamps. If you’re outfitting a shop on a budget or you need modular capacity that can adapt from 18 in. one day to 48 in. the next, this 1/2-in. option is easy to recommend. If your work leans toward large furniture and wide panels, factor in the price of stiffer 3/4-in. pipe or plan to add more clamps across the width.
The bottom line
This 1/2-in. pipe clamp delivers exactly what the format promises: strong, controllable pressure in a compact, affordable package. The cast-iron build is solid, the clutch mechanism is reliable with basic care, and the screw gives you fine control during glue-ups. Its limitations—shallow throat, potential pipe flex on longer spans, and a clutch that prefers a clean pipe—are real but manageable. With a few best practices, it becomes a dependable daily driver for small to mid-size assemblies.
Recommendation: I recommend this clamp for anyone building out a versatile, budget-friendly clamping system for small to medium glue-ups, repairs, and general shop use. Pair it with decent 1/2-in. pipe, keep the threads and clutch clean, and you’ll get consistent results. If your work frequently requires long reaches and heavy, wide panels, consider stepping up to 3/4-in. pipe or supplementing with parallel-jaw clamps—otherwise, this 1/2-in. setup earns its spot on the rack.
Project Ideas
Business
Custom Panel and Butcher Block Service
Offer made-to-order panels, countertops, and butcher blocks. Use pipe clamps to handle long glue-ups cost-effectively—swap in different pipe lengths to scale capacity without buying new bar clamps. Market to DIYers, cabinet shops, and contractors; upsell edge profiles, inlay strips, and finish options.
Clamp Kit Rentals for Weekend Projects
Assemble rental kits with 8–12 pipe clamp fixtures, 1/2 in. black pipes in multiple lengths, soft pads, and clamping cauls. Provide a quick-start guide on glue-ups and cleanup. Deliver and pick up locally for a fee, capturing customers who don’t want to buy a full clamp arsenal for a single project.
On-Site Glue-Up and Assembly Support
Mobile service for installing reclaimed wood walls, wide stair treads, or live-edge shelves. Bring pipe clamps and portable cauls to glue, straighten, and assemble on location. The high clamping force helps tame imperfect stock; charge per hour plus a setup fee and offer optional finishing.
Bent-Lamination Product Line
Produce small-batch laminated goods—arched shelf brackets, lamp frames, cutting board handles, or curved chair components. Pipe clamps and purpose-built forms keep tooling costs low while you iterate designs. Sell via Etsy, craft fairs, or local boutiques; highlight strength-to-weight and elegant curves.
Workshops: Mastering Glue-Ups
Host paid classes on edge-jointing, caul use, squeeze-out control, and panel flattening with pipe clamps. Provide hands-on stations, materials, and take-home checklists. Upsell clamp fixtures, pipes, and starter kits after class, and offer follow-up private sessions for complex projects.
Creative
Modular Panel Glue-Up Station
Build a wall-mounted or bench-top panel glue-up rack using multiple 1/2 in. pipe clamps on black pipe rails. Use cauls with wax paper to keep panels flat and square while gluing cutting boards, tabletops, or cabinet doors. The clutch lock lets you reposition quickly across different panel widths, and the 1,000 lb clamping force helps close tight joints without bowing.
Bent-Lamination Arch Lamp
Create a sculptural floor or desk lamp by steam-bending thin wood strips over a curved MDF form. Use several pipe clamps and wide cauls to press the laminations evenly along the curve. The adjustable pipe length lets you accommodate long sweeps; the high clamping force ensures consistent glue lines and a spring-back-resistant arch.
Bookbinding and Art Press
Make a versatile press for bookbinding, printmaking, or flattening watercolors. Mount two pipe clamps in parallel through hardwood cheeks with a flat platen top and bottom. The clutch lock gives precise pressure control, and the cast-iron fixtures deliver uniform compression for clean spines and wrinkle-free sheets.
Live-Edge Slab Straightening Jig
Mill slightly twisted or cupped live-edge slabs by building a pipe-clamp sled. Set the slab on a torsion-box base, then use clamps with padded cauls across high spots to hold it flat while you route a leveling pass. The throat depth is ideal for surface-level hold-downs without interfering with the router sled movement.
Multi-Panel Veneer Press
Construct a veneer press frame sized for cabinet doors or marquetry panels. Arrange a grid of pipe clamps across a rigid torsion frame; add melamine platens and cork-faced cauls for even pressure. The quick clutch repositioning speeds up loading multiple small panels for efficient batch veneering at home.