Features
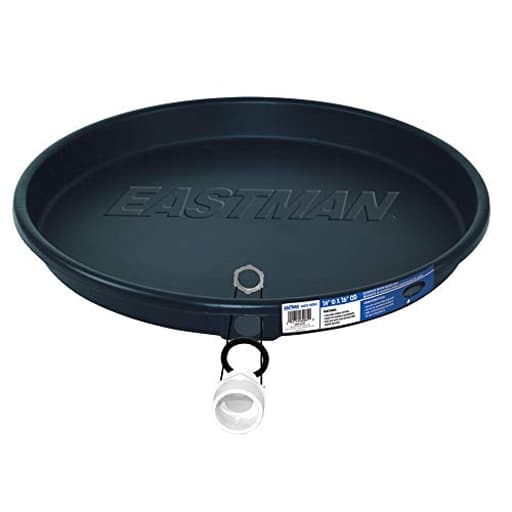
- EASTMAN WATER HEATER DRAIN PAN: The Eastman water heater drain pan prevents permanent damage to nearby fixtures and floors caused by water heater leaks or runoff
- WHAT IS INCLUDED: This water heater drain pan includes (1) drain pan and (1) 1 inch PVC fitting for a drain pipe connection
- DURABLE AND HIGH QUALITY: This water heater pan is designed for gas water heaters; made with durable, high-impact plastic that provides protection against rust, corrosion, and cracking
- EASY INSTALLATION: Water heater pans include drain fittings for quick and easy installation
Specifications
| Color | Black |
| Size | 24 in. ID x 26 in. OD |
| Unit Count | 1 |
Related Tools
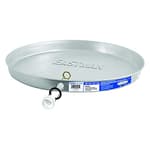
This water heater drain pan is a molded high-impact plastic basin that sits under a gas water heater to collect leaks or runoff and protect surrounding floors and fixtures. It measures 24 in. inner diameter by 26 in. outer diameter and includes a 1 in. PVC compression drain fitting for connection to a drain line. The plastic construction resists rust, corrosion, and cracking.
Eastman Water Heater Drain Pan with PVC Fittings, 24 Inch ID x 26 Inch OD Compression, 60082 Review
A simple, lightweight pan that does the job—if you set it up right
I installed the Eastman drain pan under a mid-size gas water heater in a basement utility room that sees occasional condensation and the occasional drip from maintenance work. I chose the 24-inch inside diameter model to give the tank some breathing room and to allow for easy inspection around the base. After living with it for a while, here’s how it stacked up.
Build quality and materials
This pan is molded from high-impact plastic, and that choice shows up in both good and not-so-good ways. On the plus side, it won’t rust, doesn’t react with slightly acidic condensate, and shrugs off the kinds of dings that permanently crease thin-gauge metal pans. Mine arrived with a small bend on one side (shipping wasn’t exactly gentle), and it popped right back without cracking. That flex is reassuring.
On the other hand, this is a lightweight pan. The walls and lip are thinner than a metal option, and if you’re expecting the rigid feel of a formed steel or aluminum pan, this will read as “flexy.” In use, once the heater is settled on a flat floor, the pan’s rigidity matters less than you’d think—its job is catching leaks and directing them to the drain, not supporting the appliance. That said, the pan relies on your slab or platform being flat; any point loads or debris under the pan will telegraph through. Sweep and check for pebbles before setting it down.
Sizing and fit
The 24-inch internal diameter worked well for a standard 40–50 gallon residential gas unit, leaving enough clearance at the circumference to inspect for moisture and to maneuver the drain fitting. The 26-inch outer diameter provides a modest lip and keeps the footprint manageable if you’re tight on space.
A few notes from my install:
- Measure the heater’s base diameter and add at least an inch for clearance. If you’re over 23 inches in diameter, step up to a larger pan.
- Check clearances to walls and the path for your drain line before you buy; the molded drain hole location and your nearest drain might dictate how you orient the pan.
Installation experience
Installation was straightforward. The pan ships with a 1-inch PVC compression fitting, which is exactly what most building inspectors want to see on a pan drain: a smooth, unobstructed outlet capable of moving a surprising amount of water quickly. My fitting came in a small bag taped to the pan—easy to miss if you’re unpacking quickly—so check the packaging thoroughly before you toss anything.
Here’s the process I followed:
1. Dry-fit the pan on a cleaned, flat surface. I used a 24-inch level to verify the slab wasn’t crowned.
2. Insert the compression fitting through the molded hole, gasket inside, nut outside, hand-tight plus an extra quarter turn. No thread sealant is necessary on the compression interface; save tape for the downstream threaded adapters if you use them.
3. Route 1-inch PVC at a consistent slope to a floor drain. Keep the run as straight as possible and avoid any traps or check valves. A pan drain must be gravity-fed and visible at its termination point.
4. Lift-and-place the heater into the pan with a helper. Avoid dragging the unit across the lip; that’s how you scar or fold a thin pan. Two nylon lifting straps made this easy.
Once in place, I filled the pan with a couple of inches of water to check for leaks at the fitting and to confirm positive drainage. No drips, no standing water.
In use
The real test of a drain pan isn’t dramatic—if things go right, you forget it’s there. During a controlled test (I cracked the heater’s drain slightly and let it seep for 15 minutes), the pan collected and routed the water cleanly to the floor drain without pooling. The lip is tall enough to contain a minor spill and low enough not to interfere with combustion air around the base of my gas unit.
The plastic surface is easy to wipe clean, and it doesn’t hold onto mineral scale. I appreciate the black color more than I expected; it hides scuffs and makes it easy to spot fresh water.
One extra note: I tried it as a catch basin under a small utility pump station for a day to see how it handled vibration. The pan didn’t walk or chatter when placed on a rubber underlayment. For shop or utility uses where you want a lightweight, sacrificial catch tray, it works fine.
Durability and what to watch for
Flex and thickness: As long as you treat the pan as a collection basin—not a structural base—it holds up. The rim will flex if you press on it; that’s normal for this material. If your heater sits on leveling feet (some do), consider adding steel load spreaders under the feet or ensure the feet sit entirely within the flat area of the pan’s floor. Point loads are the enemy of thin plastics.
Temperature: The pan lives in a relatively stable environment. I wouldn’t put it in direct sun or near a heat source beyond a standard water heater base. The material shows no signs of warping under normal conditions.
Fitting security: The included compression fitting sealed first try and stayed dry through fill tests and a month of normal service. Recheck it after a week; plastics can relax slightly.
Shipping dings: The same flexibility that helps in use also means the pan can arrive with a bend. In my case, it was a non-issue, but it’s worth a quick visual inspection before install.
Code and compatibility considerations
Drain destination: A pan drain needs gravity flow to an approved location, typically a floor drain or to daylight where it’s visible. Don’t tie it into a condensate pump or a trapped line.
Size: This pan’s 24-inch internal diameter makes it a fit for many 40–50 gallon units, but measure first. Allow clearance for T&P discharge routing and gas line access.
Fuel type: It’s marketed for gas heaters and sits low enough not to obstruct combustion air around the skirt of common atmospheric units. It also physically fits electric units; just ensure clearance to the element access panels and follow your local code.
Where it shines
- Quick, simple installs where corrosion resistance matters.
- Basements or utility rooms with a nearby floor drain.
- Budget-conscious setups where you don’t need the heft (or cost) of metal.
- Secondary uses as a shop catch pan or soaking tray—lightweight, easy to carry, easy to rinse.
What could be better
- Stiffer rim: A slightly thicker lip would inspire more confidence during placement and resist deformation when nudged.
- Packaging: A bit more protection around the rim would reduce shipping creases.
- Fitting options: Including a second reducer bushing would help those who want to tie into existing 3/4-inch lines (even though 1-inch straight to drain is preferable).
Tips from my install
- Bring a helper. The pan will last longer if you lift the heater straight down rather than sliding it.
- Sweep and inspect the floor first. A stray screw under the pan can create a high point and eventually wear through.
- Label the pan drain line at its termination point so nobody mistakes it for a condensate line and caps it later.
- Keep the included fitting with the pan when storing. It’s small and easy to misplace.
The bottom line
The Eastman drain pan is a functional, no-frills solution that prioritizes corrosion resistance and ease of installation over heavy-duty rigidity. In my use, it did exactly what a pan is supposed to do: provide an unobtrusive safety net for minor leaks and direct water safely to a drain. It’s not a structural platform and shouldn’t be treated like one, but on a flat surface and with a proper gravity drain, it performs reliably.
Recommendation: I recommend this pan for standard residential water heater installs where you have a flat floor and a nearby gravity drain, and you value lightweight corrosion resistance over metal-pan rigidity. If you expect rough handling, need a pan to withstand frequent impacts, or you plan to drag a heavy heater in and out repeatedly, a thicker metal pan might be a better fit. For most baseline installs, though, this Eastman strikes a practical balance of cost, simplicity, and performance.
Project Ideas
Business
Branded Decorative Planter Line
Refinish and sell the pans as heavy‑duty outdoor planters—painted, textured, or wrapped with simulated wood/metal finishes. Market to apartment dwellers and landscapers as affordable, rust‑proof planters that include a built‑in drainage outlet. Offer add‑ons like custom paint, stands, liners, and soil packs.
Mobile Pet Grooming Kit Product
Package the pan as part of a turnkey mobile grooming kit for entrepreneurs: pan + stand + non‑slip mat + hose adaptors + quick‑connect drain hose. Sell kits online or wholesale to groomers and pet sitters. Offer rental options for event pop‑ups or seasonal demand spikes.
Greywater Capture & Landscaping Service
Offer a small‑scale greywater diversion product and installation service using the pan as a leak/collection basin under water heaters or laundry units, then route the drain to irrigation systems or rain gardens. Position the service to eco‑conscious homeowners and small properties looking to reduce potable water use.
Event Beverage & Catering Rental
Rent or sell prepped beverage tubs to caterers and event planners. Line the pans with insulated sleeves or branded wraps, supply lids and drain hoses, and offer pickup/drop‑off service. The pans are easy to clean, stackable, and cheaper than metal alternatives—sell branding/decoration as an upsell.
Portable Spill/Containment Kit for Trades
Create a contractor‑oriented product: the pan plus absorbent pads, a drain hose, and a locking cap becomes a portable spill/containment kit for HVAC, plumbing, or appliance techs. Market as an OSHA‑friendly accessory to prevent site damage during repairs and include options for bulk sales to service companies.
Creative
Self‑Watering Raised Planter
Turn the pan into a durable, low‑maintenance planter base. Place a sturdy pot or a custom liner inside the pan, add soil and plants, and use the included 1" compression fitting to route excess water to a drip line or small reservoir underneath. The pan prevents root run‑off onto decks and lets you collect and reuse drainage water for other plants.
Portable Pet Washing Station
Make a compact dog‑wash basin for small dogs or cats. Add a non‑slip mat and foldable stand so the pan sits at waist height, attach a short hose to the compression drain to direct greywater into a bucket, and add a quick‑connect sprayer. It’s lightweight, corrosion‑proof, and easy to clean—great for outdoor grooming or flea rinses.
Party Beverage/Ice Tub
Use the pan as a large center‑of‑table ice bucket for bottles and cans at parties. Line with a reusable insulated bag or heavy plastic, fill with ice, and use the drain fitting to easily empty meltwater. You can also disguise it with a wooden or fabric surround to make a rustic beverage station for gatherings.
Compost Tea Collector
Create a simple compost‑tea brewing station: place a mesh basket or perforated tote filled with compost inside the pan, add water to steep, and collect nutrient‑rich leachate through the drain fitting into a jug or garden hose. The pan contains mess and makes it easy to strain and bottle liquid fertilizer.
Wall or Vertical Herb Garden Module
Mount the pan horizontally or at a slight tilt to make a shallow, wall‑mounted herb planter. Add mounting brackets, a breathable liner, and potting mix; use the drain fitting to route excess water into a catch bottle or into a lower tier for a stacked vertical system. The pan’s durability makes it suitable for balcony or patio use.