Features
- FLEXES AND ADHERES behind wall for professional results
- FLEXES AND ADHERES behind wall for professional results
- FOR HOLES 3"-5" in diameter
- MAKES REPAIRS 5X FASTER when used with 3M High Strength Large Hole Repair Compound
- REPAIR DAMAGED AREAS on walls and ceilings
- NO SHRINKING, cracking, or sagging
- Interior/exterior (with exterior paint)
- EASY TO SAND spackling compound
- CUSTOMIZE repair plate by cutting to desired size
- Not recommended for structural joints or stress cracks
Specifications
| Color | 12 fl. oz. + Kit |
| Size | 12 oz. |
| Unit Count | 1 |
Related Tools
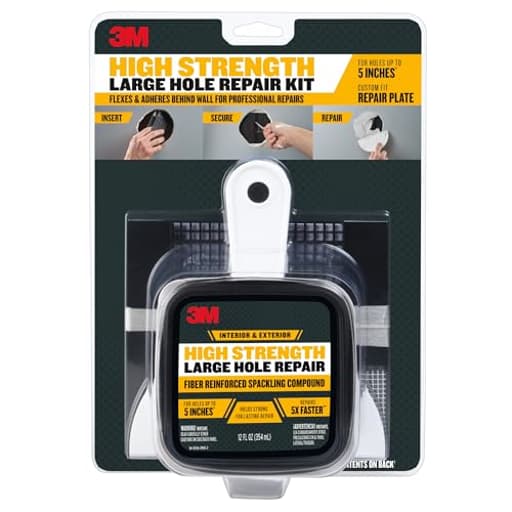
This large-hole repair kit includes a 12 fl. oz. fiber-reinforced spackling compound, a repair plate, putty knife, and sanding sponge for repairing 3–5 inch diameter holes in walls and ceilings. The repair plate adheres behind the wall while the compound is designed to flex and resist shrinking, cracking, and sagging, and it sands easily; the plate can be trimmed to size and the finished surface can be painted for interior or exterior use. Not recommended for structural joints or stress cracks.
3M High Strength Large Hole Repair Kit, Includes Fiber Reinforced Spackling Compound (12 oz.), Repair Plate, Putty Knife and Sanding Sponge, For Easy Wall Repair, No Shrinking or Cracking Review
A straightforward fix for doorknob-sized disasters
The first time I used the 3M Large Hole Repair Kit was on a classic doorknob hole—about 4.5 inches across and slightly ragged around the edges. I’ve patched drywall a variety of ways over the years, from mesh patches and “California” patches to cutting a new plug and screwing in backer cleats. This kit sits in a nice middle ground: faster and cleaner than fabricating a plug, far more reliable than a simple mesh patch, and friendly enough for a first-time user to get a good result.
What’s in the box
- Fiber-reinforced spackling compound (12 oz)
- Flexible repair plate with adhesive tabs
- Plastic putty knife
- Sanding sponge
Everything you need for a 3–5 inch hole is here. The compound is the standout: it’s dense, creamy, and loaded with fibers that keep it from slumping, shrinking, or cracking as it cures. The plate is trimmable and designed to sit behind the drywall, giving the compound a rigid base to build on. The putty knife and sanding sponge are basic but serviceable.
Setup and application
I started by squaring the hole slightly and knocking back any loose gypsum. A quick vacuum and wipe around the inner paper edges helped, since adhesion inside a wall cavity is usually the Achilles heel of these kits. The repair plate scored and snapped easily, which mattered because my hole overlapped a stud. Trimming the plate let me avoid that obstruction and still get full coverage behind the opening.
Adhering the plate is simple in principle: fold it, slide it into the opening, then pull it flat against the backside of the drywall so the sticky pads grab. In practice, the dustiness inside a wall can work against you. Firm pressure and a few extra seconds holding it in place helped. On one patch where the interior cavity was especially flaky, I added a strip of my own painter’s tape across the outside of the hole to keep tension on the plate while the compound locked everything together. After the first fill sets, the plate isn’t going anywhere.
The fiber-reinforced spackle spreads like a heavier joint compound. It clings to the plate immediately, making the first “bridge” pass easy. I built up to slightly proud of the surface in two applications, letting the first pass firm up before topping it. Pro tip: a lightly dampened putty knife on the final pass does make it easier to get a flat, feathered edge.
Dry time will depend on temperature and humidity; mine was sandable in a few hours and fully ready for a second skim by the next morning. The included sanding sponge is a good starting grit for flattening the patch. After knocking down high spots, I did a quick skim with regular lightweight joint compound to blend the transition out a few more inches. If you’re working on textured walls, plan on retexturing after the patch—this spackle sands to a smooth finish.
Finish and durability
After priming and painting, the patch blended in cleanly. More importantly, it stayed put. No hairline cracks at the perimeter, no dish-out from shrinkage, and no visible telegraphing of the plate behind it. Weeks later, even with door slams nearby, the repair hasn’t moved. That’s the key win for the fiber-reinforced filler; it behaves more like a structural filler than a typical lightweight spackle.
I also tried the kit overhead on a small ceiling patch. The compound’s body kept it from sagging—within reason. I still recommend two lighter coats rather than one heavy fill on ceilings to avoid chasing gravity.
Where it excels
- Holes in the 3–5 inch range where mesh patches are too flimsy and a full drywall plug is overkill
- Repairs near obstructions (studs, pipes) where trimming the backer plate makes the difference
- Quick turnarounds—first fill to paint can be a day, depending on conditions
- Clean work: no sawdust from cutting a plug, minimal debris beyond sanding dust
The fiber-reinforced compound is the secret sauce. It’s tough, it sands predictably, and it doesn’t punish you with shrink lines around the perimeter. You can also reuse what’s left in the tub for smaller fills; it feathers into standard joint compound without fuss.
Friction points and limitations
- Backer plate adhesion can be finicky in a dusty cavity. Meticulous prep helps. If the interior paper is chalky, plan to hold the plate under tension for a minute or add a temporary piece of tape over the opening during the first fill.
- The included putty knife is slightly wider than the tub opening, which makes loading the blade a little awkward. Not a dealbreaker; just scoop across the top rather than dipping deep.
- Smooth finish only—matching heavy orange peel or knockdown will require texture work after the patch.
- Not for stress cracks or structural joints. If you’re repairing movement-prone areas (corners, seams, stair-step cracks), use proper taping and setting-type compound.
- Exterior use is limited. The kit notes interior/exterior with exterior paint, but I’d reserve it for sheltered locations (soffits, garages) and avoid constant wetting or direct sun exposure.
Compared with other methods
- Versus a mesh patch: This kit is more reliable on larger holes. Mesh patches tend to telegraph and can crack under minor impact. The 3M plate provides a stiffer substrate and the fiber compound is less prone to issues as it dries.
- Versus a true drywall plug with backer sticks: A plug remains the most “correct” repair in terms of structure, especially for holes exceeding five inches. But it’s slower and messier, and the tapered edges you cut in the plug are another place for shrinkage and cracking. For the target size range, the 3M kit is faster and plenty strong.
- Versus hot mud (setting compound): Hot mud sets fast and hard, and pros love it. It also has a steeper learning curve and needs precise timing. The 3M compound is more forgiving for casual users and doesn’t require mixing.
Tips for best results
- Bevel the edge of the hole and remove any loose paper or gypsum to give the compound a sound perimeter.
- Vacuum the cavity and wipe the backside paper where the plate will land.
- Trim the plate to avoid studs or wires; bigger isn’t always better if it won’t sit flat.
- Build in two passes instead of one heavy fill, especially overhead.
- Feather wide on your final skim—8 to 10 inches each direction hides transitions.
- Prime before paint; primers help equalize porosity and sheen over patches.
Value and quantity
With 12 ounces of compound, you can easily complete one large patch and still have enough for additional small repairs. The included tools aren’t premium, but they’re appropriate for the task. If you already own a knife and sanding gear, you’re paying for the convenience of the backer plate and the fiber-reinforced filler—arguably the kit’s strongest components. For frequent users or pros, buying the compound separately and fabricating your own backer may be more economical; for most DIY repairs, the all-in-one approach is worth it.
The bottom line
The 3M Large Hole Repair Kit delivers on the problems this size of patch usually creates: weak support, shrinkage, and cracking. The repair plate provides a solid backbone without carpentry, and the fiber-reinforced compound is forgiving to apply, resists movement as it cures, and sands clean. Prep still matters; rushing adhesion inside a dusty wall cavity will frustrate you. But with basic care, the process is quick and the result is stable and clean.
Recommendation: I recommend this kit for homeowners and DIYers tackling 3–5 inch holes in drywall or similar interior surfaces. It’s faster and more reliable than mesh patches, less fussy than a full plug, and produces a paint-ready repair with minimal drama. If you’re repairing stress cracks, exterior exposures, or holes larger than five inches, look to more traditional methods. For its intended use, though, this kit is a smart, time-saving fix.
Project Ideas
Business
Fast-Turn Airbnb/Short‑Term Rental Touch‑Up Service
Offer a specialty service that handles quick cosmetic repairs between guests — 3"–5" holes, scuffs, and small ceiling damage. Market the service on speed (repairs 5x faster with this kit), reliability (no shrinking/cracking), and minimal downtime. Price per-repair or offer bundle packages for turnovers. Target property managers and hosts who need fast, paint-ready fixes.
Event Venue Rapid Repair Contract
Partner with event spaces and caterers as an on-call repair vendor for emergency touch-ups during setups and breakdowns. The kit’s ease of sanding and interior/exterior finish capability lets you make near-instant cosmetic repairs that can be topcoated quickly. Sell retainers for standby coverage during high-volume weekends and charge hourly plus materials.
DIY Repair Workshops + Branded Kits
Run hands-on classes teaching homeowners and makers how to patch holes and repurpose patches into decor (e.g., niches, portholes, textured panels). Sell take-home kits that include the large-hole repair kit plus small extras (pigments, mini-templates, sanding pads). Workshops can be held at maker spaces, hardware stores, or online as video courses with bundled physical kits shipped to students.
Micro‑Niche & Decorative Accent Product Line
Create and sell a product line of small decorative recessed niches and faux portholes produced using the repair-plate technique. Produce finished pieces (pre-painted and pre-sanded) that customers can inset into existing 3"–5" holes to create built-in looks without major construction. Sell via Etsy, Shopify, or local home-decor boutiques; promote as quick upgrades for tiny apartments and coastal/industrial decor themes.
Landlord Property‑Maintenance Subscription
Offer recurring maintenance contracts to landlords and small property managers that include routine cosmetic repairs (holes, dings, patch sanding and painting). Use the kit to standardize and speed repairs, reducing unit turnover times. Price by unit or by monthly retainer with per-repair add-ons; highlight savings from faster turnovers and reduced repainting scope because the compound resists cracking and sands easily for paint-ready results.
Creative
Textured Relief Wall Panels
Use the repair plate as a stencil/backing and apply the fiber-reinforced spackling compound in layers to build up raised geometric or organic relief panels. Because the compound flexes, resists shrinking/cracking and sands easily, you can carve, sand, and paint intricate textures that read like plaster relief. Cut the plate into repeated shapes for a modular installation (3"–5" modules) and finish with interior or exterior paint for statement walls or weatherproofed exterior accents.
Mini Recessed Display Niche
Intentionally cut a 3"–5" opening and adhere the repair plate behind the drywall to form a secure back; use the compound to form and smooth the recess edge and shelf ledge. Sand and paint the niche to create small display pockets for candles, succulents, or tiny sculptures. The kit’s non-shrinking, flexible compound makes clean curved transitions possible and durable for light decorative use (not structural loads).
Porthole Picture Frames
Create faux portholes by trimming the repair plate to a circular backing, patching and shaping the compound into a porthole rim, sanding to smooth, then painting with metallic finishes. The finished piece can be mounted over a small photo or trinket to give a built-in look. The plate can be cut to customize the depth and the compound sands easily for a crisp, finished edge.
Patch‑Mosaic Hybrid Art
Make a series of repaired spots across a panel or wall, tinting the spackling compound with pigment or embedding glass beads and tile snippets into each wet patch. Once cured and sanded, these repaired islands become a textured, low-profile mosaic field. The fiber reinforcement reduces cracking as you build up layers and the plate lets you control the recessed/backed shapes.
Reinforced Mount Point for Lightweight Objects
When repairing a damaged area that will also be used to hang lightweight items (keys, small planters, framed photos), use the repair plate as a backing and build up the compound to create a reinforced block behind the drywall. After sanding and finishing, install a hook or bracket into the patched area. Note: the kit is not for structural loads, so limit use to small, lightweight items.