Features
- Recommended for application to new or previously painted wood, hardboard, metal, drywall, cured plaster, masonry
- Use to fill gaps, holes and cracks in metal, wood and masonry
- Sandable and paintable
- Resists shrinking, sagging and cracking
Specifications
| Color | White |
| Size | Gallon (Pack of 1) |
| Unit Count | 1 |
Related Tools
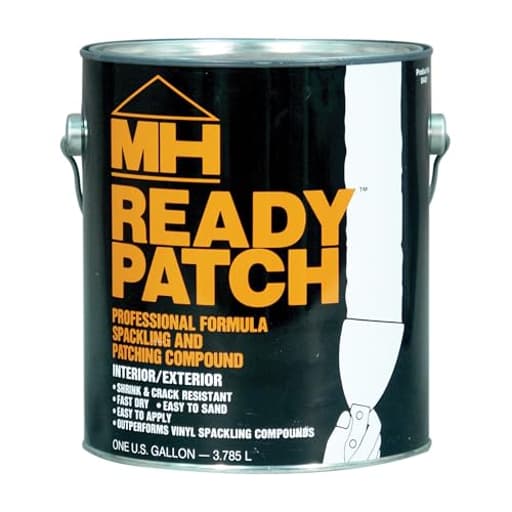
A spackling and patching compound for filling gaps, holes and cracks in wood, metal, drywall, cured plaster, hardboard and masonry. It is sandable and paintable and resists shrinking, sagging and cracking. Supplied in a one-gallon container.
Zinsser 4421 MH Ready Patch Professional Spackling and Patching Compound, Gallon Review
A versatile patching compound that behaves like a pro
I reach for MH Ready Patch when I need a filler that doesn’t telegraph through paint, won’t slump off a vertical surface, and sands to a dead-flat finish. It’s a solvent-based spackling and patching compound packaged in a one-gallon can—a quantity that makes sense if you’re tackling trim packages, exterior prep, or a round of repairs across different substrates. Over several projects—interior trim, pine doors, fascia repairs, and a steel entry door—I’ve come to rely on it as a dependable, paint-grade filler with very few surprises.
What it is and where it shines
Ready Patch is designed for patching gaps, holes, and cracks in wood, metal, drywall, cured plaster, hardboard, and masonry. In practice, it excels on paint-grade woodwork and exterior prep where you want minimal shrink and a smooth, sandable surface. It fills the gap between lightweight spackles (which sand nicely but can shrink or telegraph) and two-part epoxies or auto-body fillers (which are strong but can be finicky to mix, smell worse, and sand like concrete).
On vertical surfaces, it holds an edge well. It’s creamy out of the can but firm enough that it doesn’t sag when you feather a thin finish coat. For deeper repairs—think corner dings, router burns on edges, or weather-checking in fascia—building up in lifts prevents any subtle sink-back.
Application and workability
- Prep: Clean out loose material, vacuum dust, and make sure the surface is dry. On bare, weathered wood, I like to scuff and wipe with a solvent-compatible cleaner so the patch bonds to sound fibers, not gray oxidized fibers.
- Consistency: Buttery is the best way to describe it. It spreads predictably with a flexible putty knife and feathers thin without tearing.
- Open time: It stays workable long enough to shape, yet “sets” quickly enough that you’re not waiting all afternoon to sand. Thin applications are sand-ready fast; deeper pockets need more time.
- Layering: For voids deeper than roughly 1/4 inch, I apply in two or three passes rather than one heavy fill. Each pass bonds well to the previous layer once it has firmed up.
Tip: Load the knife, press firmly to key the material into the substrate, then pull a slightly heavier pass and finish with a light, wide wipe to minimize sanding later.
Drying, sanding, and paint
Ready Patch cures to a firm, dense surface that sands far easier than most epoxies and many solvent fillers. It powders nicely without gumming paper, which is a big advantage if you’re finishing to high-gloss or spraying trim. I usually start at 120–150 grit for leveling and finish at 180–220 on paint-grade wood. On drywall and cured plaster, a lighter hand is wise—its density means you can easily over-sand the surrounding area if you’re not paying attention.
Paint adhesion has been excellent with both waterborne and oil-based primers and topcoats. For uniform sheen on large patched areas, I always spot-prime. On exterior wood, priming is non-negotiable; it locks everything down and evens porosity. The white color hides under light paints readily; under very dark colors, a primer coat eliminates any chance of ghosting at the edges.
Performance across materials
- Wood: This is where it earns its keep. Pine, poplar, and other softwoods often show dents and scratches; Ready Patch fills and feathers so smoothly that seams disappear after paint. On exterior softwood trim and fascia, I’ve had no cracking or edge lift after seasonal changes when the patch is applied to sound, primed wood and painted reasonably soon.
- Drywall and cured plaster: For small holes and cracks, it’s cleaner than a setting compound because you can sand sooner and it doesn’t flash under paint when primed. I wouldn’t use it to tape seams, but for dings and fastener pops it’s excellent.
- Metal: On a primed steel door, it bonded well and sanded flush without chipping at the edges. As with any metal work, rust management and proper priming matter more than the filler itself.
- Masonry: Hairline cracks and minor voids can be patched successfully, provided the substrate is dust-free and dry. Don’t expect it to bridge moving joints; it’s a rigid filler, not an elastomeric sealant.
Shrink, sag, and crack resistance
The standout here is predictable dimensional stability. Feather-thin finish passes stay put and don’t print through after paint. In deeper fills, if you try to do everything in one go, you may see a slight sink as it cures; two lifts eliminate that. I haven’t had cracking on properly prepped, non-moving substrates. For any joint that sees movement, use a flexible caulk or sealant and reserve Ready Patch for the cosmetic surface.
Odor, cleanup, and safety
There’s a noticeable solvent odor on opening the can. It dissipates as you work, but ventilation is a must for interior use. I wear a dust mask when sanding and keep a window open with a fan pulling air out of the space.
Cleanup is with solvent, not water. Wipe knives with mineral spirits or an appropriate cleaner right after use to keep them from gumming up. If that’s a dealbreaker for you, a latex filler might be more convenient—but you’ll give up some of this product’s sanding quality and shrink resistance.
Can management and shelf life
Big cans of patching compound can be a blessing or a curse depending on how you store them. A few habits have helped me keep Ready Patch in good shape:
- Stir thoroughly before each use; don’t just scrape from the top.
- After scooping what you need, smooth the surface in the can and lay a piece of plastic wrap directly on the compound before sealing the lid. This reduces skinning.
- Seal the lid tightly and store in a temperate space. Storing upside down also helps minimize air exchange.
I’ve had cans stay workable for a long time with those practices. If a thin skin forms, I remove it and mix the good material underneath. If the product has thickened noticeably or starts to string, I retire it rather than trying to force it—surface quality matters too much at the finishing stage to fight bad material.
Limitations and best practices
- Not for structural repairs: If you’re dealing with rot or areas that need consolidation, treat or rebuild with a structural epoxy system first, then use Ready Patch as the cosmetic top layer.
- Movement cracks: On joints or materials that expand and contract significantly, a flexible sealant is the better tool. Use this for surface refinements.
- Deep voids: Build in lifts and allow cure between passes.
- Temperature and humidity: Cure times lengthen in cool, damp conditions. Plan your workflow so you’re not sanding too soon and smearing the surface.
How it compares in the kit
- Versus lightweight spackle: Far better edge hold and less shrink, with a denser, more durable finish. Slightly more odor and solvent cleanup.
- Versus two-part epoxies or body filler: Much easier to use, no mixing clock to beat, and sands far easier. Not as structural, and still has solvent odor.
- Versus latex wood fillers: Smoother feathering and fewer pinholes, especially noticeable when spraying trim or aiming for a high-sheen finish.
Bottom line and recommendation
MH Ready Patch has become my go-to for paint-grade repairs where finish quality matters: door faces, casings, baseboards, window trim, exterior fascia, and spot fixes on drywall and primed metal. It spreads cleanly, resists sagging, shrinks very little, sands to a dust-like finish, and takes paint beautifully. The solvent odor and cleanup are trade-offs, but the improved surface quality and predictable results are worth it for me.
I recommend this tool for anyone doing serious prep work—painters, carpenters, and dedicated DIYers who value a flawless paint surface. It’s especially good if you’re tired of spackles that shrink back or fillers that fight the sander. If you need a stainable filler, want water cleanup, or are repairing structural rot, look elsewhere. For everything else in the paint-grade world, Ready Patch is a reliable, professional-grade solution that streamlines the path from repair to a pristine finish.
Project Ideas
Business
Quick Turnaround Rental/Real‑Estate Touch‑Ups
Offer a mobile patch-and-paint touch‑up service for landlords, real‑estate agents, and short‑term rental hosts. Use the spackling for rapid filling, sand, prime and paint to make units market‑ready between tenants. Position as fast, cost‑effective repairs with bundled hourly or per‑room pricing.
Bespoke Textured Wall Panels for Interiors
Produce and sell bespoke bas‑relief or textured wall panels for residential and boutique commercial clients. Market custom designs (sizes, finishes) to interior designers and on platforms like Etsy or Instagram; offer installation or DIY hanging kits as add‑ons.
Upcycled Furniture Restoration Service
Specialize in restoring and refinishing thrifted or client furniture—fill gouges and gaps, rebuild edges, sand and refinish with decorative paint or faux stone. Package as a sustainable, high‑margin service: source low‑cost pieces, restore, and resell through an online shop or local markets.
Historic Trim & Molding Repair
Provide niche repair services for older homes: patch plaster, repair damaged trim, recreate small decorative moulding elements using spackling as a moldable medium. Target historic home owners and restoration contractors; charge premium rates for on‑site delicate work and matching finishes.
Workshops and Starter Kits
Teach hands‑on classes (in‑person or virtual) on creative uses of spackling—textured panels, faux finishes, and small decor items. Sell accompanying starter kits (compound, spreaders, sanding pads, simple molds) and digital patterns/templates. This builds recurring revenue from classes, kit sales, and social proof.
Creative
Bas‑Relief Wall Panels
Use the spackling compound to build low‑relief sculptures directly on plywood or canvas. Apply in layers, carve or press textures while damp (stamps, combs, or found objects), then sand smooth where needed and paint or gild for a high‑end decorative panel. Great for statement art, headboards, or accent walls.
Textured Mixed‑Media Backgrounds
Create durable textured backgrounds for mixed‑media pieces by spreading the compound onto canvas or wood panels and sculpting peaks, waves, or geometric patterns. Once dry and sanded, the surface accepts acrylics, inks, and metallics—ideal for one‑of‑a‑kind art sold online or at craft fairs.
Faux Stone & Concrete Finishes
Transform plain pots, planters, or inexpensive furniture with a faux stone finish. Apply spackling in uneven layers, stipple with brushes or sponges for texture, sand selective areas for wear, then use layered paints and washes to mimic stone or concrete surfaces.
Custom Decorative Hardware and Embellishments
Form small decorative elements (appliqués, rosettes, drawer ornaments) by pressing spackling into silicone molds or sculpting freehand. After curing, sand and paint or antiquate. These lightweight embellishments are perfect for upcycled furniture and home décor projects.
Mosaic Grout & Relief Inlays
Use the compound as a pigmented grout for indoor mosaics or as the medium for shallow inlay work on tabletops and trays. Its sandability lets you level pieces flush, and it accepts paint well—combine with tile, glass, or found objects for textured, durable surfaces.