Features
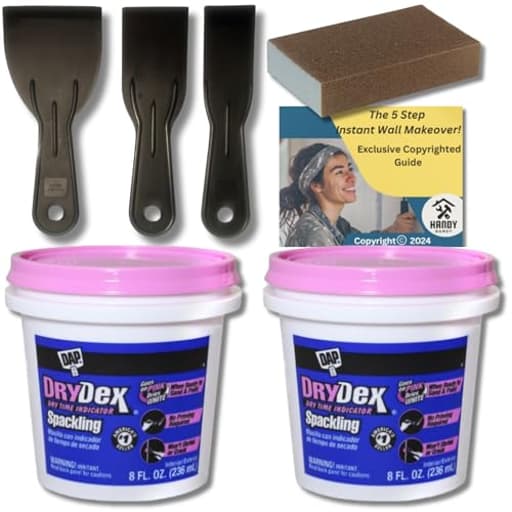
- Dry Wall Patch Repair Kit Includes: Dry Dex Dap spackle putty for walls (2 Pack, 8oz. each), sanding sponge, 3 pack putty knife set, and a helpful guide to assist this wall repair patch kit
- Drydex Spackling Paste for walls: Two packs of 8 oz. Dry dex pink spackling. Pink spackle dries white for a seamless wall hole filler. Once drywall putty has dried white, your plaster wall repair is complete it can be sanded and painted.
- Sand Paper for Wall Repair: None of the dry wall patch kits would be complete without this 80/120 Grit Fine/ Medium sanding sponge. Perfect for sanding wall spackle for filling holes, painted surfaces, metal, drywall hole patch, wood, and plastic. Reusable for multiple wall putty hole repair jobs.
- Putty knife 3 pack set: Perfect for leveling drywall crack sealer, dry wall repair, gap filler for wall, or fix holes in walls drywall. Three pack includes: 1.5 inch, 2 inch, and 3 inch putty knife.
- Exclusive Handy Dandy Guide: We want to be the most complete wall hole repair kit. Anyone can give you some drywall joint compound drywall mud and send you on your way. We provided this copyrighted guide to give you step by step instructions as well the best tips to get your dry wall hole fill job done right. You won’t find this guide in any other dry wall repair kits.
Specifications
| Color | pink white |
| Unit Count | 1 |
Related Tools
This drywall repair kit includes two 8 oz jars of pink spackling that dries white, an 80/120 grit sanding sponge, a three-piece putty knife set (1.5", 2", 3"), and a step-by-step repair guide. It is intended for filling nail holes, cracks, and small wall damage; once the spackle has dried white it can be sanded and painted for a seamless finish. The sanding sponge and putty knives support leveling and finishing on drywall, plaster, wood, and painted surfaces.
Handy Dandy Drywall Repair Kit Bundle with DAP Drydex Spackling Pink, Sanding Block, Putty Knives, Handy Dandy Guide, and Nail Hole Filler for Walls Review
Why I reached for this kit
My to-do list had the usual suspects: nail holes from rearranged art, a few hairline cracks near a door frame, and a mystery divot where a chair back met drywall. I grabbed the Handy Dandy Drywall Repair Kit because it promised everything I’d need in one box, including a guide, and—importantly—DAP Drydex, the pink-to-white spackling that makes timing the next step easier.
What’s in the box
- Two 8 oz jars of Drydex spackling (goes on pink, dries white)
- An 80/120 grit sanding sponge
- Three putty knives (1.5", 2", and 3")
- A step-by-step repair guide
It’s a compact set designed for small to modest repairs across drywall, plaster, and even painted wood. The selection of knife widths covers most household patching tasks, and the sanding sponge is the right profile for working around trim and corners.
Setup and first use
I started by knocking down any loose paper or flaking paint around each flaw, then lightly scuffed the area with the 120 side of the sponge. The Drydex spreads smoothly and doesn’t slump on vertical surfaces. I used the 1.5" knife for nail holes and the 2" for slightly larger dents. For a small crack that had opened up over a door, I widened it slightly with the knife tip to give the compound a place to key in, then skimmed it flush.
The color-change feature is more than a gimmick. Thin fills turned white within about 30–45 minutes in a dry, ventilated room; deeper fills took a couple of hours. It takes the guesswork out of moving to sanding, especially if you’re new to patching.
Performance: filling, drying, and paint readiness
For what this kit targets—nail holes, pings, and hairline cracks—it performs well. The Drydex has a creamy consistency that makes it easy to feather edges. Shrinkage on thin applications was minimal. On a few slightly deeper divots, I needed a second skim coat after the first set and turned white. Because the color change indicates surface dryness rather than a full cure, I found best results waiting a little longer—especially before sanding—than the moment it turned white. That reduced pilling and kept the surface flatter.
Once dry, the spackle sands cleanly with predictable dust. After sanding, the patched areas took paint well; spot-priming is still smart practice, particularly over darker colors or when you’ve exposed raw paper. Even without primer, my matte paint covered nail holes in two coats.
Sanding and finishing
The included sanding sponge is 80/120 grit, labeled fine/medium. I rarely needed the 80 side—120 was my default for flattening and feathering. If you’re picky about ultra-smooth finishes, you may want to follow with a finer grit (180–220) that’s not included, especially on glossier paints that telegraph scratches. The block itself is the right density—firm enough to keep edges true but compliant in corners.
Dust control is typical for spackle. A damp microfiber cloth between passes helps keep the working area clean, and a simple dust mask is wise if you’re doing more than a couple of holes.
Putty knives: useful, with a caveat
The three knives cover a good spread of widths for small repairs. They’re lightweight and flexible enough for feathering, and the handles are comfortable over an hour or two of intermittent use. On my set, the largest knife had a slightly rough edge out of the package, which left faint ridges in the skim coat. It took a minute with fine sandpaper to knock that down, after which it behaved. It’s a minor issue but worth checking before you start.
For broader wall blemishes or blended patches wider than a few inches, I still prefer a 6" knife to span more of the surface. This kit doesn’t include one, which is understandable given its focus on small repairs.
The guide is better than expected
I don’t put much stock in pack-in guides, but this one is thoughtfully laid out. It covers prep, application, drying, sanding, and painting in a sequence that mirrors how you actually work through a room. There are simple tips—like feathering pressure at the edges and not overworking the compound—that help avoid common mistakes. For a first-time DIYer, it’s a confidence booster. For experienced users, it’s a quick checklist that keeps you moving.
Durability and storage
The two 8 oz jars are a sweet spot for household maintenance. I worked through several rooms’ worth of touch-ups and still had product left. As with any spackling, it will dry out if you’re careless. Pressing a piece of plastic wrap onto the compound surface before closing the lid, then sealing the jar firmly, kept mine fresh over several weeks. Because the sanding sponge is reusable, I just knocked out the dust and rinsed it; it held up fine after multiple sessions.
Where this kit shines—and where it doesn’t
Strengths:
- Quick, clean repairs for nail holes, picture hanger removals, and hairline cracks
- Easy-to-read drying cue from pink to white
- Lightweight, manageable tools that suit small surfaces
- All-in-one convenience that reduces trips back to the store
Limitations:
- Not intended for larger holes (anything bigger than about 2" really needs a patch), and the kit doesn’t include mesh or metal patches
- The included 3" knife is the largest, which can be limiting for broader blends
- The finishing grit tops out at 120; most walls benefit from a final pass with 180–220
- A minor quality control quirk on one knife edge required a quick tune-up
If you anticipate repairing doorknob-sized holes or replacing sections of drywall, you’ll want a different kit with patch material and a wider knife. This set is tailored to everyday cosmetic fixes and excels there.
Value and alternatives
Could you assemble a similar setup piecemeal? Sure. But the convenience of matched components and a clear guide matters. You get the right type of compound for small repairs, the tools to apply and finish it, and instructions that prevent rework. Buying a 6" knife and a sheet of 220 grit paper alongside this kit would turn it into a near-complete solution for most household touch-ups. For renters or homeowners doing a pre-paint sweep, that’s hard to beat.
Tips for best results
- Lightly scuff glossy paint before filling so the compound keys in
- Don’t overfill; two thin coats sand flatter than one thick one
- Trust the color change but allow a bit more time for deeper fills before sanding
- Feather wider than you think; it hides the repair under angled light
- Wipe dust between passes, and spot-prime if you’ve exposed paper or are covering a dark color
- Check knife edges before starting; a quick polish can save time later
Final recommendation
I recommend the Handy Dandy Drywall Repair Kit for anyone tackling routine wall maintenance—nail holes, small dents, and hairline cracks—especially if you want a straightforward, step-by-step process. The Drydex compound is forgiving and beginner-friendly, the color change takes the timing guesswork out, and the included tools are capable for the scope of work the kit targets. While I’d add a finer grit paper and keep a wider knife on hand for broader blends, those are small extras. For most everyday fixes, this kit simplifies the job and delivers clean, paint-ready results with minimal fuss.
Project Ideas
Business
Quick Turnover Rental Touch-Up Service
Offer a fast, low-cost wall repair service to landlords, Airbnb hosts, and property managers: patch nail holes, small dents, and scuffs between tenants. Use the compact kit for standardized, consistent results. Pricing model: per-room or per-job flat fee; add optional paint-matching. Market via local Facebook groups, property management forums, and partnerships with real estate agents.
Hands-On DIY Repair Workshops
Run small-group weekend classes teaching homeowners how to repair holes, texture, sand, and finish walls. Use your kit as the class toolset and sell take-home kits packaged with the Handy Dandy Guide. Revenue streams: ticket sales, kit sales, and follow-up private lessons or on-call services.
Bespoke Textured Art Commissions
Leverage the textured-art techniques to create commissioned wall panels and canvases for interior designers and homeowners. Upsell framing and installation. Promote through Instagram, local galleries, and interior design meetups. Price by size and complexity; offer limited editions to increase perceived value.
Subscription Repair Kit for Hosts & Handyman Startups
Create a subscription box targeted at rental hosts and small contractors: periodic replacement spackle jars, new sanding sponges, updated guides with seasonal tips, and access to short how-to videos. Offer tiered plans (basic supply replenishment to premium: phone support and priority scheduling). Partner with property-management software or local co-ops for distribution.
Creative
Textured Canvas Wall Art
Use the pink/white spackling like a modeling paste to build raised textures and patterns on stretched canvas or wooden panels. Apply with the various putty knives to create ridges, swirls, or geometric relief; sand smooth or selectively to add contrast; once dry, paint with acrylics or metallics for gallery-style pieces suitable for home décor or gifts.
Faux Concrete Planters & Home Accents
Give inexpensive terracotta, plastic, or thrifted ceramic pieces a modern concrete look by applying thin layers of spackle, texturing with the 1.5" knife or sanding sponge, and finishing with gray washes or sealant. Results: durable, lightweight faux-concrete planters, candle holders, or bookends that sell well at markets.
Custom Relief Panels & Headboards
Create custom bas-relief panels for walls or headboards by spreading spackle over MDF or plywood, using stencils or hand tools to sculpt motifs (floral, geometric, abstract). After drying and sanding, prime and paint or gild highlights. Panels can be grouped for large installations or sold individually.
Upcycled Furniture Detailing
Use spackle to rebuild missing trim, create faux carved details, or smooth out imperfections on secondhand furniture. Shape with smaller knives, sand to a crisp edge, then prime and paint or stain. Turn thrifted pieces into boutique-quality items for resale.