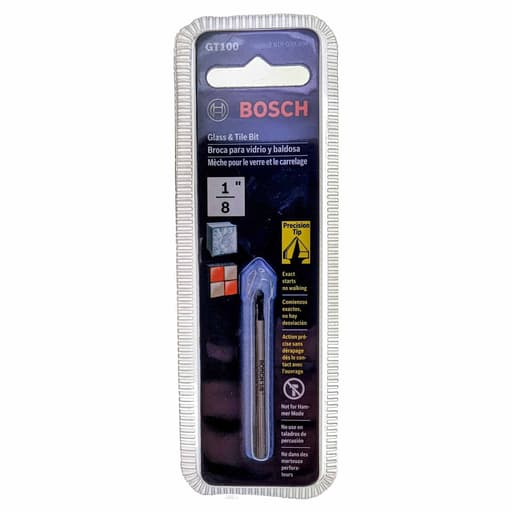
Specifications
| Upc | 0000346372243 |
| Model Number | GT100 |
| Pack Quantity | 1 |
| Diameter (D) Inch | 1/8 |
| Total Length (L2) Inch | 2 7/64 |
| Manufacturer Item Number | 2610020404 |
Related Tools
Related Articles

1/8 inch glass and tile drill bit. Total length 2 7/64 inches. Sold as a single-piece pack.
Bosch Glass and Tile Bit Review
A small bit for brittle work
Small bits can be fussy, especially on brittle materials. I brought Bosch’s 1/8-inch glass-and-tile bit into the shop because I needed clean pilot holes in glass mosaic sheets and a few ceramic soap-dish tiles. Over several projects, I put this little spear-tip to work on annealed glass, standard wall tile, a couple of mirror offcuts (not tempered), and some tricky shell material. It’s a single 1/8-inch bit with a total length just over 2 inches, and that compact size actually helps with control when precision matters.
Design and build
This is the familiar spear-point carbide style meant for glass and ceramic. The geometry centers well once it’s started, and the narrow shank (same 1/8-inch diameter) fits any standard three-jaw drill chuck. There’s no flute to evacuate chips like a twist bit; instead, the tip grinds its way through. That design is perfect for minimizing lateral force on fragile surfaces, but it also means you have to manage heat and slurry.
At just 2 7/64 inches overall, you don’t get a lot of reach, but for a 1/8-inch hole that’s not a negative. It keeps leverage short and reduces wandering, which is the thing that breaks glass and chips glaze. Effective drilling depth in practice is roughly 1 1/2 to 1 3/4 inches, plenty for tiles, mirror stock, and thin glass.
Setup and technique
With glass and glazed tile, technique is everything. What worked for me:
- Skip hammer mode. Use a regular drill on low speed with a light, steady feed.
- Start with painter’s tape or a masking template. It prevents skating and gives the spear point a bite.
- Keep it cool. A little water on the surface—refreshed often—extends the bit’s life and keeps edges clean.
- Start at a slight angle, then upright. A shallow angle gets the point started; once it nicks the surface, bring the drill square.
- Back the work. A scrap of wood behind the piece prevents blowout at exit.
- Don’t force it. Let the carbide grind. Too much pressure heats the tip and dulls it fast.
Using that routine, the bit behaved predictably and left tidy holes.
Performance on common materials
- Annealed glass and mirror (untempered): Slow and steady, the bit produced round, chip-minimal holes. Entry edges were crisp under tape, and any faint breakout on exit was solved by backing the work and easing the hole with the bit for a second or two. On 1/8-inch mirror, I could produce multiple holes before noticing any loss in cutting speed.
- Ceramic wall tile: The bit cut well through the glaze and body. It doesn’t fly—this is a grinding process—but it’s steady. For mounting accessories where a small pilot is all you need before a larger masonry bit or anchor, the 1/8-inch hole is a sweet spot.
- Shell and other brittle oddities: I tested on shell material from a coastal project and the bit surprised me. With water and light pressure, it advanced cleanly where twist bits simply shattered the work.
- Porcelain tile: This is where the limits show. On dense, vitrified porcelain, the spear tip glazed quickly, barely scratching the surface. A wet diamond bit is the right tool for porcelain. I got a faint divot and decided not to abuse the bit further.
Speed, control, and hole quality
The bit’s temperament rewards patience. Under 1,000 RPM—with plenty of water—I got the best combination of control and bit life. At higher speed, it still cuts, but the tip heats up and dulls faster, especially on glass. Entry holes were impressively clean when I used tape and a template. Without tape, the bit can still walk until it nicks a point, so I’d call tape “strongly recommended.”
Blowout is minimal when the work is backed, but on glass and tile you should always plan for exit support. On wall tile, I would often stop just shy of breaking through, flip the piece, and finish from the back to guarantee a flawless hole; the short length of the bit makes that easy to control.
Durability and bit life
Carbide spear tips are consumables, and this one is no exception. Used correctly—low speed, water, light feed—I was able to make several dozen holes across glass and ceramic before noticing slower progress. Abuse it on porcelain or run it dry on glass and you’ll shorten its life dramatically. The good news: it’s consistent. You’ll feel it slow down well before it stops cutting altogether, which gives you time to adjust technique or swap bits.
Because the bit is small, it’s easy to overheat without realizing it. I dipped the tip in water every 10–15 seconds on long cuts and wiped away the slurry. That habit kept the edge in good shape and also improved hole quality.
Accuracy and usability
At 1/8 inch, this bit excels at pilot duty—holes for small fasteners through ceramic trim, starter holes for bottle-cutting jigs, or any layout where a larger diamond core bit will follow. The short length helps keep the drill square to the work. I appreciated how quickly it settled into a cut once the tip grabbed; the spear geometry naturally centers and resists drifting, provided you use tape or a template.
The round shank holds fine in a cordless drill. I wouldn’t use an impact driver, and there’s no reason to reach for a rotary hammer. A drill with a clutch adds a margin of safety if you’re new to drilling glass.
Where it shines—and where it doesn’t
Strengths:
- Clean, controlled starts on glass and standard ceramic glaze
- Predictable, low-chipping holes with basic precautions
- Compact length for better control on fragile work
- Affordable, sensible choice for occasional glass/tile tasks
Limitations:
- Not suitable for porcelain or other very dense, vitrified materials
- Requires water cooling and patience for best results
- Single size; if you need a range of diameters, consider a multi-bit set or diamond cores
Value and use cases
As a single 1/8-inch bit, it fits neatly into a kit for glass mosaic installation, mirror mounting, and small hardware installs on ceramic tile. If you routinely drill porcelain or need larger, clean holes for anchors like toggle bolts, you’ll want wet diamond bits. For occasional DIY and light professional use on glass and ceramic, this bit strikes a nice balance of cost and performance.
A practical pairing I’ve used: start a 1/8-inch pilot with this bit to get through glaze cleanly, then follow with an appropriately sized carbide masonry bit (for ceramic) or a diamond core (for glass) to finish to the target diameter. That workflow reduces wandering and chipping on the surface layer.
Safety notes
Eye protection is non-negotiable; glass chips are sharp. Gloves help when handling shards, but keep them slim enough to maintain feel. Clamp your work if possible, especially with small pieces, and avoid trying to drill tempered glass—it will shatter. If you’re unsure whether a piece is tempered, assume it is and don’t drill it.
Recommendation
I recommend this 1/8-inch Bosch glass-and-tile bit for anyone who needs clean, controlled pilot holes in annealed glass, mirror, and standard ceramic tile. It’s compact, predictable, and capable of tidy results as long as you use water, low speed, and light pressure. It’s not the right choice for porcelain or fast production work—that’s diamond territory—but within its intended materials and with proper technique, it earns a spot in the kit.
Project Ideas
Business
Drilled Sea Glass Jewelry Line
Source or collect sea glass, drill 1/8 inch holes, and produce necklaces, earrings, and keychains. Sell sets by color and size on Etsy or at markets, offering custom engraving on accompanying tags and gift-ready packaging.
Tile Hardware Retrofit Service
Offer a mobile service to add pilot holes in glazed tile for accessories like towel hooks, soap dishes, and small shelves. Use the 1/8 inch bit for precise pilots that reduce cracking, then step up sizes as needed. Market to landlords and bathroom remodelers.
Bottle Light Kits and Custom Drilling
Drill 1/8 inch cable pass-throughs near the base of wine and spirits bottles, add cork-top fairy lights, and sell as ready-made lamps. Provide a ‘drill-while-you-wait’ option for customers’ keepsake bottles at pop-ups and craft fairs.
Backsplash Accessory Mounting
Install slim rails, hooks, and magnetic knife strips onto existing tile backsplashes by drilling small pilot holes with minimal chipping. Partner with kitchen organizers and offer same-day, dust-controlled installation.
Workshop: Drill Glass and Tile Safely
Run short classes teaching low-speed drilling, water cooling, taping, and layout techniques. Include a take-home project (wind chime or tile light) and sell starter kits featuring the 1/8 inch bit, clamps, tape, and safety gear.
Creative
Sea Glass Wind Chimes
Collect beach glass and drill 1/8 inch holes near the edges to string pieces with fishing line or fine wire. Combine with driftwood for a coastal mobile that tinkles softly in the breeze. Keep the bit cool with water and low RPM for clean, chip-free holes.
Stained Glass Suncatchers with Invisible Hangers
Drill tiny 1/8 inch hanger holes at the top corners of stained glass panels so you can hang them with small jump rings or filament instead of soldered tabs. The small diameter keeps the hardware discreet and the glass lines clean.
Constellation Tile Night-Light
Lay out a constellation pattern on a porcelain or ceramic tile and drill 1/8 inch ‘star’ holes. Mount the tile in a simple frame and backlight with LED strip or fairy lights so the stars glow through the perforations.
Ceramic Planter Drainage Upgrade
Turn decorative ceramic cups or small planters into functional pots by drilling multiple 1/8 inch drainage holes in the base. Several small holes provide good drainage while preserving strength in thinner ceramics.
Laced Copper Tile Coasters
Drill a series of 1/8 inch holes along the edges of ceramic tiles and ‘lace’ patterns across the face using thin copper wire or leather cord. Seal the tile bottom with cork and finish the wire with patina for a mixed-material coaster set.