Features
- 12 in. ripping capacity on left side for common rips (e.g., stair treads and risers)
- Up to 14-1/3 in. ripping capacity on right side for maximum-width rip cuts
- Lightweight, durable aluminum construction
- Folds down to 19 in. long by 3 in. wide for storage
- Permanently laser-etched markings for accurate setting
Specifications
| Color | Silver |
| Material | Aluminum |
| Is It A Set? | No |
| Number Of Pieces | 1 |
| Product Height (In) | 1.0 |
| Product Length (In) | 12.0 |
| Product Width (In) | 3.0 |
| Product Weight (Lbs) | 1.2 |
| Product Weight (Oz) | 19.2 |
| Left Ripping Capacity | 12 in. |
| Right Ripping Capacity | Up to 14-1/3 in. |
| Folded Dimensions | 19 in. x 3 in. |
| Includes | (2) installation screws |
Related Tools
Related Articles

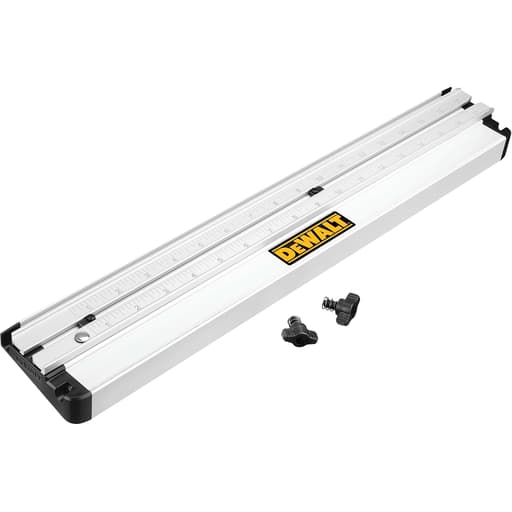
Folding rip guide attachment for circular saws. Provides a 12 in. ripping capacity on the left side and up to a 14-1/3 in. ripping capacity on the right side for wider rip cuts. Constructed from aluminum for reduced weight and durability. Folds compactly for storage and has permanently laser-etched scale markings for setting the guide.
DeWalt 12 in. Dual-Port Rip Guide Review
Why I reached for this rip guide
I keep a few ways to make straight rips on the truck: a clamped straightedge, a track saw, and a basic fence that rides the edge of the workpiece. For jobs where I’m ripping consistent widths out of construction lumber or sheet parts already squared on one side—think stair treads, risers, shelves, and filler strips—I prefer an attached rip guide. It’s quick, it’s repeatable, and I don’t have to shuffle clamps around between cuts. That’s where this lightweight, folding rip guide has earned a spot in my kit.
What it is and how it’s built
The rip guide is a compact, aluminum attachment that bolts to your circular saw’s shoe with two included screws. Once mounted, it folds out to provide a 12-inch ripping capacity on the left side and up to 14-1/3 inches on the right. The arms fold back down to a tidy 19 inches by 3 inches for storage. At about 1.2 pounds, it doesn’t make the saw feel nose-heavy, and the aluminum construction has held up to being knocked around in a crate without bending or losing alignment.
The scale markings are laser-etched, which I appreciate more than I expected. On sunny job sites or under LED lights, painted scales can glare or fade; these don’t. They’re crisp and permanent, which matters when you’re dialing in repeat cuts across a bunch of boards.
Setup and compatibility
Installation is simple in theory: remove two screws from your saw’s shoe, align the rip guide’s bracket, and secure it with the included hardware. In practice, compatibility is the make-or-break detail. This guide is designed around specific saws that have the correct mounting holes on the shoe. On some models—particularly worm-drive saws—the fit is straightforward and solid. On many sidewinders and newer cordless saws, there may be no compatible mounting points or the geometry doesn’t allow the guide to sit square. If your saw doesn’t have the right hole pattern, there’s no practical way to adapt it.
My advice: before buying, look closely at your saw’s shoe for the correct threaded holes and check the manufacturer’s compatibility notes. This is not a universal clamp-on fence, and that’s the biggest caveat with this otherwise capable guide.
Once installed, I recommend a quick calibration. Set the guide to a known dimension (say, 6 inches), make a test rip in scrap, measure the offcut, and adjust the “zero” relationship by nudging the bracket if necessary. Blade kerf and shoe variance between saw models can shift the scale a hair; a five-minute calibration pays off later with reliable repeatability.
In use: speed and repeatability
On tasks like ripping 1x12s down to consistent widths for trim and stair components, the rip guide shines. I can set the width, fold the arm out, snug the guide foot against the board’s edge, and make clean, parallel cuts without setting up a separate fence. The right-side capacity of up to 14-1/3 inches is particularly handy when I’m trimming shelf stock to a standard depth; the left-side 12-inch capacity covers most risers and treads.
Cut accuracy has been excellent for a rip-fence style guide: if I do my part, I can keep cuts within a 1/32 inch of target across an 8-foot run. The permanence and clarity of the etched scale makes it easy to land on exact measurements and return to them throughout a project. Because the guide foot follows the edge of your workpiece, your result is only as straight as the reference edge—if the edge is wavy, your cut will be consistently parallel to a wavy line. For best results, start with a factory edge or joint one edge before using the guide for repeat rips.
Balance and control feel natural. The added mass is minimal, and visibility around the shoe isn’t compromised. On long rips, I keep a steady, gentle pressure pushing the guide foot into the workpiece while keeping my eyes on the cut line. The guide eliminates the drift you can get when relying solely on the shoe against the board’s edge.
Build quality and durability
The aluminum arms and hinges feel robust for their weight. Folding and unfolding doesn’t introduce slop, and the lock-up stays consistent after travel. The joint hardware hasn’t loosened with use, though I give it a quick once-over at the start of the week. The etched scale remains legible without the smudging or chipping I’ve seen on painted markings. The compact folded size—19 by 3 inches—means it slides into a job box or hangs on a peg without hogging space.
Limitations and trade-offs
- Compatibility: This is the big one. If your saw lacks the right mounting holes, it won’t fit. Verify before you invest. If you switch between saws often, you may need multiple guides or accept that it will live on one dedicated saw.
- Maximum width: Left-side rips stop at 12 inches; right side at 14-1/3 inches. That covers many tasks but not breaking down full sheets into wide panels. For sheet goods beyond that, I still reach for a track saw or a clamped straightedge.
- Edge quality: Because the guide rides the workpiece edge, any irregularities telegraph into the cut. This is true of all rip-fence attachments, but worth noting if you’re working with rough stock.
- Flex at full extension: While the arms are stiff for the category, any fence this long can exhibit a touch of flex if you lean on it. A light touch and good support under the workpiece keep cuts true.
Practical tips
- Calibrate once: Set the scale to your saw and blade kerf with a test cut. Scribe a tiny reference mark if needed.
- Use a straight reference edge: Joint or shoot one edge, or select boards with a factory edge for your reference side.
- Support the work: Staging on sacrificial foam or a bench with ample support helps minimize binding or wandering.
- Blade choice matters: A sharp, appropriate-tooth blade will improve cut quality more than any guide can.
- Mind the material edge: Keep consistent, light pressure pushing the guide foot to the edge—don’t oversteer.
Where it fits in my workflow
I reach for this rip guide when I need a series of parallel cuts, fast, and I’m working off a straight edge: stairs, casing returns, shelving strips, closet build-outs, and many trim scenarios. It fills the gap between a universal clamp-on edge and the more deliberate setup of a track system. The folding design means it can live on the saw without demanding space, and the quick deployment keeps me moving.
If I’m processing rough lumber, making very wide rips, or chasing cabinet-grade surface quality in hardwood plywood, I still prefer a track saw. And if I’m using a saw that can’t accept the guide, I default to a universal solution.
The bottom line
This rip guide is a well-executed, lightweight attachment that brings speed and repeatable accuracy to everyday ripping tasks. The dual-side capacities (12 inches left, up to 14-1/3 inches right) cover a lot of common dimensions, the aluminum build holds alignment while keeping weight down, and the laser-etched scale makes setup quick and reliable. It folds small, installs cleanly on compatible saws, and stays out of the way when not in use.
Recommendation: I recommend it—conditionally. If your circular saw is compatible with the mounting pattern, this is a practical, durable rip guide that will save time and deliver consistent results on a wide range of cuts. If your saw isn’t compatible, or if you frequently switch between different saws, consider a universal clamp-on guide or a track system instead. The value is excellent within its compatibility envelope; outside of that, it’s simply not the right tool.
Project Ideas
Business
Slat Wall Panel Kits
Produce DIY-ready slat wall kits: pre-ripped slats in set widths, optional acoustic felt backing, and mounting spacers. The guide’s repeatability keeps production fast and uniform, reducing sanding/cleanup. Offer bundles by square footage and finishes (raw MDF, stained oak, painted).
French Cleat Storage Packages
Sell pre-ripped, beveled French cleat strips (e.g., 48 in. lengths), installation hardware, and a few starter bins. The laser-etched scale ensures matching widths for a professional look. Market to home garages, craft rooms, and pop-up retailers who need modular display walls.
Mobile Panel Breakdown Service
Provide on-site sheet goods ripping for DIYers lacking space or tools. Use the folding rip guide for accurate, repeatable widths (cabinet sides, shelves, backs) in driveways or apartments. Charge per sheet plus cuts; upsell edge banding and labeling for assembly-ready parts.
Custom Stair Riser/Tread Facelifts
Offer stair refreshes by ripping new risers and treads to precise widths, then finishing and installing over existing stairs. The 12–14-1/3 in. capacity covers most standard riser/tread dimensions. Package options include painted risers, stained treads, and nosing upgrades.
Closet and Pantry Shelf Upgrades
Fabricate uniform plywood or melamine shelves and face frames ripped to exact widths for reach-in closets and pantries. Sell as cut-to-fit kits with edge banding and mounting hardware. The guide speeds production with fewer measuring errors and cleaner, repeatable strips.
Creative
Modern Slat Wall Accent
Rip full sheets of MDF or plywood into consistent 1–3 in. slats for a living room or hallway accent wall. The laser-etched scale lets you repeat exact widths for clean gaps, and the right-side 14-1/3 in. capacity is handy for wider trim caps or top rails. Paint or stain slats, mount on felt or acoustic backing, and finish with a matching header piece.
French Cleat Workshop System
Set your circular saw to a 45° bevel and use the rip guide to produce uniform 3–4 in. cleat strips from plywood. Batch out long, repeatable cleats for walls, then make matching cleats on tool holders and storage bins. The folding guide makes it easy to bring onsite if you’re outfitting a garage for a friend.
Modular Entryway Organizer
Build an entry bench with cubbies and a shoe rack by ripping sheet goods into precise side panels, shelves, and face frames (e.g., 11-1/4 in. shelves). The left-side 12 in. capacity covers common cabinet carcass widths; use the right side when you need a slightly wider top or backer. Edge-band for a furniture-grade finish.
Strip-Laminate Cutting Boards
Rip hardwoods into perfectly uniform strips (e.g., alternating 1 in. walnut and maple), glue up, then crosscut for checkerboard or herringbone patterns. The consistent strip width from the guide keeps seams tight and the patterns crisp. Add a juice groove after final sanding and oiling.
Cedar Planter Boxes with Beveled Corners
Use the rip guide to create identical side planks from cedar fence pickets, then bevel the saw base for mitered corners. Make square or rectangular planters with a floating base. The durable aluminum guide stays accurate outdoors, and the etched scale speeds up repeat cuts for sets.