Features
- Holds a Single or Double row of cables, centered on 2x4
- Easy installation, just nail-on wood or metal stud
- Makes routing, fastening or positioning cables easy
- Helps to prevent heat-buildup of cables
- Suitable for both low-voltage and power applications, cUL listed
Specifications
| Size | 25 Pack |
| Unit Count | 25 |
Related Tools

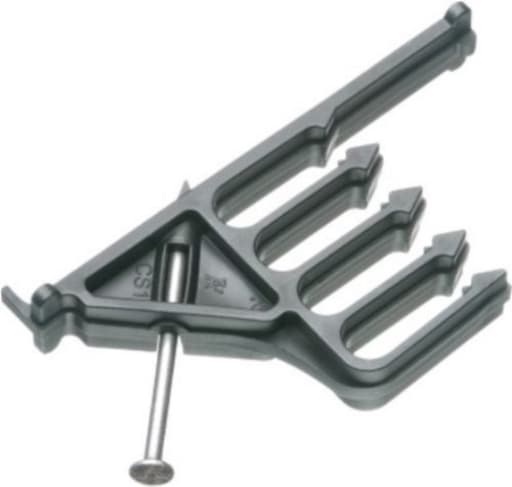
Non-metallic nail-on cable spacers that hold up to eight 14/2 cables in a single or double row and center them on a 2x4 stud. They install by nailing to wood or metal studs, help reduce cable heat buildup, are suitable for low-voltage and power applications, and are sold in a 25-pack; cUL listed.
ARLINGTON CS14-25 Nail-On Cable Spacer, Holds up to Eight 14/2 Cables on Stud, Non-Metallic, 25-Pack Review
Why I reached for this cable spacer
I ran into these cable spacers on a panel upgrade where the home runs were multiplying fast and started to look like a plate of spaghetti. I needed a quick, code-conscious way to keep multiple NM cables organized, off the stud edge, and spaced so heat wouldn’t build up at the panel approach. The Arlington cable spacer looked like a simple answer: a non-metallic, nail-on bracket that lets you stack and center multiple cables on a 2x4. After a few jobs with them, I’ve kept a 25-pack in the van.
Design and build
The spacer is a single molded piece that nails to a stud and creates a centered channel for cables to sit in. It’s non-metallic, which means no sharp edges and no corrosion issues. The plastic feels rigid enough that it won’t bow under a full load of NM but has just a touch of give so you can press a cable into place without nicking the jacket.
The profile supports a single or double row of cables, with an advertised capacity up to eight 14/2 runs. In practice, I can confirm that eight 14/2 cables fit without forcing anything. If you’re mixing in 12/2, you’ll fill up faster. The body is sized to sit on a 2x4 and center the bundle, which is especially useful near top plates and panel zones where neatness and consistent spacing matter.
Installation experience
Installation is straightforward: hold the spacer where you want the cable path centered on the stud and drive the integrated nail(s). In pine 2x4s, they seat with a couple of strikes and don’t wander. The non-metallic body resists cracking when you give it a firm hit, which is more than I can say for some of the cheaper clips I’ve tried.
On metal studs, it’s possible to nail these in, but it’s not my favorite approach. I’ve had better luck pre-punching or using a self-drilling screw through the same mounting area when working with steel. That also makes repositioning easier—once you’ve nailed one in and realize you want the run two inches higher, you’ll be prying it off and leaving a scar. A screw offers a cleaner redo. If you’re planning on adjustments, drill a pilot and use a screw from the start.
Cable management and heat considerations
What sets this spacer apart from basic staples or loose bundling is the centered, separated positioning. When you stack several NM cables tightly, heat can build up and you may run into derating concerns. By holding cables in a defined path with a bit of air around them and distributing them in a single or double row, the spacer helps avoid creating a tightly compressed bundle. It doesn’t replace code knowledge, but it makes staying on the right side of it easier.
I’ve used these on tall stud bays to keep multiple home runs tidy on the way down to the panel and at the top plate to line up a group before crossing. The difference during inspection is noticeable: cables are straight, evenly spaced, and protected from wandering to the edge where a careless screw could reach them.
Real-world use cases
- Organizing panel home runs: Excellent for staging a dozen circuits approaching a service or subpanel so you can land them cleanly.
- Multi-gang box feeds: Helpful on the stud next to a large switch or receptacle cluster, where multiple NM cables need to be routed together.
- Low-voltage staging: While the spacer is suitable for low-voltage and power, I still keep signal and power on separate paths when possible to limit interference and satisfy local requirements. Check your AHJ if you plan to mix.
Holding power and cable fit
Cables snap in with moderate hand pressure. I like to load from the bottom row first and stagger the cables so the jackets sit naturally without crossing. The spacer’s recesses are smooth, and I haven’t seen any jacket abrasion. With a full load of 14/2, the bundle remains centered and off the stud face, which pays dividends later when drywallers and trim carpenters show up.
A note on capacity: don’t force thicker cables just to hit the advertised number. If you’re running mostly 12/2 or 12/3, plan to use more spacers rather than cramming. The tool’s value is in maintaining organization and spacing—not in packing the maximum number possible.
Durability and handling
The plastic takes incidental bumps without cracking. I’ve dropped a loaded spacer against the stud face while adjusting other runs, and it shrugged it off. That said, a big pry to remove a nailed unit will chew up the mounting area. If you anticipate moving things around, again, a screw is kinder to both the spacer and the stud.
Temperature hasn’t been an issue; they’ve behaved fine in unconditioned spaces during summer attic work and cool basement remodels.
Compatibility and code notes
The spacer is cUL listed, and the non-metallic body plays well with both power and low-voltage cabling. The centered path on a 2x4 makes it easy to maintain setback from the stud edge. I still use protective plates where required and follow spacing rules near top plates and tight penetrations. If you’re working under a jurisdiction that’s particular about bundling and derating, this spacer is a friendly companion to good planning—it doesn’t replace it.
Workflow improvements
Where these really shine is in speed and repeatability. Instead of ad hoc staples and creative zig-zagging to route multiple cables, I set two or three spacers on consecutive studs, load the cables in order, and I’m effectively done. Cable identification and grouping stay intact, and I don’t have to fight a compressed bundle when I reach the panel. On service changeouts where time is tight, that matters.
I also appreciate how they keep cables from drifting to the stud edge during the rest of the project. Other trades can read the visual “lane” and are less likely to snag or bury the runs under random bracing.
What could be better
- Fastener flexibility: I’d like a dedicated screw hole or included screw option for clean repositioning and metal studs. Nails are fast but unforgiving when plans change.
- Capacity clarity for larger cables: The eight-cable guidance is for 14/2. It would be helpful to have a clearly marked recommendation for 12/2 and 12/3 to remove guesswork on site.
- Metal stud guidance: While nail-on metal attachment is feasible, a brief instruction note or accessory for steel would improve the experience.
None of these are dealbreakers; they’re quality-of-life tweaks that would make an already useful spacer even friendlier.
Value
A 25-pack is the right quantity for a small-to-medium job or to restock the electrical bin. Given the time saved during routing and the cleaner, safer cable paths, the cost per spacer pays for itself quickly, especially around panels where organization takes the most time. I’ve had no failures across multiple packs.
Tips for best results
- Plan the route: Set spacers where you want the bundle to run before you pull in the last two or three circuits.
- Load in order: Place cables in a consistent sequence (by breaker number or circuit label) so panel terminations are faster.
- Don’t overfill: If you’re using 12/2 or mixed sizes, use an extra spacer rather than squeezing.
- Use screws when repositioning is likely: On metal studs or uncertain layouts, a self-drilling screw makes changes painless.
- Protect penetrations: Pair with nail plates where required to keep inspectors happy and cables safe.
Recommendation
I recommend this cable spacer for electricians and serious DIYers who want tidy, code-conscious cable runs without fuss. It installs quickly, holds a realistic load of NM cleanly, and keeps bundles centered on a 2x4, which helps both with heat considerations and jobsite protection. I’d like a screw-friendly option for easier repositioning—especially on metal studs—but that’s a minor gripe in an otherwise dependable, time-saving accessory. If your work involves organizing multiple 14/2 or mixed NM runs to panels or busy boxes, keeping a 25-pack on hand is an easy yes.
Project Ideas
Business
Pre-Wired Renovation Kits
Pack the spacers into homeowner-friendly kits (spacers, labeled cable sleeves, adhesive-backed mounting clips, instructions) tailored to common projects (TV wall, home office, kitchen). Sell via home-improvement marketplaces and offer upsells like labeling packs. Target DIY renovators and small contractors who value tidy, code-friendly cable runs.
On-Site Cable Cleanup Service
Offer a service to retrofit older homes with organized, code-aware cable routing using nail-on spacers. Charge per room or per linear foot, include basic labeling and a before/after photo portfolio. Market to realtors prepping homes for sale, property managers, and tech installers.
Contractor Supply Bundle
Create wholesale packs for electricians and low-voltage installers: 25-, 100-, and 500-count bundles plus a job-site kit containing nails, a guage template for spacing, and a quick-install guide that cites the cUL listing. Sell through distributor channels and local electrical suppliers.
Decor & Lighting Install Kits for Makers
Design niche product lines for event decorators and lighting designers—colored spacer packs, mounting templates for string-light grids, and pre-measured kits for common ceiling spans. Sell via Etsy and event-supply shops and provide downloadable layout plans for venues.
Training Workshops & Online Course
Run short in-person workshops and a paid online course teaching safe, code-conscious cable routing using simple tools like nail-on spacers. Include downloadable job checklists, billable-rate calculators, and templates to help attendees turn the skill into a side-business offering installation or consultation services.
Creative
Concealed Media Wall Organizer
Use a row of nail-on spacers behind a recessed media wall to route and neatly separate TV, soundbar and streaming device cables. Center them on the studs so cables stay hidden in the wall cavity and heat is reduced. Finish with removable access plates so owners can reconfigure components without drywall damage.
String-Light Grid for Indoor Gardens
Nail a grid of spacers to a ceiling or wall studs to anchor and evenly space low-voltage grow or decorative string lights over a shelf of plants. The spacers keep wiring taut and centered, making a tidy, modular support system that can be reconfigured as plants grow.
Macramé & Textile Anchor System
Repurpose the spacers as discrete anchor points for heavy macramé or woven wall hangings mounted to studs. Center multiple anchor points on a 2x4 for balanced weight distribution and to keep decorative cords separated and neat.
Workshop Cord & Air-Hose Organizer
Install rows of spacers along a workshop wall to route power cords, extension leads and low-voltage hoses. The nail-on design makes quick installation to studs possible; grouping multiple cables prevents tangles and reduces heat buildup for safe storage near power sources.
Custom LED Backlight Raceway
Create a slim interior raceway behind signage or shelving by nailing spacers at regular intervals to hold LED strips and their power cables. The spacers center wiring on studs for a clean gap between drywall and the panel, improving airflow and lowering heat concentration for longer LED life.