Features
- Universal fit for DEWALT miter saw dust ports
- Collects sawdust to help keep the work area cleaner
- Reduces dust in the line of sight for improved visibility
- Covered by a 3-year limited warranty (with 1 year free service and 90-day satisfaction guarantee)
Specifications
| Color | Black |
| Number Of Pieces | 1 |
| Product Height (In) | 2.0 |
| Product Length (In) | 14.81 |
| Product Width (In) | 6.0 |
| Product Weight (Lbs) | 0.22 |
| Product Weight (Oz) | 3.52 |
Related Tools

Related Articles

Universal dust bag intended to collect sawdust from miter saws. Designed to attach to compatible dust ports to reduce debris on the work surface and improve visibility while cutting. Includes a limited warranty and standard service coverage.
DeWalt Miter Saw Dust Bag Review
Why I reached for a simple dust bag
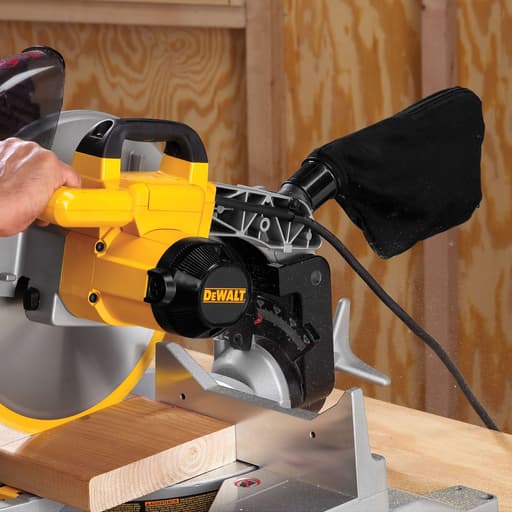
A miter saw can turn even a tidy shop into a snow globe in minutes. I’ve used extractors, shrouds, and DIY hoods, but sometimes power, noise, setup time, or jobsite constraints push me toward the simplest option: a bag on the port. That’s what led me to the DeWalt dust bag—a lightweight, universal-fit accessory meant to clip onto DeWalt miter saw dust ports and catch the worst of the mess while keeping the cut line clearer.
After several weeks of trim work, a bathroom remodel, and a punch-list day of on-site casing and flooring transitions, I formed a clear picture of where this bag shines, and where it comes up short.
Setup and fit
Installation is as straightforward as it gets. The collar slips onto the dust port of DeWalt miter saws and holds well enough that I didn’t worry about it working loose during regular use. On my 12-inch sliding compound saw, the fit was snug and secure, with no tools needed.
A couple of observations on fit:
- On some DeWalt saws, the collar seats just inside the port rather than over it. That reduces the passage slightly. It didn’t stop me from working, but I did notice chips building at the neck sooner during aggressive cutting.
- On a non-DeWalt miter saw, I was able to adapt it with a wrap of tape around the port to build up diameter. It wasn’t elegant, but it got me through a few cuts without the bag popping off.
- I also tested it briefly on a compact jobsite table saw’s blade‑guard port. It physically fit, but I wouldn’t recommend a bag for ripping—more on that below.
Overall, the “universal” claim holds true within DeWalt’s ecosystem, and with minor persuasion you can make it work elsewhere.
Dust collection performance
Expectations matter here. A bag on a miter saw is a passive solution; there’s no airflow pulling dust into the port, so collection depends on how the saw ejects chips and how open the path is.
What I saw in real use:
- Crosscutting pine and poplar trim: The bag captured a meaningful portion of the heavier chips and kept the blade guard area and my cut line much cleaner than going bare. The table and floor still accumulated dust, but the cloud was reduced. This is the use case where the bag makes sense.
- Cutting MDF and plywood: Fine dust largely escaped. The bag helped a little with visual clarity, but most fines drifted past. If you’re sensitive to dust or cutting large volumes of sheet goods, a vac or hood is the better answer.
- Bevel and compound cuts: Capture drops off because the chips deflect differently. I still used the bag to keep some debris from flinging back toward me, but it won’t keep the bench clean here.
- Repetitive production cutting: The bag doesn’t keep up. It fills fast and becomes a choke point at the port sooner than you’d like.
The biggest win is improved visibility at the cut. By catching some of the immediate spray, the bag reduces the dust plume that can obscure a pencil line right when precision matters.
Capacity and maintenance
Capacity is limited. That’s simply the trade-off of a lightweight bag designed to hang off a small port. During trim runs, I often stopped every dozen or so cuts to empty it. Working with denser stock or wider boards sped that up. On particularly dusty tasks like cutting MDF returns, it was down to a handful of cuts before the bag needed attention.
As the bag approaches full, chips start to settle at the neck, and you’ll feel collection drop off. Emptying frequently helps avoid any compaction near the port. I also found it useful to give the bag a quick shake after a couple cuts to keep material from bridging internally.
For emptying, the bag is as simple as the rest of the design—quick to clear out and get back to work. Just plan for frequent trips to the bin if you’re batching cuts.
Where it works—and where it doesn’t
- Punch-list jobs and light trim: Great. It tames the mess enough that you’re not tracking chips through a finished home, and it’s quiet, tool-free, and always ready.
- Shop work without a vac: Good enough for small batches and layout cuts where you care about line-of-sight. Still sweep-worthy afterward.
- Flooring and long rips: Not a fit. On a table saw, or when you need maximum chip evacuation, a bag restricts flow and fills immediately. I skipped the bag for ripping and used extraction instead.
- Production runs: Bring a vac or a hood. The bag becomes a bottleneck in a hurry.
Build quality and durability
The bag’s fabric and stitching are typical for a miter saw accessory—lightweight, flexible, and easy to compress into a toolbox. After weeks of use, it shows the expected surface wear from stray chips and the occasional brush against the fence, but no fraying seams or tears. The interface at the collar hasn’t stretched out, and it still seats solidly on the port.
It’s also backed by DeWalt’s standard coverage: a limited 3-year warranty with 1 year of free service and a 90‑day satisfaction guarantee. For a soft accessory, that’s reassuring, especially if you’re uncertain about fit.
Tips for better results
- Empty early and often. Treat half-full as full to prevent clogging at the collar.
- Keep the path clear. A quick tap on the bag between cuts keeps chips from bridging.
- Mind your cut type. Expect the best capture on straight chop cuts; plan extra cleanup on bevels and miters.
- Don’t use it to replace extraction on dust‑intensive tasks. If you can run a vac, do—it’s simply more effective.
Who it’s for
- Carpenters and DIYers who need a grab‑and‑go solution for small jobs where dragging out a vac is overkill.
- Users working in finished spaces who value keeping chips off the immediate work surface and improving cut-line visibility.
- DeWalt miter saw owners who want a straightforward, guaranteed fit without fiddling with adapters.
If your workload leans toward production carpentry, MDF, or jobsite ripping, you’ll outpace what a passive bag can offer.
Pros
- Quick, no-tools install on DeWalt miter saws
- Tangible improvement in cut-line visibility
- Lightweight and packable
- Reasonable durability for a soft accessory
- Backed by robust warranty and satisfaction window
Cons
- Small capacity requires frequent emptying
- Only modest dust capture, especially with fine particles
- Can slightly restrict the port on some saws
- Not suitable for high-volume cutting or ripping tasks
The bottom line
The DeWalt dust bag does exactly what a passive collection bag can do—and no more. In my shop and on site, it kept the immediate area around the blade cleaner, reduced the plume that obscures a pencil line, and spared me some cleanup on light trim work. It also filled quickly, struggled with fine dust, and occasionally narrowed the port enough that I had to pause and clear chips.
Recommendation: I recommend this dust bag for light-duty use, quick setups, and anyone who wants a low-effort way to improve visibility and catch the heaviest chips on a DeWalt miter saw. It’s not a substitute for a dust extractor, and it won’t keep up with production or dust-heavy materials. If you understand those limits and work within them, it’s a handy, inexpensive accessory that earns its keep. If you’re hoping for near-vacuum performance or long runtimes between emptying, skip the bag and invest in a proper extraction setup.
Project Ideas
Business
In-Home Clean Trim & Framing Service
Offer a mobile service installing baseboards, casing, and custom picture frames directly in clients’ homes. Market the dust-controlled workflow (dust bag, drop cloths, optional HEPA air filter) for fast, low-mess results in occupied spaces.
Event Pop-Up Framing Booth
Set up at art fairs or galleries to cut and assemble frames on demand. The dust bag helps keep the booth tidy and compliant with indoor venues; sell frames, mats, and hanging hardware with premium same-day pricing.
Contractor White-Glove Cut Station
Partner with remodelers to provide an on-site, low-mess miter cut station for punch lists and trim days inside finished units. Charge a day rate plus per-cut pricing; emphasize reduced cleanup and faster turnaround.
DIY Weekend Rental Kit
Bundle a compact miter saw, this dust bag, clamps, a stop block, drop cloths, and safety gear into a rental package targeted at condo/apartment DIYers. Include setup cards and angle charts; upsell blades and project kits.
Dust Control Tips Content + Affiliate Sales
Produce short videos and a checklist on keeping small shops clean (proper bag use, frequent emptying, lighting for visibility). Monetize with affiliate links to the dust bag, blades, and accessories, plus paid templates and consultations.
Creative
Pop-Up Picture Frame Studio
Use the miter saw with the dust bag to build custom picture frames at home without coating the room in sawdust. Cut precise 45° miters, add corner splines for strength, sand lightly, and finish. The cleaner cut area helps preserve finish-ready pieces and makes iterative fitting quick.
Segmented Wood Clock
Cut repeatable angled segments (e.g., 12 x 30°) for a circular clock face. The dust bag keeps your cutline visible while batching parts. Glue into a ring, flatten, inlay numbers, and mount a quartz movement for a striking wall piece.
Chevron Accent Wall Panels
Batch-cut equal-length boards at matching angles to create a chevron or herringbone wall treatment. The dust bag reduces cleanup so you can install in finished spaces, aligning patterns cleanly thanks to unobstructed sightlines.
Crown Molding Practice Jigs + Room Refresh
Build inside/outside corner practice blocks and a simple crown stop jig, then install crown molding in a room. Less airborne dust around paint and furnishings makes on-site fitting and recutting less stressful.
Mitered Keepsake Boxes
Craft small boxes with 45° mitered corners and optional spline accents. The cleaner workspace helps with precise glue-ups and prevents dust nibs in the finish, yielding gift-worthy results.