Features
- WIDE RANGE OF USE - It has both markers and crayon type filler, very easy to fill the scratch, discoloration, hole or separation gaps, Ideal for any kind of wooden furniture.
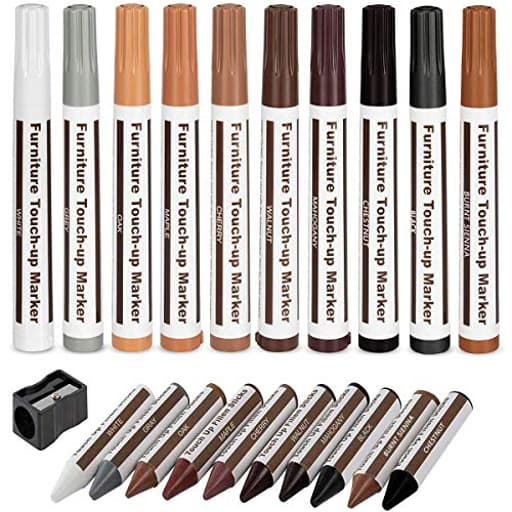
- 10 UNIQUE COLORS - Maple, Oak, Cherry, Walnut, Mahogany, White, Grey, Chestnut, Burnt Sienna and Black to match the color of your furniture. Now there's no need for you to call a professional to retouch your scuffed furniture. Become the pro yourself!
- PREMIUM QUALITY - Top quality markers and wax sticks that cover scratches, nicks, scuffs, and discoloration on furniture, cabinets, tables, beds and more. 100% effective and permanent.
- EASY TO USE - Simply draw over the scratch, allow it to quickly dry, and watch the scratches disappear right before your eyes! These are safe to use on all types of wooden furniture. Use the included sharpener to sharpen the wax sticks.
- QUALITY WATTANTY: If the marker you receive is dry or leaking, there may be product problems caused by logistics, please feel free to contact us at any time.
Specifications
| Color | OAK |
| Size | 21 Piece Set |
| Unit Count | 21 |
Related Tools
This 21-piece furniture repair kit contains color-matching markers and crayon-style wax filler sticks in ten wood tones (maple, oak, cherry, walnut, mahogany, white, grey, chestnut, burnt sienna and black) for concealing scratches, nicks, scuffs, discoloration, gaps and small holes in wood surfaces. Markers dry quickly and the wax sticks can be sharpened with the included sharpener, making the kit suitable for touch-ups on floors, tables, cabinets, bedposts and other finished wood furniture.
DAIXISM Furniture Repair Kit Wood Markers Wax Sticks, for Stains, Scratches, Wood Floors, Tables, Desks, Carpenters, Bedposts, Touch Ups, and Cover Ups Review
I keep a small caddy for “furniture triage” in my shop, and the DAIXISM furniture repair kit has earned a permanent spot in it. It’s a simple combo—ten stain-style markers and ten crayon-like wax filler sticks, plus a sharpener—but it covers most of the small cosmetic headaches that show up on floors, cabinets, tables, and bedposts.
What’s in the kit and how it’s organized
You get ten wood-tone markers and ten matching wax fillers: maple, oak, cherry, walnut, mahogany, white, grey, chestnut, burnt sienna, and black. That palette spans both warm and cool tones, and the inclusion of white and grey is more useful than it sounds—they’re helpful on light finishes, painted cabinets, or for toning down a repair that went too dark.
The markers are chisel-tipped and dry fast. The wax sticks are the softer type you can smear into a gouge, then level off. A basic sharpener is included for shaping the wax points. Packaging is straightforward, and everything arrived clean with snug caps on the markers.
Setup and first impressions
There’s no setup beyond shaking the markers. The ink is alcohol-based with a faint smell typical of furniture touch-up pens; it flashed off quickly. One marker felt a touch dry on first use; a vigorous shake and reseating the tip solved it. The wax sticks are medium-soft—firm enough to pack into a void without crumbling, but pliable enough to push cleanly with finger pressure. The sharpener is inexpensive plastic, yet it did the job of tapering the wax for finer fills.
Color matching and technique
Color matching is the make-or-break with kits like this. Cap colors get you close, but they’re not perfect. I test on a scrap or the back edge of a piece first and often layer:
- Start lighter than you think, then glaze darker tones as needed.
- Use the marker with the grain and don’t linger. Wipe immediately with a soft rag to blend the edges.
- For “cat claw” or white-line scratches that only broke the finish, the markers alone are ideal.
- For dings, chipped veneer edges, or shallow gouges, use the wax first, level it, then glaze with a marker to unify the sheen and color.
A few useful tricks:
- Heat softens wax. Warming the stick between your palms or with a hairdryer for a couple seconds helps it press into small voids.
- Stippling with the marker tip, instead of drawing a line, creates a more natural look on open-grain woods or busy veneers.
- On floors, apply and immediately buff with a microfiber cloth; this avoids creating obvious dark “patches.”
Performance on different surfaces
I tried the kit across several real-world repairs:
- Pre-finished hickory flooring: The walnut and chestnut markers blended out heel scuffs and a few white scratches convincingly. The key was a light hand and immediate wipe-back. Under morning light the repairs disappeared unless I knew where to look.
- Kitchen cabinets (reddish oak stain): The oak marker read a bit cooler than the doors, but layering a whisper of cherry over oak nailed the tone. On the sink base where wear was heavier, I used the wax for a tiny chipped corner, leveled it, then touched it with a mix of oak and chestnut marker to match. The result passed the “standing at arm’s length” test easily.
- Solid wood entry door with claw scratches: The wax filler did the heavy lifting here. I pressed in oak and then glazed with cherry to reintroduce warmth. A hand-buff with a clean rag evened the sheen.
- Walnut veneer shelving: The shelves had both light nicks and darker edge wear. Walnut was a good base, but chestnut helped bridge lighter flecks in the veneer. Here, stippling worked better than straight strokes.
Across all of these, the markers excel at shallow, finish-only issues. The wax shines when the substrate is disturbed. The combination lets you address both in one session.
Durability and finish integration
Repairs made with the markers held up well after daily cleaning with a damp cloth and mild soap. On floors, an area I treated and left alone for a month blended more as the solvents fully flashed off; that initial “just-touched-up” sheen mellowed nicely.
A few caveats:
- Oil polishes can deepen color slightly; test first if you routinely use them.
- The wax is not structural. On deeper chips it’s purely cosmetic and can be displaced by sharp impacts or aggressive scrubbing. It’s easy to reapply, though.
- On raw, unfinished wood, the markers soak in unpredictably. This kit is made for finished surfaces.
If you want extra insurance on a high-traffic spot, a light wipe-on polyurethane or a dab of shellac over a fully dry marker repair can lock it in. Avoid topcoating over fresh wax—let it be, or very lightly seal adjacent areas.
Where it falls short
No touch-up kit is magic. A few limitations showed up:
- Color matching takes practice. On finishes with strong red or grey undertones, I needed to layer to avoid a flat or “wrong” color. Going too dark is easier than bringing it back, so patience matters.
- On glossy piano-like finishes, the color match can be right, but the sheen difference gives the repair away at certain angles. A compatible topcoat helps but adds complexity.
- Very soft, light pine can absorb marker unevenly. In those cases, I preferred the wax with the faintest marker glaze.
- The included sharpener works, but it clogs quickly with wax; keep a paper towel nearby to clear it.
None of these are dealbreakers, but they set realistic expectations: this is for cosmetic touch-ups, not restoration.
Practical tips for better results
- Clean first. A bit of mineral spirits or a damp microfiber cloth removes oils that can prevent adhesion.
- Work in good, natural light. Overhead warm LED lighting can trick your eye.
- Test and layer. Start with maple, oak, or chestnut for most mid-tones; add cherry to warm or grey to cool.
- Wipe immediately. Especially on floors, apply the marker and buff right away to avoid dark halos.
- Level the wax. A plastic card or bone folder cleans excess without scratching the surrounding finish; follow with a soft rag.
- Feather the edges. A lightly damp cloth can pull back intensity at the perimeter of a marker pass.
- Revisit after it cures. What looks slightly off right away often settles; make final tweaks the next day.
Value and use cases
For landlords, property managers, and anyone maintaining wood-heavy spaces, the breadth of colors and the ability to address both surface scratches and small divots makes the kit a strong value. It saved me from hauling out stains, brushes, and finish cans for quick fixes, and it prevented more than one cosmetic issue from turning into a re-finishing job. It’s also approachable for first-timers; a careful test, a steady hand, and a clean rag are most of what you need.
Pros:
- Useful color range with both warm and cool tones, plus white and grey
- Fast, convincing repairs on finish-only scratches
- Wax plus marker workflow covers shallow dents and chipped edges
- Quick dry time and low odor
- Simple to learn and easy to keep on hand
Cons:
- Color matching can be fussy on complex stains; layering is often required
- Sheen mismatch on very high-gloss finishes without topcoat
- Wax fills are cosmetic and can be dislodged with heavy wear
- Occasional dry marker on first use; shaking helps
Recommendation
I recommend the DAIXISM furniture repair kit for anyone who needs practical, quick cosmetic fixes on finished wood: homeowners, renters, and pros doing punch-list work. It won’t rebuild missing corners or replace a proper refinish, but it reliably hides scratches, scuffs, and small chips across a wide range of tones. With a little practice—testing colors, layering lightly, and buffing immediately—you can achieve clean, “invisible at a glance” repairs in minutes. That combination of ease, versatility, and convincing results is exactly what I want from a touch-up kit.
Project Ideas
Business
Mobile Furniture Touch-Up Service
Start a low-overhead on-site repair business that offers quick scratch and chip fixes for homeowners, realtors, and property managers. Service model: short appointments (30–60 minutes) with flat-rate pricing per item or per home. Packages: basic touch-up, staging-ready refresh, and full-room cosmetic restoration. Market via local Facebook groups, Nextdoor, and realtor partnerships.
Airbnb & Short-Term Rental Maintenance Partnership
Contract with Airbnb hosts to provide scheduled touch-ups between guests to keep furniture looking pristine. Offer emergency same-day fixes for stains and scratches. Revenue: recurring monthly retainer + per-visit fees. Upsell: supply a branded mini-kits for hosts to handle tiny issues themselves.
Branded DIY Touch-Up Kits + Video Tutorials
Package the markers and wax sticks with a printed color-match card, sandpaper swatch, micro-brushes, and a QR code linking to step-by-step videos. Sell on Etsy, Shopify, and at craft fairs. Marketing: before/after imagery, how-to reels, and a digital ‘color matching’ quiz to reduce returns. Price tiers: basic kit, pro kit (extra shades, applicators), and gift sets.
Community Workshops: Fix Your Furniture
Run hands-on evening/weekend classes teaching homeowners how to use markers and wax sticks for common repairs. Charge per seat, partner with community centers or hardware stores, and sell kits at the class. Add value with a follow-up online Q&A group and discounted refill packs for attendees.
B2B Bulk Supply & Refill Program
Sell bulk 21-piece kits and customized branded sets to restoration shops, carpenters, salon/hotel chains, and staging companies. Offer a subscription refill plan for markers and wax sticks with priority shipping, and provide color-consulting support for large clients. Contracts can include periodic training sessions for staff.
Creative
Vintage Furniture Micro-Makeover
Use the markers and wax sticks to restore one vintage piece (side table, chair, or dresser) into a refined, sale-ready item. Match tones to blend out surface scratches, fill small gouges with wax, then lightly sand and apply a thin coat of clear wax or satin varnish. Tips: photograph before/after for social media, keep a log of color mixes used, and use the sharpener to create fine points for detail work.
Dollhouse & Miniature Repair Studio
Apply the markers and wax sticks to touch up tiny wooden dollhouse furniture and architectural details. The crayon sticks sharpen to create precise fills; markers add wood grain and patina. Techniques: dilute marker ink for washes, use a toothpick to push wax into very small cracks, and buff with a soft cloth for a realistic sheen.
Mixed-Media Wood Panel Art
Create layered wall art by distressing plywood panels, accenting raw edges and small imperfections with the wood markers, and filling intentional gaps with colored wax for texture. Combine with paint washes, stencils, or metal hardware. Use contrasting wax colors to make insets pop and then seal with matte medium.
Custom Wedding & Event Wooden Decor
Offer hand-refined, personalized wooden signs, table numbers, and centerpieces. Use markers to color-match repairs on reclaimed wood and wax to conceal nail holes or splits for a polished look. Add hand-lettering or burned initials, then provide couples with a small take-home touch-up stick for future events.