Features
- EASY TOUCH-UP – This Minwax Wood Stain Marker is great for quick and easy touch-ups of common nicks and scratches on wood items. It’s also ideal as a stain pen for small hobby and wood craft projects, or to add decorative touches to larger wood projects.
- VERSATILE – Use these stain pens for wood on furniture, molding, cabinets, doors, floors and other wood surfaces in your home. They’re perfect to keep on hand in your tool box for nicks and scratches.
- FAST DRYING – It’s easy and quick to use this stain marker: simply apply the stain to the wood and wipe the excess with a cloth. The wood touch up pen is fast drying, so your items are ready for immediate use.
- DARK WALNUT WOOD STAIN – This dark wood stain provides a beautiful, rich dark walnut color. Deep notes of brown and black look great on a wide variety of projects.
- A BRAND YOU CAN TRUST – Minwax is America’s leading brand of wood finishing and wood care projects. Since 1904, we have been inspiring consumers to Keep on Finishing. We offer consumers a complete line of products to meet every wood finishing need.
- Easy touch-up for common nicks and scratches
- Ideal for use on furniture, molding, cabinets and more.
- Dark Walnut
- Fast drying
- Easy and quick
Specifications
| Color | Dark Walnut |
| Size | Dark Walnut |
| Unit Count | 1 |
Related Tools
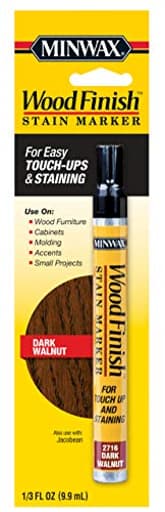
This .33 fl oz wood stain marker applies a fast-drying dark walnut stain for quick touch-ups of nicks, scratches and small hobby or craft projects. It is intended for use on furniture, molding, cabinets, doors and floors, and excess can be wiped off with a cloth for a neat finish.
Minwax 63487000 Wood Finish Stain Marker for Touch Ups, Dark Walnut, .33 fl oz Review
Why I reached for this stain marker
I keep a few repair tools in my shop specifically for the “oops” moments—chair legs that scuff during a move, a cabinet door that kisses a handle, a floorboard nicked by a dropped tool. For small defects on dark-stained wood, the Minwax stain marker in Dark Walnut has become one of my go-tos. It’s essentially a .33 fl oz pen filled with stain, sized and shaped for precision rather than big coverage. If you already like Minwax’s Dark Walnut in a can, this is the pocket version for quick touch-ups.
What it’s good at
This marker excels at disguising light-to-moderate scratches, worn edges, and small sand-throughs on dark finishes. On a walnut-stained oak cabinet edge, a single pass immediately knocked back the bright, raw wood and brought it within the same tonal family as the surrounding surface. On a maple shelf stained dark, I needed two thin passes, but the final color blended convincingly with the existing finish.
It’s also very convenient for working around hardware and profiles—moldings, chamfers, and inside corners—where a brush feels clumsy and a rag is messy. The felt tip gives you control to track along a scratch without flooding the area, and the ability to “draw in” grain direction helps visually blend the repair.
Color match and blending
Dark Walnut is a rich brown with some soft black undertones—not chocolatey, not reddish. On true walnut and on oak stained in a comparable tone, the marker’s color harmonized well. On espresso finishes that skew cooler and nearly black, it still muted bright scratches effectively but didn’t turn them jet black; I layered a couple of light passes and followed with a slightly darker blending marker to push it further when needed. If you’re working on a finish that’s more gray or has a heavy topcoat tint, expect to do some test marks on a hidden area first.
A tip for matching: apply in very light strokes and stop early. It’s easier to build depth than pull back an area you’ve over-darkened. I also like to feather the stain past the defect by a millimeter or two to avoid the “colored-in line” look; wiping lightly with a clean cloth immediately after application helps blend the edges.
Application and workflow
Using the marker is simple:
- Clean the defect area to remove wax, oils, or dust.
- Shake well with the cap on.
- Prime the tip on scrap or a paper towel until stain flows.
- Touch the tip to the defect and move with the grain.
- Wipe off any excess right away.
On open-grain woods (oak, ash), the stain soaks quickly, and one light application is often enough. On tighter-grain woods or over older, sealed finishes, I found that thin, repeated passes work better than one heavy application.
The product description calls it fast-drying, and with thin coats on a porous scratch, I’ve found that to be true—dry to the touch in minutes. If you flood the area or apply over a non-porous surface, it can take much longer to stop feeling tacky. I’ve learned to keep my passes light and immediately wick away excess with a cloth.
Finish and sheen
This is a stain, not a finish. It adds color, not a durable protective layer. On many pieces, the surrounding topcoat (poly, lacquer, shellac) still has enough sheen that a colored scratch reads fine even without a new finish layer. On high-traffic edges (kitchen cabinets, desk fronts) or on glossier surfaces, you’ll get a more invisible repair if you follow up with a tiny dab of matching clear finish once the stain has cured. A wipe-on poly in a compatible sheen, applied sparingly, blends those spots nicely.
The marker itself leaves a subtle luster when it’s fresh, but I wouldn’t rely on it as the final surface in an area that gets regular rubbing or cleaning.
Control and consistency
The stain inside is fairly thin by design—it needs to flow through a felt tip. Because of that, it can run if you hold the marker vertically and dwell in one spot, especially on vertical surfaces. I keep the pen at a slight angle, touch down briefly, and keep a cloth under my other hand to catch any drips. Shaking before use matters; unshaken, the output can look watery or uneven, and shaking re-suspends the pigments for more consistent coverage.
The tip is medium-point—broad enough to fill shallow scratches quickly, narrow enough to trace a line. If you’re working on hairline scratches, the side of the tip gives good control. For larger wear areas or a cluster of defects, I still prefer a rag and liquid stain from a can; this pen is about precision, not square footage.
Where it struggles
- Non-wood materials or filled areas: If a defect is filled with glue or putty that doesn’t accept stain, the marker can’t do much—it will sit on top and wipe away or dry unevenly. You’ll need a color-matched fill stick or a tinted lacquer touch-up instead.
- Very dark, nearly black finishes: It tones scratches down but may not go fully black without layering with a black touch-up solution.
- Heavy damage: For gouges or missing finish over an area larger than a quarter, you’re better off with a small brush and a can of stain, then spot topcoating.
Durability and maintenance
For light touch-ups on cabinets and furniture, the repairs have held up through routine dusting and gentle cleaning. If a spot gets scrubbed frequently—around door pulls, for example—applying a tiny bit of clear topcoat after the stain cures increases durability and keeps the color from lightening over time.
The marker itself ages like any felt-tip: cap it tightly and store it horizontally so the tip doesn’t dry out. I’ve gotten months of intermittent use out of one marker, and the .33 fl oz volume goes further than you’d expect when you’re just addressing scratches.
Practical tips for better results
- Test first. Even within “Dark Walnut,” existing finishes vary. Try a hidden spot or the underside of a shelf.
- Less is more. Build up slowly in thin layers, wiping between passes.
- Align with the grain. Short, grain-direction strokes look more natural than cross-grain dabs.
- De-gloss if needed. If a shiny topcoat prevents absorption, a very light rub with a gray abrasive pad at the defect (not beyond it) can help—only if you plan to re-topcoat the spot.
- Seal high-wear spots. A dot of matching clear finish after staining helps the repair blend and last.
- Shake well and re-prime periodically during a session for even flow.
Value and who it’s for
For anyone maintaining dark-stained furniture, trim, or cabinets, this marker is inexpensive insurance. It’s also a smart addition to a move-in kit for landlords or tenants who want to clean up baseboards and door frames. Woodworkers will appreciate it for post-assembly nicks or to tone exposed end grain that finished a shade lighter.
If your work regularly involves refinishing larger sections, you’ll still want traditional stains and finishes on the shelf. But for everyday scuffs that would otherwise catch the eye, this little marker saves time and avoids dragging out cans, brushes, and drop cloths.
Final recommendation
I recommend the Minwax Dark Walnut stain marker for quick, targeted touch-ups on dark-stained wood. It blends common scratches effectively, the color is versatile across walnut-toned finishes, and the pen format gives you the control you need on small defects. Use it with a light hand, wipe promptly, and don’t expect it to perform miracles on non-porous fills or heavily damaged areas. Paired with a small bottle of matching clear topcoat for high-traffic spots, it’s a simple, reliable solution that earns its place in a toolkit.
Project Ideas
Business
On‑Site Quick Touch-Up Service
Offer a mobile service for homeowners, landlords, and property managers that fixes small nicks and scratches in minutes. Market to realtors prepping homes for showings and landlords between tenants. Use the stain marker for fast work — charge a per-item or flat-trip fee. Upsell: include minor sanding, buffing, and a small supply of markers for property owners.
Furniture Flip Shortcuts
Run a small furniture-flipping business where the marker is used to hide scratches and blend mismatched tones quickly, reducing the need for full refinishes. This saves time and materials, letting you turn inventory faster. Document before/after photos for listings and emphasize the rich dark walnut finish to attract buyers.
DIY Craft Kits & Workshops
Assemble sellable kits (coaster kits, ornament kits, mini-frame kits) that include a stain marker, wood pieces, instructions and finishes. Host local workshops or online classes teaching staining techniques, distressing, and quick repairs. Sell branded markers or bundle them in gift sets for holidays and craft fairs.
Property Maintenance Subscription for Realtors
Create a subscription service for real estate agents and Airbnb hosts offering monthly small-maintenance visits: touch-ups, door-sill repairs, and minor woodwork fixes. Provide a branded stain marker as part of the package (useful marketing tool). Pricing: tiered plans based on number of properties or visit frequency; emphasize speed and minimal disruption.
Creative
Miniature Furniture Restoration
Use the stain marker to age and repair dollhouse furniture, wooden toys, or small cabinetry pieces. The fine tip lets you reach tight joints and carved details; fast-drying formula speeds up work. Technique: apply, immediately wipe excess with a cloth for subtle aging, or layer lightly for deeper tone. Combine with light sanding or whitewash to create a period-appropriate finish.
Wood-Slice Ornaments & Coasters
Create rustic coasters and tree ornaments from wood slices. Use the marker to stain the bark edge or to add a dark walnut halo around the center for contrast. Add hand-painted motifs or pyrography in the center; finish with a clear sealer. The small size of the marker makes producing batches fast and keeps waste low.
Mixed-Media Accents
Incorporate rich walnut tones into mixed-media art, scrapbooks, or journals. Use the marker to simulate wood grain on cardboard, to darken paper edges for vintage look, or to add leather-like shading. Because it dries fast, you can quickly layer inks, paints, or adhesives without long waits.
Custom Frame & Carving Highlights
Refresh picture frames, mirror frames or carved molding by using the marker to even out color, accent crevices, and create an antique finish. Apply in recessed areas and wipe the raised surfaces slightly to create depth. Great for small upcycling projects — fast results without stripping or full refinishing.