Features
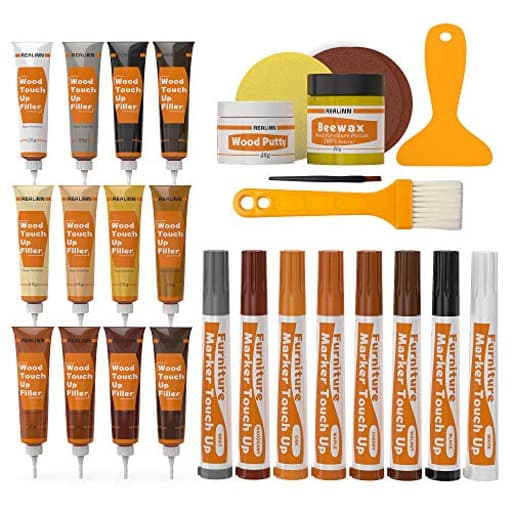
- KIT INCLUDES our most powerful wood repair compounds, so you can repair all levels of damage to wood furniture by yourself. Includes 12 touch up fillers, 8 touch up markers, 1 wood putty, 1 beewax, 2 brushes, 2 sandpaper, 1 sponge and 1 scraper
- RESTORE ALL KINDS OF DAMAGES such as scratches, chips, cracks, holes and discoloration on wooden floors, doors and furniture like desks, chairs, beds, wardrobes, bookcases, cabinets, wooden crafts and many more
- EASY TO USE: Apply the filler into the cracks, and then smooth the surface with scraper. The markers can be used to touch up the superficial scratches or to draw wood grain
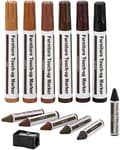
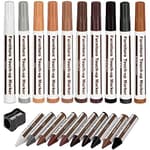
- UNIQUE COLORS: The touch up fillers are available in 12 colors: White, Black, Light Gray, White Maple, Yellow Maple, Deep Pine, Earthy Yellow, Yellow Teak, Red Cherry, Cedar, Dalbergia, Walnut. The touch up markers come in 8 colors: White, Gray, Oak, Maple, Cherry, Walnut, Mahogany, Black
- Tips for mixing colors: You can mix the desired wood filler color according to the color chart. When mixing colors, first add the lighter repair filler, then gradually add the darker wood repair filler, observing the color changes until you achieve the desired shade
Specifications
| Color | Brown |
| Size | 28 Piece Set |
| Unit Count | 1 |
Related Tools
A 28-piece wood repair kit with 12 touch-up fillers, 8 touch-up markers, wood putty, beeswax, two brushes, two sandpaper sheets, a sponge and a scraper for repairing scratches, chips, cracks, holes and discoloration on wooden floors, doors and furniture. The kit includes 12 filler shades and 8 marker colors that can be mixed to match finishes; fillers are applied into damage and smoothed with the scraper, while markers are used for surface touch-ups or to recreate wood grain.
REALINN Wood Furniture Repair Kit- Set of 28 - Touch Up Markers, Fillers with Wood Putty - Repair Scratch, Cracks, Hole, Discoloration for Wooden Door, Floor, Table, Cabinet Review
Why I reached for this kit
I keep a small bin of touch-up supplies for wood around the shop—markers, wax sticks, a putty or two. The REALINN wood repair kit promised to consolidate all of that into one compact box: 12 colored fillers, 8 touch-up markers, a small tub of putty, a beeswax cube, brushes, sandpapers, a sponge, and a scraper. I spent a couple of weekends using it on a handful of real-world problems: a scratched oak stair tread, a dinged walnut table edge, a chewed door molding, a chipped veneer cabinet corner, and superficial scuffs on a maple dresser. It’s not a magic wand, but it’s a capable, thoughtfully assembled kit that covers most day-to-day furniture and floor repairs very well.
What’s inside and how it’s organized
The kit’s value starts with breadth. The 12 filler shades span from whites and grays through maple, cedar, cherry, teak, and walnut tones. The 8 markers hit the common touch-up colors (white, gray, oak, maple, cherry, walnut, mahogany, black). The fillers are soft enough to press into chips and cracks with the included scraper, then smoothed and feathered. The markers are solvent-like pens that lay down color cleanly and can be used to draw grain lines or tint the filler after it’s set.
A couple of small but useful add-ons: the two sandpaper sheets (medium and fine) help you knock down highs and nibs, and the beeswax lets you final-buff small fills or add a subtle sheen. Everything packs back into the box neatly, which matters if you plan to keep this on a shelf and reach for it occasionally.
My one organization gripe: the color labeling on the fillers could be clearer. I ended up making tiny swatches on a scrap card and keeping it in the box. If you buy this, I’d recommend doing the same—dab a dot of each filler and a line from each marker onto a card, label it, and you have a quick reference the next time you need a match.
Test 1: Scratched oak stair tread
For a cluster of long, light scratches from a dog nail, I skipped fillers and went straight to the markers. On oak, layering “oak” and a little “walnut” darkened the scratch just enough to blend into the grain without closing the scratch line itself. The chisel tip on the markers is handy—you can use the edge for hairline scratches or the broad face to shade a wider scuff.
A quick tip that worked well: wipe immediately with a slightly damp cloth if the color is too heavy, then reapply. The ink lifts easily in the first minute, which makes blending very forgiving. After the tread dried, I buffed lightly. In normal lighting the scratches were essentially invisible; in raking sunlight, you could still track them if you knew where to look (that’s true of almost any marker repair).
Test 2: Dinged walnut table edge
This was a pea-sized chip on a walnut veneer edge. I packed the walnut-toned filler into the void, overfilled just slightly, and used the plastic scraper to level it. Ten minutes later, a light pass with fine sandpaper feathered the perimeter. The color was close, but I added a touch of “mahogany” marker to mimic a darker grain band running through that section. A few strokes brought the fill to life.
Finish-wise, satin-to-matte surfaces hide repairs best. On this table’s semi-gloss edge, the fill blended well from most angles, but in bright afternoon light you can spot a difference in sheen. A quick rub with the beeswax mitigated that and unified the luster. If your top surface is glossy, expect to do a little extra sheen management; there’s no clear topcoat in the kit.
Test 3: Chewed door molding
Softwood trim with rounded bite marks—exactly the kind of damage fillers are meant for. I kneaded a mix of “white maple” and a touch of “cedar” to land in the right color family (start with the lighter color and add darker in small increments—much easier to control). After pressing the blend into the divots, I used the scraper and then a damp sponge to clean the edges. Once set, I used the “maple” marker to draw faux grain through the filled zones. The molding looked solid again without repainting the entire run. If your trim is painted, the white and gray fillers double as patching compounds you can then paint over.
Test 4: Chipped veneer cabinet corner
Corners are tricky because they catch the eye. Here I used a slightly darker filler than the surrounding veneer (cherry plus a touch of walnut), filled flush, and then glazed the edge with the “cherry” marker to reintroduce warmth. The result held up well to casual inspection. Running a finger along the corner, you feel a slight softness compared to wood, but visually it passes the standing-back test.
Test 5: Surface scuffs on a maple dresser
Superficial abrasion, no loss of material. This is marker-only territory. The “maple” marker looked too yellow at first, but stippling with the tip and immediately blending with a damp cloth controlled the saturation. On light woods, less is more—build up slowly and feather outward.
Color matching and blending
Color range is this kit’s biggest strength. Between the 12 fillers and 8 markers, I could get very close on oak, walnut, cherry, pine, and various maples. Mixing the fillers is straightforward and surprisingly effective. The key is to:
- Start with the lighter filler and add darker in tiny amounts.
- Test on a scrap or an inconspicuous area.
- Let the fill set before final color tuning with the markers.
Recreating grain makes a disproportionate difference. Even on a good color match, a dead-flat patch looks fake. A couple of faint, slightly wavy lines in the right direction helps the eye read “wood,” not “patch.”
Ease of use and cleanup
The workflow is simple: fill, level, touch up color, buff. The plastic scraper is the unsung hero—it’s stiff enough to slice excess filler cleanly without digging into adjacent finish. The included brushes are fine for applying putty in tight spots, though I mostly used the scraper and my finger. I found the fillers workable for several minutes; they firm up enough to sand or color within about 10–20 minutes. The markers dry quickly and don’t smear after a minute or two.
Cleanup is minimal. A damp cloth handles most mistakes. Keep a melamine sponge (magic eraser) nearby if you want to pull back heavier marker application without affecting the surrounding finish too much.
Durability and finish
For cosmetic repairs, the kit performs well. On lower-traffic areas (legs, sides, trim), fills and touch-ups hold up without further attention. On high-wear horizontal surfaces—tabletops, stair treads—expect to refresh now and then, especially if the original sheen is high-gloss. The kit’s fillers and markers blend better into satin and matte finishes. If you need a perfect sheen match on a glossy surface, you’ll want a compatible clear topcoat, which this kit doesn’t include.
Where it falls short
- Color labeling could be clearer on the filler tubes. Swatch your kit on day one.
- The markers skew a touch warm in a few tones; adjust by layering a neutral (gray/black/white) sparingly to cool the color.
- No clear finishing coat. Repairs in glossy, high-wear areas may telegraph under strong light unless you manage sheen with wax or a separate topcoat.
- This isn’t structural repair. Deep gouges in solid wood or broken corners may need wood epoxy, sanding, and stain—outside the scope of this kit.
None of these are dealbreakers; they’re just boundaries to keep expectations realistic.
Practical tips from the bench
- Work in good, natural light. Matching under warm indoor bulbs can fool your eye.
- Always start lighter, both in filler mix and marker application, and build up.
- Overfill slightly, then level with the scraper; it’s easier than trying to add material to a low spot later.
- Feather the edges with fine sandpaper once the filler sets; go gently to avoid burning through surrounding finish.
- Draw grain lines last, following the actual wood’s direction and spacing.
- Buff with the beeswax for a more unified look on satin finishes.
Value
Considering the number of colors and the inclusion of both fillers and markers, the kit is good value. A little material goes a long way, and having all the shades in one box beats buying individual pens and putties piecemeal. For homeowners, property managers, furniture flippers, and even pros who need an all-in-one touch-up set on service calls, it earns its keep.
Recommendation
I recommend the REALINN wood repair kit for anyone looking to handle everyday cosmetic wood repairs without hauling out sanders and stains. It’s versatile, easy to use, and the color range—especially with mixable fillers—covers most species and finishes you’ll encounter. You’ll still see limits on glossy, high-wear surfaces and on deep structural damage, and I wish the color labeling were clearer. But for scratches, chips, edge dings, veneer nicks, and scuffed trim, this kit consistently delivered clean, convincing fixes with minimal fuss.
Project Ideas
Business
Mobile Touch-Up Service
Offer on-site quick-fix repairs for scratches, chips and small holes in homes, rental properties and staged listings. Charge per repair (e.g., $30–$120 depending on size/complexity) and upsell full-piece restorations. Market to realtors, property managers and Airbnb hosts for fast turnaround jobs.
Hands-On DIY Repair Workshops
Run small classes teaching homeowners how to fix common wood damage using the kit—cover filler mixing, color matching, grain drawing and finishing. Charge per attendee, sell starter kits at the workshop, and offer follow-up video guides or private coaching for an additional fee.
Flip & Resell Vintage Furniture
Source damaged vintage pieces cheaply, use the kit to perform high-impact repairs and refinishing, then resell for profit on Etsy, Facebook Marketplace or to local boutiques. Use professional before/after photos and detailed descriptions about the repairs to justify higher prices.
Subscription Maintenance for Short-Term Rentals
Provide a monthly maintenance package for Airbnb/VRBO hosts: scheduled inspections and quick wood repairs between guests to keep furniture and floors looking fresh. Charge a recurring fee plus per-repair costs; advertise reliability, rapid response and small emergency call-outs.
Creative
Custom Inlaid Coasters
Make sets of personalized wood coasters by glueing thin wood scraps or salvaged veneer, filling chips and seams with matching fillers, and drawing or enhancing grain with the markers. Sand smooth, buff with beeswax and seal. Sell as wedding/housewarming gifts with custom initials or in matched wood-tone sets.
Miniature Furniture Makeovers
Restore or upcycle dollhouse and small decorative furniture using the small fillers and markers to hide cracks, re-create grain and match finishes. These tiny projects are fast, low-cost, and great for social-media content (time-lapse repair videos) or for sale to collectors and crafters.
Patchwork Wood Wall Panels
Collect small wood offcuts or reclaimed slats and assemble geometric patchwork panels. Use fillers to level joints and color-match seams with mixed filler shades; use markers to unify grain or add contrast lines. Finish with beeswax for a tactile wall art series in multiple sizes.
Heirloom Rescue — Before & After Series
Pick a series of badly scratched or chipped pieces and perform staged restorations: fill, blend grain with markers, sand and finish. Photograph dramatic before/after sets and sell the finished items or frame the photos as a themed art collection highlighting restoration craftsmanship.