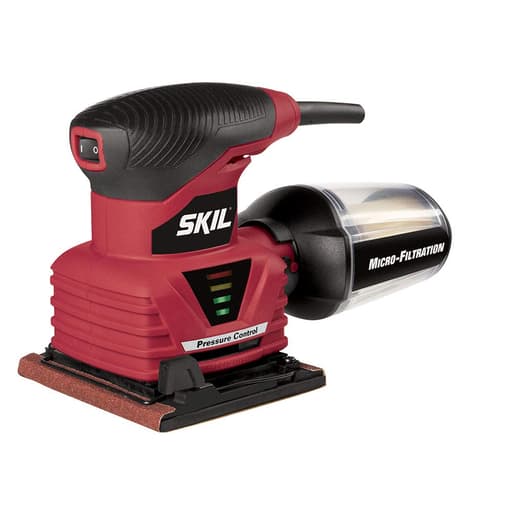
Features
- Pressure-control indicator that warns when excessive pressure is applied
- Pad brake to reduce gouging
- Micro-filtration system to capture fine dust
- Clear dust canister for visual fill-level monitoring
- Built-in vacuum adapter for improved dust collection
- Soft-grip body for user comfort and control
- Dust-sealed switch for extended tool life
Specifications
| Input Voltage & Frequency | 120V |
| Input Current (Approx.) | 2 A |
| No Load Speed (Rpm) | 14,000 |
| Pad Size | 4 in x 4-1/2 in |
| Tool Height (In) | 6 |
| Tool Length (In) | 9 |
| Tool Width (In) | 4.5 |
| Tool Weight (Lb) | 2.6 |
| Included Accessories | Paper punch plate; 1 sheet of abrasive paper |
| Dust Collection | Clear dust canister; built-in vacuum adapter |
Related Tools

Related Articles

A corded sheet palm sander designed for general-purpose sanding and finishing. It provides a visual pressure indicator to help maintain consistent sanding pressure, a pad brake to reduce gouging, and a sealed switch to limit dust ingress. Dust is collected in a clear canister and can be routed to a vacuum via a built-in adapter.
Skil 1/4 Sheet Sander with Pressure Control Review
Why I reached for this sander
Refinishing a set of old pine stair treads reminded me how underrated a small quarter‑sheet sander can be. I picked up the Skil sheet sander for that job and a handful of furniture touch‑ups, looking for something compact, predictable, and decently clean to use indoors. Over several weeks of stop‑and‑go work—glue line knock‑downs, between‑coat scuffing, and flush sanding along edges—I got a clear picture of where this tool shines and where it asks for patience.
Design, ergonomics, and controls
At 2.6 pounds, the sander is light in the hand and easy to guide with fingertips rather than muscle. The soft‑grip body is genuinely comfortable during longer sessions, and the low profile keeps your hand close to the work, which helps with control on edges and inside corners. The rectangular 1/4‑sheet pad is ideal for getting right up against baseboards and into stair nosings, and it reaches tighter spots than most random orbiters.
The pressure‑control indicator is not a gimmick. On fresh paper, it’s surprisingly easy to lean too hard, bogging the pad and risking swirl marks. The visual cue nudged me back to a light touch, which produced a more even finish and kept the motor happier. There’s also a pad brake that helps the pad stop quickly when you lift off the work; I found it reduces those little start/stop scuffs you can get when setting the tool down mid‑project.
The dust‑sealed switch is reassuring if you’re sanding softer woods that shed lots of powder. During my sessions the tool got warm but never hot, even after roughly 45 minutes of continuous runtime. Noise is typical for a palm sander—more of a high‑pitched buzz than a roar—so I still wear hearing protection.
Skil lists a no‑load speed of 14,000. In practice, the sander feels quick and consistent, with a removal rate that matches light to medium‑duty work. It’s not a paint‑stripper or deck‑sander, but for leveling putty, easing edges, and preparing bare wood for stain, it’s well‑matched.
Dust collection is better than expected—if you use it right
The clear dust canister and micro‑filtration setup do a credible job containing fine dust when the paper holes are properly punched and aligned. Visibility into the canister is genuinely useful; I could time my emptying before suction dropped. Emptying, though, is messy—do it outside and give the filter a gentle brush or a quick blast from a shop vac.
Hooked up to a vacuum via the built‑in adapter, dust collection improves dramatically. With a small shop vac on low suction, the pad stayed clear longer, paper lasted longer, and the work area stayed much cleaner. The adapter fit snugly on my vac hose without extra tape. If you work indoors, I’d consider the vacuum connection a must; the canister alone is fine for quick touch‑ups but not ideal for extended sanding in a finished space.
One small but important detail: use the included punch plate to perforate your paper so the holes line up. Miss the alignment and you’ll notice dust spitting out from under the pad and the canister filling unevenly.
Paper setup and the finicky clamp situation
Like all 1/4‑sheet sanders, this one uses standard 9x11 paper cut into quarters. The clamping bars are straightforward: flip them up, tuck in the paper, and flip them back down. Getting the length just right matters. Too short and the paper will creep; too long and it wrinkles around the corners.
I found the front clamp perfectly serviceable, but the rear clamp can be fussy. If the paper is cut on the short side, it can work loose over time, especially with coarser grits. A couple of adjustments helped:
- Cut the paper a hair long and pre‑curve the ends before clamping so it seats under the bar.
- After clamping, tug gently on both ends to make sure there’s no slack.
- If you’re using heavier‑backed sheets that barely reach, a thin fold of tape on the paper edge can help the clamp bite.
Once dialed in, the paper stayed put for me through a full set of treads. It’s an area where a slightly stronger spring would inspire more confidence, but it’s workable if you pay attention during setup.
Surface quality and control
With 120‑ to 220‑grit paper, the finish quality is clean and predictable, particularly on flat hardwood surfaces. The rectangular pad tracks straight, which makes it easy to sneak up to a scribe line without wandering. On softwoods, light pressure and fresh paper make the biggest difference: lean on it and you’ll risk uneven removal around earlywood/latewood. Here the pressure indicator helps you stay disciplined.
I appreciated the brake most when working intricate trim. Start the sander on the work with minimal pressure, let it settle, and you won’t get those tiny gouges that can appear if the pad spins up in mid‑air and lands while still coasting.
Reliability notes
I did encounter one hiccup during testing: after a short break, the sander refused to start once. Power cycling at the outlet and working the switch a few times brought it back, and it never repeated the issue. It’s impossible to know whether that was a switch quirk or something deeper, but it gave me a moment’s pause. The dust‑sealed switch is a thoughtful inclusion, and it should help longevity in dusty environments, yet this is still a lightweight 2‑amp tool. If you’re counting on daily reliability, I’d keep a backup or step up to a heavier‑duty model.
Where it fits, and where it doesn’t
This sander is at its best in these scenarios:
- Refinishing trim, shelves, and furniture panels
- Between‑coat sanding of varnish or paint
- Light leveling of filler and putty
- Edge and corner work where a random orbital can’t reach
Where it’s less ideal:
- Aggressive stock removal or stripping finishes
- Large flat surfaces where a 5‑ or 6‑inch random orbital is more efficient
- Jobs that demand hook‑and‑loop convenience or industrial durability
Tips to get the most from it
- Cut paper accurately and use the punch plate so the dust system can do its job.
- Keep pressure light; let the tool speed and abrasive do the work. Watch the indicator.
- Connect a vacuum for indoor work; the canister alone is fine outdoors or for quick jobs.
- Empty the canister outside and brush the filter; don’t tap it hard, as that can damage the media.
- Rotate or replace paper early. A fresh sheet removes faster and runs cooler.
Pros and cons
Pros:
- Light, comfortable, and easy to control
- Helpful pressure indicator that promotes better technique
- Effective pad brake reduces start/stop scuffs
- Respectable dust collection, excellent with a vacuum attached
- Clear canister makes maintenance obvious
Cons:
- Paper clamping can be finicky with short cuts or thick paper
- Occasional start‑up quirk raises questions about long‑term reliability
- Not suited to heavy stock removal
Recommendation
I recommend this Skil palm sander for homeowners and weekend woodworkers who need a compact, affordable 1/4‑sheet tool for light to medium‑duty sanding. It’s comfortable, leaves a clean surface when used with a light touch, and the dust setup—especially with a vacuum—keeps the workspace tidy. Be prepared to pay attention to paper setup, and keep your technique in check using the pressure indicator.
If you’re a pro or you expect daily, no‑excuses reliability, I’d look at a heavier‑duty option with more robust clamping or a hook‑and‑loop pad. For the tasks it’s designed to handle, though—trim, furniture, and between‑coat work—the Skil does the job well, provided you respect its limits and set it up carefully.
Project Ideas
Business
Mobile Trim & Door Paint-Prep
Offer a dust-controlled deglossing and smoothing service for doors, baseboards, and window trim ahead of repainting. Use the vacuum adapter for near dustless operation in occupied homes, and the pressure indicator to avoid flattening profiles—ideal for property managers and Realtors.
Furniture Refinishing Micro-Shop
Specialize in small furniture (nightstands, chairs, end tables). Provide consistent, swirl-free prep and between-coat sanding with controlled pressure to avoid edge burn-through. Bundle pickup/drop-off and market before/after transformations on social media and marketplaces.
CNC/Laser Part Finishing Service
Partner with local makers to batch-sand flat parts (sign blanks, puzzle pieces, plaques) post-cutting. Offer per-piece or per-tray pricing, dust-managed turnaround, and optional sealing. The sander’s even pressure reduces inconsistency across batches.
Dustless Drywall Patch Smoothing
Provide tidy touch-up sanding for small drywall patches in rentals or offices. Connect to a shop vac to drastically cut airborne dust; use fine grits and controlled pressure to blend patches without oversanding paper facing. Ideal as a same-day add-on to handyman services.
Workshops: Finishing 101
Host paid classes teaching surface prep, grit progression, and between-coat sanding. Demonstrate how the pressure indicator improves results, and let attendees practice on cutting boards or frames they take home. Upsell curated sandpaper kits and finishes.
Creative
Shabby-Chic Picture Frames
Upcycle thrifted wooden frames into shabby-chic décor. Use the pressure-control indicator to gently scuff edges and high spots for authentic distressing without gouging. The pad brake keeps corners clean, and the vacuum adapter minimizes dust while you layer paint/glaze and sand back selectively.
Resin-and-Wood Coasters
Create wood coasters with resin inlays or floods. After cure, step through fine grits on the sheet sander to level and smooth; the micro-filtration and vacuum adapter keep resin dust contained. Light, even pressure (guided by the indicator) ensures a flat, swirl-free surface ready for polishing.
Farmhouse Lettered Signs
Plane-free smoothing for pallet boards and glued panels before hand-lettering. Knock down raised grain between paint coats using light, controlled passes to avoid burn-through. The clear dust canister helps manage cleanup for indoor crafting sessions.
Cutting Board Refresh
Refurbish tired end- or edge-grain cutting boards: flatten light cup, erase knife marks, and break edges with progressive grits. The pressure indicator prevents low spots, and dust collection keeps fine wood dust off kitchen surfaces before oil/wax finishing.
Upcycled Cabinet Door Chalkboards
Turn old cabinet doors into chalkboards: degloss factory finish, scuff profiles gently without gouging, then apply chalkboard paint. The pad brake and soft grip give control over raised panels while dust sealing and vacuum hookup keep the workspace tidy.