Features
- User-Friendly Design: Simplifying the process and eliminating the need for professional assistance. Transform your existing 5" and 6" recessed can lights into elegant pendant or hanging fixtures effortlessly with this easy-to-use conversion kit.
- Elegant Design: This 5" and 6" recessed can conversion kit includes a flat ceiling medallion that covers recessed can openings and enhances your lighting fixture’s visual appeal. Suitable for modern and classic interiors, it adds a stylish touch to any room's decor.
- Durable Construction: Made from premium-grade steel, this conversion kit supports hanging light fixtures up to 50lbs and ceiling fans up to 35lbs, ensuring secure installation for various fixtures with trusted strength and stability.
- Simple Installation: The kit includes a 7¾" flat ceiling medallion and a medium base light socket adapter for easy installation. No patchwork required, saving time and effort. Step-by-step instructions ensure a smooth, hassle-free setup process.
- Flexible Solution: This recessed light conversion kit is perfect for kitchens, living rooms, and bedrooms, catering to DIY enthusiasts completing home lighting renovations.
Specifications
| Energy Efficiency Class | Energy-efficient LED lighting |
| Color | White |
| Unit Count | 1 |
Related Tools
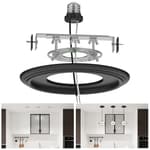
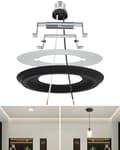
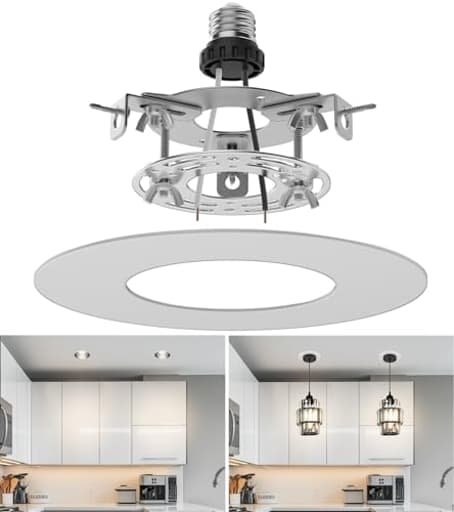
A recessed can light conversion kit that converts standard 5" and 6" ceiling cans into pendant or hanging fixtures; it includes a 7.75" flat steel ceiling medallion and a medium-base socket adapter in a white finish. The kit supports hanging fixtures up to 50 lb and ceiling fans up to 35 lb, includes installation instructions to avoid ceiling patchwork, and is compatible with energy-efficient LED bulbs.
tebio Recessed Can Light Conversion Kit for 5" and 6" Ceiling Fixtures - Pendant/Hanging Light Upgrade, Compatible with Ceiling Fans, Includes 7¾" Flat Steel Medallion, White Finish Review
Why I picked up this kit
I had a pair of 6-inch recessed cans over a kitchen island that felt more like task lighting than a focal point. Rather than patching drywall and installing new boxes, I tried the tebio conversion kit to turn those cans into pendant mounts. My goals were straightforward: get a secure, code-conscious way to hang fixtures, keep the ceiling tidy, and avoid a weekend of mudding and sanding. The kit delivered on most of that brief—and taught me a few installation lessons along the way.
What’s in the box and how it’s built
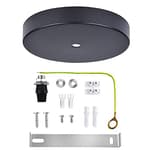
The kit centers on a steel bracket system that anchors to the inside of a 5- or 6-inch recessed can, a 7.75-inch flat steel medallion to hide the old opening and trim, and a medium-base socket adapter that powers your new fixture from the existing can’s socket. The medallion comes in a clean white finish; it’s low-profile, rigid, and paintable if you want it to disappear further into the ceiling.
Two details matter here:
- Load ratings: up to 50 lb for hanging fixtures and up to 35 lb for ceiling fans. The bracketry feels appropriately stout for those numbers.
- Adjustability: the mounting plate can be shifted to align the fixture stem with the center of the can. That adjustability is what makes the kit work across different can geometries.
The hardware assortment is generous, though I recommend having a few quality self-tapping sheet metal screws and drill bits on hand. More on that below.
Installation: the real-world workflow
I’ve installed plenty of lighting and I still set aside a calm afternoon for this. Working overhead slows everything down, and recessed cans vary a lot in construction. Here’s how my process went for a single 6-inch can:
- Kill power at the breaker, confirm with a non-contact tester.
- Remove the trim and bulb, then the can’s internal socket plate if it’s in the way.
- Dry-fit the bracket and medallion on a table first to understand how the pieces will line up.
- Hold the bracket up in the can, adjust it so the threaded center lines up where the pendant canopy will sit. Mark hole locations.
- Pre-drill the can housing with a small metal bit. My can’s steel was surprisingly hard; pre-drilling was essential.
- Fasten the bracket inside the can with self-tapping screws. The kit’s hardware mixed and matched fine, but I ended up using my own screws for a couple of positions to get the bite I wanted.
- Thread the fixture stem, attach the medallion, connect the socket adapter and ground as instructed, then mount the pendant canopy.
From power-off to power-on, the first can took about an hour and a half. The second went faster—about 50 minutes. The most time-consuming steps were pre-drilling and ensuring the bracket sat level and centered. The medallion’s thin profile helped the canopy sit flush without fussy shimming.
Two practical tips from my install:
- Dry assemble everything on a workbench before you get on the ladder. Once you see how the bracket, center stud, and medallion stack, the ceiling work gets much easier.
- Pilot holes are your friend. Even if you’re using self-tapping screws, a quick pilot hole saves time and frustration, especially with hardened can housings.
How it looks once installed
The flat 7.75-inch medallion did exactly what I wanted: it covered the can opening cleanly and visually “reset” the ceiling around the new pendant. On white ceilings, it recedes. With most standard pendant canopies, the overlap is enough that you don’t see any of the old cutout. If you’re very particular about lines, you can caulk the medallion-to-ceiling seam and paint it, but I found it looked good as-is.
Importantly, the medallion’s thickness didn’t interfere with my pendant canopy. Some conversion rings are too chunky and leave a gap or tilt the canopy; this one sat flush.
Strength and stability
I hung a glass-and-metal pendant roughly in the 6–8 lb range. Once the bracket was cinched down, there was no wobble beyond what you’d expect from a typical stem mount. I gave it a few firm test pulls (as I always do) and felt confident in the bracket’s grip on the can housing.
About those load ratings: 50 lb for fixtures is generous and more than enough for typical pendants and semi-flush mounts. The 35 lb ceiling fan rating is notable, but I would not hang a fan from any can conversion without verifying what the can is attached to. Many recessed “remodel” cans are clipped to drywall and are not meant to carry dynamic loads. If you’re considering a fan, make absolutely sure the can is firmly secured to framing and that the assembly meets local code for fan-rated support. For light fixtures, the kit’s bracket-to-can connection felt robust.
Electrical considerations
The included E26 socket adapter is simple: it screws into the existing can’s socket and gives you leads to wire your new fixture. It’s a clean solution that avoids junction boxes or splices you’d have to bury. The kit is compatible with LED bulbs (really, any fixture that accepts standard medium-base bulbs, provided the fixture itself is LED-friendly). Do pay attention to grounding. The instructions cover it, but it’s easy to overlook a proper bond to the bracket/medallion and the new fixture’s ground.
What I liked
- Robust steel bracketry with sensible adjustability. It adapts to both 5- and 6-inch cans without kludges.
- The 7.75-inch medallion cleans up the ceiling opening and doesn’t telegraph through most canopies.
- No drywall patching, no new boxes—big time and mess savings.
- Weight ratings that inspire confidence for typical fixtures.
- The socket adapter keeps wiring straightforward and reversible.
What could be better
- The instructions are serviceable but not particularly clear about the best assembly sequence. A simple exploded diagram and a tip to dry-fit first would save DIYers time.
- Expect to drill. Self-tapping screws alone often aren’t enough for hardened can housings. Having the right drill bits and a couple of spare screws made a big difference.
- Hardware consistency. My kit had plenty of parts, but I still used my own self-tapping screws for a couple of positions to get the bite I wanted.
None of these are deal-breakers, but they’re worth planning for. A cordless drill with fresh bits, a magnetic driver, and a second set of hands for the first install will make life easier.
Who it’s for
- Homeowners who want to convert 5- or 6-inch cans to pendants or hanging fixtures without patching drywall.
- Confident DIYers comfortable drilling thin steel and making basic line/neutral/ground connections.
- Renovations where a clean, low-profile medallion is preferred over a decorative rosette.
If you’re not comfortable on a ladder with a drill and wire nuts, an electrician can install this quickly—and still save you the mess of moving boxes and repairing ceilings.
A note on compatibility and depth
Recessed cans vary. Before you buy, measure the can’s inner diameter (5 or 6 inches) and note the depth and any internal obstructions. Very shallow housings or unusual trim systems may complicate the bracket install. If your can uses adjustable internal plates, plan on removing or repositioning them to clear the bracket and central stud.
Value
The value here is less about raw materials and more about the work you avoid. Relocating or replacing cans with junction boxes, patching the ceiling, and painting can easily burn a weekend and a few hundred dollars in materials. This kit got me a solid, centered pendant in under two hours with a neat finish. For me, that’s a good trade.
Recommendation
I recommend the tebio conversion kit for anyone looking to turn 5- or 6-inch recessed cans into pendant or hanging fixtures without tearing into the ceiling. It’s sturdy, adjustable, and the flat 7.75-inch medallion delivers a clean, finished look. Plan on doing a bit of drilling, lay out the parts before you start, and you’ll end up with a professional-looking result. I’d use it again for light fixtures without hesitation. For ceiling fans, I’d only proceed after confirming the can’s structural support meets fan-rated requirements and local code. For pendant conversions though, this kit is a practical, reliable solution that saves time and keeps your ceiling intact.
Project Ideas
Business
Recessed-to-Pendant Upgrade Service
Launch a local service offering fast conversions of recessed cans to pendants using this kit. Market to homeowners, realtors preparing listings, and Airbnb hosts who want higher-style photos. Offer packages (single-room, kitchen island, whole-home) and upsell curated shade bundles and LED bulbs. Quick installs and 'no patchwork' messaging reduce barriers for clients.
Style Bundle E-Commerce Kits
Create curated conversion kits that pair the conversion hardware with pre-selected shades, cords, and energy-efficient LED bulbs in coordinated styles (modern, farmhouse, industrial). Sell online with how-to videos and room-setup guides. Offer add-ons like dimmer-compatible bulbs or decorative medallion finishes.
Contractor/Designer Partnership Program
Offer bulk discounts and co-branded packages to interior designers and contractors who frequently upgrade lighting. Provide templates for specification sheets and installation guides, and create a small installer certification so partners can market 'certified conversions' to their clients.
Hands-On Workshops and Content
Run paid local workshops or online classes teaching homeowners and DIYers how to convert recessed cans using the kit, pair shades, and choose bulbs. Create video content and downloadable guides that can be monetized or used to funnel attendees into buying your style bundles or hiring your installation service.
Seasonal & Rental-Staging Packages
Target short-term-rental hosts and home stagers with short-term upgrade packages: swap recessed lights for pendant fixtures for photos and showings, then swap back if needed. Offer seasonal swaps (e.g., warmer bulbs and accents in fall) and a rental model for decorative shades and accessories to generate recurring revenue.
Creative
Kitchen Island Pendant Swap
Replace recessed cans over a kitchen island with matching pendant lights using the conversion kit and a set of 3–5 shades. Use the 7.75" medallion to cover the can edges for a clean look; pick energy-efficient LED bulbs for consistent color temperature. Arrange pendants at staggered heights for visual interest and use the kit’s 50 lb capacity to hang heavier decorative shades (ceramic or metal).
Cluster Chandelier from Multiple Cans
Convert a cluster of adjacent 5"/6" cans into a single multi-pendant chandelier. Install short cords/sockets from each converted can and group them above a dining table or foyer to create a cohesive, modern chandelier effect without cutting new holes. The medallions keep the ceiling neat and require no patchwork.
Hanging Planter-Lights
Turn a recessed fixture into a combined light and planter: convert the can to a pendant, attach a shallow, waterproof planter bowl below the shade (or integrate a hanging terrarium), and use an LED grow-spectrum bulb. The kit supports the weight of planter plus soil (within 50 lb), and the medallion and socket adapter make the conversion quick and tidy.
Vintage-Edison Industrial Pendant
Create an industrial-style pendant by attaching a metal or smoked-glass shade and an Edison-style LED bulb to the conversion kit. Use a dark-finish shade and leave the medallion painted white for contrast, or paint the medallion to match the fixture. The secure mount lets you use heavier decorative hardware while keeping an easy DIY install.