Features
- ELEGANT DESIGN: This 4" and 6" recessed can conversion kit includes a flat ceiling medallion that covers recessed can openings and enhances your lighting fixture’s visual appeal. Suitable for modern and classic interiors, it adds a stylish touch to any room's decor, making it a standout pendant light kit or part of a recessed light conversion kit setup.
- KEY FEATURES: As a recessed can light converter kit with a 50 - pound load rating, the Recessed Lighting Converter allows easy installation of any light fixture or pendant according to the needs of the customers. This can light conversion kit to pendant adjusts to fit any recessed can size between 4 - inch and 6 - inch and is highly durable, made of high - quality plastic.
- COMPATIBLE BULB BASE: The recessed lighting converter works with existing recessed cans that fit standard base socket and medium base like PAR16, R16, A19, R20, PAR 20, BR25, BR30, R30, PAR30, BR38, PAR38, BR40 and R40 light bulbs and is listed for damp location use. The Recessed Lighting Converter can be used on sloped ceilings up to 45˚, showcasing its versatility as a can light conversion kit.
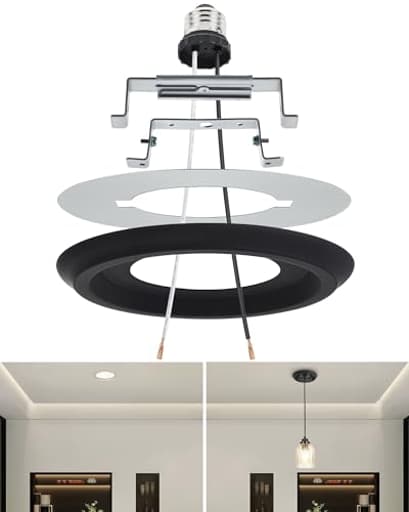
- QUICK AND EASY INSTALLATION: Installation is a breeze with no major remodeling required for this flush mount conversion kit - compatible setup. It's ETL and CETL listed for indoor use. The product comes with all necessary mounting hardware, including an adjustable bar, socket adapter, mounting bar, round metal plate, decorative medallion, and other hardware. Plus, no screws or hardware are visible after installation, ensuring a clean and tidy look, just like a well - executed pendant light conversion kit installation.
- UTILITY AND AREAS OF APPLICATIONS: It's an ideal pick for various indoor spaces such as kitchens, family rooms, balconies, bedrooms, utility rooms, home offices, basement rooms, or any area with existing recessed lighting. Whether used as a recessed can conversion kit or a pendant light kit, the decorative medallion is paintable, allowing it to match any decor style as per your requirements.
Specifications
| Color | Black1 pc |
Related Tools
A recessed can conversion kit that adapts 4" and 6" ceiling cans into a pendant or hanging fixture, covering the opening with a flat round medallion (black) and providing an E26/medium-base socket. It includes an adjustable mounting bracket and hardware, supports up to 50 lb, is ETL/CETL listed for indoor/damp locations and sloped ceilings up to 45°, and accepts standard medium-base bulbs (A19, BR25–BR40, PAR20–PAR38); the medallion is paintable.
Luvkczc Recessed Can Light Conversion Kit for 4" and 6" Ceiling Fixtures - Pendant/Hanging Light Upgrade, Includes E26 Socket, Mounting Bracket, Round Ceiling Plate(Black) Review
Why I tried this conversion kit
I’ve been staring at a lonely recessed can over a dining table for too long, wishing it were a pendant. I didn’t want to open the ceiling, fish new cable, or install a new junction box. The Luvkczc conversion kit promised a cleaner middle path: adapt the existing can into a sturdy mounting point and hide the old opening with a decorative medallion. After a weekend install and a few weeks of living with it, I’m impressed by how solid and tidy this solution is—and where its limits are.
What’s included
The kit is built around a metal mounting system that spans the opening of a 4" or 6" recessed can and a decorative, flat round medallion that covers the cutout. In the box I received:
- Adjustable mounting bar with hardware to fit both 4" and 6" cans
- Round metal plate and fixture mounting bracket
- E26 screw-in socket adapter and tail leads
- Decorative medallion (flat profile, black, roughly 8" diameter), paintable
- Screws and anchors specific to the bracket system
All of the structural components are metal; the medallion is molded plastic. The visible result is a flat, minimalist round “ceiling plate” that sits between the ceiling and your pendant’s canopy, with no exposed screws.
Installation experience
I consider this a DIY-friendly install, but you should still be comfortable working around electrical fixtures. As with any light fixture work, I shut off the breaker and verified the can was dead before I started.
My sequence:
- Remove the can’s trim and bulb.
- Screw the E26 adapter into the can’s existing lamp holder and route the leads through the opening.
- Expand and position the adjustable mounting bar across the can’s opening; secure it per the instructions (the fit for both 4" and 6" cans was straightforward).
- Attach the round metal plate and the fixture mounting bracket to the bar.
- Make the electrical connection to the pendant using the adapter leads, tuck the wiring, and then seat the medallion flush to the ceiling.
- Mount the pendant’s canopy to the bracket.
Two things stood out. First, the bar and plate create a rigid span that feels more substantial than a typical “screw-in-only” converter. Second, the finished look is clean—once the medallion and canopy are in place, there’s no visible hardware.
From power-off to lights-on, the process took about 40 minutes, including measuring pendant height and tidying up. I didn’t have to patch drywall or expand the opening. If I ever want to go back to a recessed can, reversing the steps takes just a few minutes.
Fit and compatibility
- Cans: It adjusted cleanly to both 4" and 6" housings in my tests.
- Ceiling type: The kit is listed for indoor and damp locations and works on sloped ceilings up to 45°. On a slope, make sure your pendant has a swivel or gimbal canopy.
- Load: Rated for 50 lb, which is unusually robust for this category. More on that below.
- Power: The E26 adapter draws from the existing can’s socket; no new wiring was required.
- Aesthetics: The black medallion plays well with black or dark-toned fixtures. It’s paintable if you want it to match the ceiling.
One practical check: measure your pendant’s canopy. The medallion is generous enough to cover a standard 6" can opening with margin to spare, but very small minimalist canopies can look undersized against the flat disk. Conversely, oversized canopies look fine because they simply overlap the medallion.
Build and design
The structural parts are reassuringly rigid, and the medallion’s molding is crisp. The flat profile gives a modern look without trying to mimic ornate plaster rosettes. Being plastic, the medallion won’t chip like painted metal might, but it can show scuffs if you’re not careful during install. If you plan to paint it to match a white ceiling, use a bonding primer formulated for plastics to avoid adhesion issues; a light sanding and a thin topcoat gave me a seamless match.
I also appreciate that all the fasteners disappear in the final assembly. It reads as a purpose-built ceiling plate, not as a retrofit bandage.
Safety and load handling
The headline spec is the 50 lb load rating. While that’s impressive, real-world suitability depends on more than the bracket:
- The existing recessed can must be firmly secured to framing or a mounting bar. If your can is loose or clipped to drywall only, fix that before hanging anything heavy.
- Weight isn’t the only factor; dynamic loads (kids tugging the pendant, vibration on a sloped ceiling) add stress. For heavy, multi-arm chandeliers, I prefer a dedicated box fastened to framing. For typical pendants and medium chandeliers, this kit feels plenty stout.
- The kit’s cETL listing (and CSA marking on mine) is reassuring from a compliance standpoint, but always check local code if you’re in a strict jurisdiction. If you’re on a dimmer, verify compatibility with your pendant’s driver or lamps.
In day-to-day use, my medium-weight glass pendant (around 8 lb) has stayed perfectly stable with no tilt or sag.
On sloped ceilings and damp areas
On a 30° vaulted ceiling, the bracket held firm and the medallion seated well. The limiting factor is usually the pendant canopy; use a swivel to keep the fixture plumb. The damp-location listing covers places like bathrooms (not shower zones) and covered porches; the kit itself doesn’t waterproof your pendant, so match the pendant’s rating to the space.
Living with it
The real win is visual: the medallion cleans up the scar of a recessed can, and the hidden hardware keeps attention on the pendant. I also like the flexibility. If I ever change my mind—or a future owner prefers recessed lighting—reverting is simple and doesn’t involve mudding and painting.
Electrically, the screw-in adapter is a convenience. I saw no flicker or intermittent behavior. If you’re replacing a dimmable BR/PAR lamp on a dimmer, expect to swap the dimmer or the pendant’s lamps to keep performance smooth.
Limitations and quirks
- The medallion is plastic. It looks good, and it’s paintable, but it needs the right primer to avoid peeling. If you want a raw metal or brass finish, this isn’t that.
- Color choice is limited. The black finish is handsome with dark fixtures; if you’re going for a “disappear into the ceiling” look, painting is the path.
- Extremely heavy chandeliers are better served by a dedicated fan/fixture-rated box. The 50 lb spec is strong, but I treat it as the top end, not the target.
- Because power is derived from the can’s E26 socket, the circuit conditions (dimmed vs. switched, load type) carry over. Plan your pendant choice accordingly.
Tips for a cleaner install
- Prepaint the medallion with a bonding primer and ceiling paint if you want it to vanish.
- Dry-fit the pendant canopy on the medallion before wiring to confirm coverage and alignment.
- On sloped ceilings, use a canopy with a built-in swivel for a plumb hang.
- Confirm the can is securely mounted to framing; address any wobble first.
- Label and save your can trim and bulb if you plan to revert later.
The bottom line
The Luvkczc conversion kit does exactly what I hoped: it turns a recessed can into a credible, code-listed mounting point for a pendant without tearing into the ceiling. The metal bracketry feels robust, the finish is clean with no visible fasteners, and the flat medallion makes the retrofit look intentional rather than improvised. Installation is straightforward for anyone comfortable swapping light fixtures, and the flexibility to return to a recessed setup later is a nice bonus.
I recommend this kit. It’s a practical, sturdy, and aesthetically tidy way to upgrade a space from recessed to pendant lighting, especially in dining rooms, kitchen islands, and entryways where a focal fixture makes a difference. Just choose a pendant within a reasonable weight range, use a proper primer if you plan to paint the medallion, and ensure your existing can is securely mounted. For most homes, it’s the right blend of convenience and reliability.
Project Ideas
Business
Local Recessed-to-Pendant Retrofit Service
Offer a turnkey service converting homeowners’ recessed cans into stylish pendant fixtures using these kits. Packages: basic swap (kit + install), custom shade upgrade, full lighting redesign. Target audiences: older homes, rental property owners, Airbnb hosts, small business owners. Pricing model: flat install fee per fixture + optional shade/materials markup. Sell add-ons like dimmer installation, bulb bundles, and color-matched medallion painting. Promote via local Facebook groups, Nextdoor, and partnerships with electricians/handymen (highlight ETL/CETL listing and 50 lb support).
Custom Pendant Shade E‑commerce Shop
Design and sell finished pendant shades pre-paired with the conversion kit as a drop-in retrofit product on Etsy, Shopify or Amazon. Offer collections (industrial metal, farmhouse glass, mid-century wood, fabric drum) and SKU bundles (kit + shade + recommended bulbs). Upsells: expedited installation guides, custom paint on medallion, bulk discounts for contractors. Market via Instagram styling shots, influencer room builds, and SEO-targeted listings like “recessed to pendant kit bundle.”
DIY Workshops & Private Group Classes
Host hands-on classes teaching people to build pendant shades and install conversion kits. Format: 2–3 hour sessions where attendees make a shade (mason jar, fabric drum, or simple wood) and install it into a demo recessed can. Revenue: ticket fee (materials included) + kit sales at a margin. Additional revenue from private events (bachelorette parties, team-building) and partnerships with makerspaces or community centers. Provide beginner tool kits and printed installation safety/permit info.
Hospitality & Staging Partnership Program
Partner with cafés, boutique hotels, restaurants and real estate stagers to offer short-term aesthetic upgrades: swap recessed cans to pendants to create mood lighting for openings, photoshoots or seasonal refreshes. Offer subscription maintenance (bulb replacement, cleaning, re-paint medallions) and rental options for event staging. Sales channels: direct outreach to interior designers and property managers, portfolio with before/after photos, and referral incentives.
Creative
Kitchen Island Cluster Pendant Chandelier
Use 3–5 conversion kits to turn existing recessed cans above a kitchen island into a coordinated cluster of pendants. Paint the medallions the same color as the ceiling or a contrasting accent color, hang bulbs at varied lengths for depth, and fit each kit with a mix of warm LED filament or dimmable BR30 bulbs for layered light. Materials: 3–5 kits, braided cloth cord or adjustable fixture cords, dimmer-compatible LED bulbs, paint. Notes: each kit supports 50 lb so it easily carries heavier bespoke shades; works on sloped ceilings up to 45°.
Upcycled Mason Jar / Glass-Bottle Lamps
Turn mason jars or recycled glass bottles into farmhouse-style pendant shades that screw onto the E26 socket of the kit. Secure glass to the socket with a threaded ring or a collar you fashion from hardware-store parts, use vintage-look A19 or small globe bulbs, and paint the medallion to match your kitchen or bar. Materials: conversion kit, mason jars or bottles, gasket/collar, E26 bulb, paint/sealant. Good for damp-location indoor spots like covered porches or kitchens (use damp-rated bulbs).
Hand-turned Wooden Shade Pendant
Lathe-turn wooden shades (walnut, maple or painted plywood) that slide over the E26 socket for a warm, craft look. Finish the wood with clear sealer for longevity, paint the medallion to complement the wood tone, and use warm LED bulbs to prevent heat damage. Materials: conversion kit, turned wooden shade, clear finish, E26 bulb. Tip: advertise as a custom artisan piece — the kit’s 50 lb rating allows solid wood shades.
Decorative Painted or Mosaic Medallion Accent
Make the medallion the star: hand-paint a mural, decoupage vintage maps, or apply mosaic tiles around the medallion rim, then pair with a simple clear globe or filament bulb so the ceiling artwork reads as intentional decor. Because the medallion is paintable, you can match period rooms or make a bold accent above beds or entryways. Materials: conversion kit, paints/mosaics, sealant, simple bulb.