Features
- Easy Retrofit Installation – Converts your existing recessed light into a stylish pendant fixture in minutes! Includes wired E26 socket, bracket, and round mounting plate for seamless integration.
- EASY INSTALLATION – Works with existing recessed cans 6" or surface mounting. Includes step-by-step instructions for both methods.
- 50LBS WEIGHT CAPACITY PER KIT – Strong brackets and reinforced screws safely hold most chandeliers & pendant lights (up to 50lbs each)—no sagging or instability.
- ADJUSTABLE 6" FIT – Universal design expands or contracts to fit standard recessed lighting cans 6" openings, ensuring compatibility with most homes.
- Sleek Finish – Includes a 3D decorative cover plate to hide hardware and a ceiling medallion (pendant not included) for a polished, professional look.
Specifications
| Color | black-1pc |
| Unit Count | 1 |
Related Tools
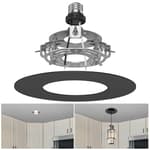
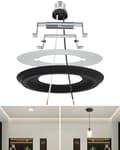
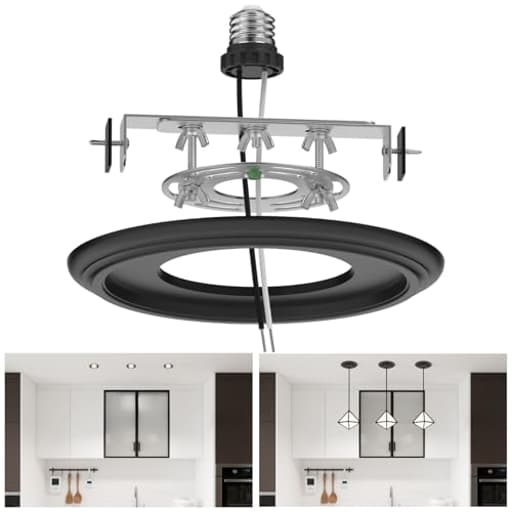
This recessed-to-pendant conversion kit converts a 6-inch recessed or surface-mounted can into a pendant fixture. It includes a wired E26 socket, mounting bracket, round ceiling plate and decorative 3D cover, fits adjustable 6-inch openings and supports fixtures up to 50 lbs; step-by-step installation instructions are included.
YIIZON Recessed to Pendant Light Converter Kit - 6 Inch Can Light Conversion, Includes E26 Socket, Mounting Bracket, Round Ceiling Plate & 3D Black Cover Review
A quick, clean way to turn a can light into a pendant
A single recessed can over my sink had bugged me for years. The location was perfect for a pendant, but I didn’t want to open the ceiling, reroute boxes, or get into a full electrical project. This is exactly the scenario where the Yiizon converter kit makes sense. It lets you repurpose a 6-inch recessed can into a proper mounting point for a pendant or small chandelier using the existing power and opening—no fishing wires or replacing housings.
After installing it in an afternoon, I came away impressed by the combination of sturdiness, adjustability, and thoughtful finishing details for the price.
What’s in the box and how it’s built
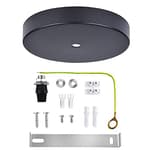
The kit includes:
- An adjustable metal mounting bracket that spans and anchors inside a 6-inch can
- A round ceiling plate that attaches to the bracket and serves as the mounting base
- A pre-wired E26 socket lead that taps power from the existing recessed can socket
- A decorative “3D” cover/medallion to hide the can and hardware
- Screws and hardware, plus step-by-step instructions
The hardware feels solid. The adjustable bracket uses slotted rails to dial in the span, and once tightened it doesn’t flex. The round plate is thick enough to inspire confidence, and the finish on the black components is consistent and smooth—closer to a satin than a glossy black, which helps it blend with most black fixtures. The decorative cover has some dimensional detail, so it doesn’t read as a flat plastic disc. It’s a simple touch that elevates the finished look.
The headline spec is a 50 lb weight capacity. I didn’t push the limit, but the way the bracket anchors into the can combined with the reinforced screws makes it feel notably more substantial than the flimsy adapter plates I’ve seen on budget kits.
Installation: genuinely DIY-friendly
I’d rate the install as straightforward if you’re comfortable with basic fixture swaps. My steps looked like this:
1) Turn off power at the breaker and confirm with a tester.
2) Remove the trim and baffle from the recessed can to expose the interior.
3) Adjust the kit’s bracket to the can opening and test-fit.
4) Mark and drill small pilot holes in the can’s inner wall.
5) Screw the bracket into the can and snug it down.
6) Attach the round mounting plate to the bracket.
7) Screw the E26 adapter into the can’s socket and route the lead neatly.
8) Fit the decorative cover and your pendant’s canopy, then secure the fixture.
Two notes from my experience:
Drilling into the can: You’ll likely need to drill a couple of small holes in the can to anchor the bracket. The thin can metal drills easily with a standard bit. If your can is older or flimsy, take your time—pilot holes and snug (not over-tight) screws are your friends.
Managing canopy fit: The included decorative cover is generous enough to hide typical 6-inch openings and paint lines. If your fixture uses a large or square canopy that overlaps the can’s opening awkwardly, dry-fit everything first. In a pinch, you can reorient the bracket or add a separate medallion to get full coverage and clearance.
From breaker off to bulb on, the whole job took me about 30 minutes, ladder time included. The instructions are clear, and all the required screws were there. I didn’t need any specialty tools—just a drill, a Phillips screwdriver, and a voltage tester.
Adjustability and compatibility
This kit is designed specifically for 6-inch cans, and the adjustable rail does a good job of accommodating variations in can diameter and trim tolerance. If you have 4-inch or oddball recessed housings, this isn’t the right solution. For standard 6-inch cans, it works well and locks down solidly.
The E26 adapter approach is the magic here—it lets you use the existing can’s socket for power, so you don’t have to open junction boxes or rewire in the ceiling. That’s great for renters or anyone who wants to avoid drywall dust. The flip side: you’re constrained by whatever circuit and switch control that can is on, and your dimming performance will depend on the bulb and that circuit.
The kit also supports surface mounting, which gives you an alternate path if you’re dealing with a non-standard can or want to anchor directly to the ceiling surface. If you go that route, be mindful of weight: tie into framing when you can, and use anchors rated for your fixture and substrate.
Weight rating and safety
The 50 lb rating is generous for most pendants and small chandeliers. I hung a medium-size pendant and the bracket didn’t flex or creak when I nudged it. That said, I wouldn’t treat 50 lbs as a hard target. For anything heavy, especially fixtures with dynamic loads (short chain plus a wide, heavy shade), I’d prefer a direct box-to-joist mount. This isn’t a ceiling fan solution, and it’s not the right tool for fixtures that require a fan-rated or brace box by code.
Practical safety pointers from my install:
- Confirm power off with a meter before touching anything.
- Keep wire leads tidy inside the can to avoid pinching under the canopy.
- Don’t over-tighten the bracket screws into thin can metal; snug is enough.
- Confirm your dimmer and bulb are compatible if you’re dimming.
The finished look
Aesthetically, the black finish blends well with modern black hardware, and the decorative cover does what it’s supposed to do: it hides the rough opening and screws without calling attention to itself. The slight dimensional profile helps it read as intentional—more like a small medallion than a trim ring. If you’re going for a crisp, tailored look in a kitchen or over an island, it’s a clean solution.
I also appreciate that the round mounting plate screws are positioned to be accessible while you’re supporting the fixture with one hand. Little things like that make working on a ladder less stressful.
Where it shines
- Quick upgrade without opening the ceiling: Uses the existing can and power, so there’s minimal mess.
- Solid hardware: The adjustable bracket and round plate feel stable and well-machined.
- Generous decorative cover: Hides the old can opening and gives a finished appearance.
- Clear instructions and complete hardware: No last-minute trips for odd screws.
What to watch for
- 6-inch cans only: If your home has 4-inch or oversized commercial cans, look elsewhere.
- Canopy compatibility: Large square canopies may need a different medallion or a creative bracket orientation.
- Drilling required: Plan on drilling small pilot holes in the can. It’s easy, but it’s not strictly tool-free.
- Don’t push the weight limit: It’s stout, but I’d stay well below 50 lbs and avoid dynamic loads.
Value and alternatives
Compared to hiring out a box move or replacing the can with a junction box and patching drywall, this kit is a bargain—in materials, time, and mess. Purpose-built “can-to-pendant” kits vary widely in sturdiness; this one lands on the better-built side without being overengineered. If you know you’ll eventually relocate the junction box or remodel the ceiling, this is a smart interim or long-term solution that won’t lock you in.
Who it’s for
- Homeowners wanting a fast, clean pendant swap in a standard 6-inch can
- Renters aiming for reversible upgrades without opening walls
- DIYers comfortable with basic fixture installs but not looking to rewire
- Anyone updating kitchens, islands, sinks, or entryways where a single can is begging to become a pendant
Recommendation
I recommend the Yiizon converter kit for anyone with a standard 6-inch recessed can who wants to install a pendant or small chandelier without opening the ceiling. The hardware is sturdy, the install is genuinely approachable, and the decorative cover gives a polished finish that hides the telltale signs of a retrofit. Stay mindful of the weight rating, dry-fit your canopy with the cover before final assembly, and expect to drill a couple of small holes in the can. If those caveats fit your project, this kit is an easy win that turns a bland can into a purposeful fixture point in under an hour.
Project Ideas
Business
Recessed-to-Pendant Retrofit Service
Offer a local service converting clients’ recessed 6" cans into stylish pendants. Package tiers: Basic (single conversion with standard shade), Designer (multiple conversions, custom shades, dimmer integration), and Staging (short-term installs for real estate showings). Pricing model: charge per fixture plus a design fee—$75–$250 per light depending on complexity. Emphasize quick installs, code-compliant wiring, and the kit’s proven 50 lb capacity for heavier fixtures.
Custom Pendant Kit Shop
Sell curated pendant kits that pair the conversion kit with custom-made shades (glass, metal, recycled materials) and matching bulbs. Offer bundles by room type (kitchen, bedroom, entryway) and cross-sell medallions, cord extenders, and dimmer-compatible bulbs. Use an online store and Instagram ads showcasing before/after transformations to drive sales. Margins come from shade design and assembly services.
Hands-on Workshops & DIY Classes
Host in-person or virtual workshops teaching homeowners how to convert recessed cans safely and creatively. Class format: safety & wiring basics, installing the kit, choosing and attaching shades, and styling tips. Charge per attendee ($40–$120) and upsell take-home conversion kits and shade-making materials. Partner with makerspaces, hardware stores, or community centers for venue and marketing.
Interior Staging & Lighting Refresh Packages
Target real estate agents and home stagers with a quick lighting refresh service to boost curb appeal and listing photos. Offer a rapid turnaround package converting key recessed lights to pendant fixtures (kitchen, entry, dining) with neutral, high-impact shades. Price per home package or per light; highlight how pendant fixtures draw attention and photograph better than recessed cans.
Subscription Accessory Program
Create a subscription that sends new interchangeable shades and decorative covers quarterly or seasonally to subscribers who already have the conversion kit installed. Tiers include basic paper/fabric shades and premium metal/glass editions. This encourages recurring revenue, keeps customers engaged with fresh looks, and leverages the kit’s easy retrofit nature—no electrician required for most swaps.
Creative
Mini Indoor Hanging Garden
Turn a converted recessed light into a suspended planter. Attach a lightweight decorative pot or macramé plant holder to the E26 socket cover (use the bracket to secure) and install a low-wattage, grow-spectrum LED bulb or small heat-safe wick light for ambience. Use multiple kits in a row at varying lengths to create a hanging plant corridor over a kitchen island or window. Benefits: brings greenery without floor space, uses existing wiring and the kit’s 50 lb capacity for heavier decorative pots if needed.
Clustered Multi-Pendant Sculpture
Create a custom pendant cluster by converting several adjacent 6" cans into a coordinated group. Use the adjustable fit to line up each kit, hang pendant shades at staggered heights, and wire the bulbs to the same circuit for a dramatic focal point. Materials: mix-and-match glass shades, metal cages, or fabric drum shades. Ideal above dining tables or large kitchen islands—the kit’s secure bracket and 50 lb rating let you use heavier designer shades safely.
Upcycled Mason Jar Chandelier
Use mason jars as shades: screw the jar lids to the kit’s E26 socket adapter (with a small hole for the bulb), or mount bulbs inside the jars with heat-resistant sleeves. The 3D decorative cover hides hardware for a polished look. Group 3–7 converted cans in a geometric arrangement to build a farmhouse-style chandelier that’s cheap, rustic, and easy to maintain.
Interchangeable Seasonal Pendant Shades
Make a modular pendant where the shade swaps quickly for holidays or style updates. Use the kit’s round ceiling plate and 3D cover for a consistent finished look; design lightweight clip-on shades (paper, fabric, thin wood veneer) that attach to the socket or collar. Offer four seasonal looks — e.g., woven rattan for summer, velvet for winter — and change the room’s mood without rewiring or repainting.
Artistic Light Mobile / Kinetic Fixture
Build a kinetic light mobile by suspending multiple converted pendants from a single ceiling medallion or beam, each on different-length cords. Integrate lightweight sculptural elements (acrylic panels, metal cutouts) that rotate gently with air flow. Use dimmable LED bulbs to create changing shadow patterns across a room—great for creative studios or children’s rooms.