Features
- The package length of the product is 18.29 inches
- The package width of the product is 18.29 inches
- The package height of the product is 19.69 inches
- The package weight of the product is 13.4 pounds
Specifications
| Color | White |
| Size | 3.5 Qt /3.3 liters (Pack of 1) |
| Unit Count | 1 |
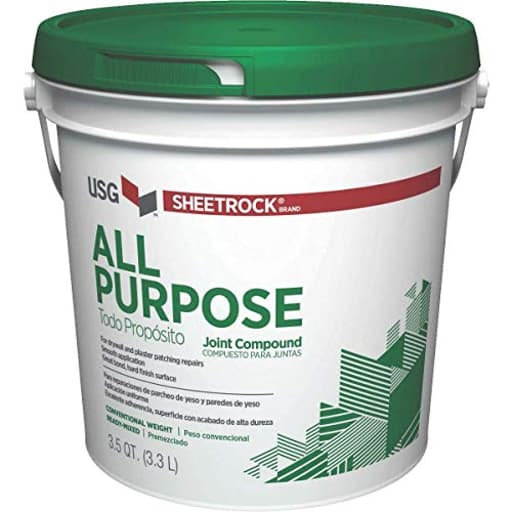
All-purpose joint compound in a 3.5‑quart (3.3 L) container for finishing drywall seams, embedding tape, and repairing minor surface imperfections. The white compound is supplied in a package measuring 18.29 × 18.29 × 19.69 inches and weighing 13.4 pounds.
USG Interiors U S GYPSUM 385140 385140004 All Purpose Joint Compound, 3.5 Qt Review
A reliable, forgiving mud for everyday drywall work
I reached for the USG all‑purpose joint compound on a recent string of small projects—patching nail pops, re-taping a few seams, and giving a tired bathroom a skimmed, paint-ready finish. In short, it behaved exactly how I want a premixed mud to behave: predictable, workable, and easy to sand. It’s a 3.5‑quart, white, ready-to-use compound that suits most interior patching and finishing tasks without fuss.
What’s in the tub
Out of the pail, the consistency is classic USG: dense enough to hold a knife edge, yet creamy with a quick mix. I always give premixed mud a quick temper before first use—either with a mixing paddle or just working it in a pan—and this one loosens nicely without separating. For base coats (embedding tape or building out shallow repairs), I used it straight from the tub. For finish passes and skim coating, I added a splash of water and mixed until it reached a smoother, almost yogurt-like flow. That small adjustment pays off in fewer knife marks and less sanding later.
The 3.5‑quart size (about 3.3 liters) hits a sweet spot for patches, bathrooms, and accent walls. It’s also genuinely portable; just note that joint compound is heavy for its volume. This tub weighs in around 13 pounds, so plan accordingly if you’re hauling multiple pails up stairs.
Application and workability
Embedding tape: I embedded paper tape over about 25 linear feet of repaired seams. The mud had enough body to support the tape without sagging, and it didn’t bubble—always my litmus test for good adhesion. Pulling a second pass to feather edges went smoothly, with minimal ridging.
Patching and nail pops: For shallow divots and nail heads, it filled cleanly without excessive shrinkage. Small repairs were often ready for a light sand and spot-coat the same day.
Skim coating: I skimmed a lightly textured bathroom with three thin coats. After adding a bit of water to thin the mix for the second and third passes, the mud spread predictably and feathered out well with a 12‑inch knife. The finish was consistent and took primer evenly after a quick sand.
In all cases, it resisted tearing and pinholing as long as I didn’t overwork it. If you keep your knives clean and don’t chase every minor imperfection while it’s wet, it rewards you with a smooth surface once dry.
Dry time and sanding
Dry time is always at the mercy of temperature, humidity, and coat thickness. With thin, well-feathered coats in a conditioned space, I could sand in about 3–5 hours. Thicker fills or humid rooms deserved overnight. That’s typical for an all-purpose premix. If you need a guaranteed same-day turn on heavy fills, a setting-type compound (hot mud) is a better choice, but you’ll sacrifice some sanding ease.
Sanding is where this mud shines. It powders up with minimal pressure and doesn’t clog paper quickly. For dust control, I like a damp sponge over high-spot ridges before a final pass with 220-grit. Used that way, I kept airborne dust to a minimum and still hit a Level 4 finish with little effort.
Finish quality and paintability
The finish quality is more than respectable for an all-purpose mud. After three coats and careful feathering, my bathroom walls took a high-adhesion primer with no flashing or dull spots. Paint laid down uniformly with a roller—no telegraphing of seams, and no soft edges revealing themselves under angled light. On patched areas, one prime coat and two finish coats blended seamlessly into existing surfaces.
Adhesion to previously painted drywall was solid after a basic scuff and wipe-down. If you’re going over glossy surfaces, plan on a bonding primer first—sound practice regardless of the compound you choose.
Storage and keeping it fresh
Premixed mud will skin or harden if you give it a chance. The pail’s seal is decent, but it isn’t magic. Here’s what worked well for me:
- Immediately wipe the rim clean before closing so the lid seats fully.
- Lay plastic wrap directly on the mud surface when the tub is partially used, then snap the lid on. This limits air exposure and prevents dry chunks from forming.
- If a thin skin forms, peel it off completely; don’t stir in dried bits. If the remaining mud stiffens slightly, add a tablespoon or two of clean water and re-temper.
Stored this way, my partially used tub stayed workable for weeks. If you plan to set it aside for months, transfer to an airtight container or finish the tub and buy fresh later.
Coverage and value
Coverage varies wildly with technique, but as a real-world benchmark: the 3.5‑quart pail handled a bathroom skim (about 50 square feet, three light coats) plus a dozen patch repairs with a little left over. For bigger jobs—full-room tape-and-finish, or multiple rooms—you’re better served by a 4.5–5 gallon bucket for both cost and continuity. For small to mid-size projects, this size is economical and wastes less.
Compared to lightweight spackles, the cost per ounce is significantly lower, and you get a compound that behaves more like what professionals expect: better feathering, smoother sanding, and trustworthy adhesion for tape.
Limitations and trade-offs
It’s not fast-setting. If you need to fill deep voids and paint same-day, a setting compound in 20–45 minute formulas will be quicker (though harder to sand).
It can dry out in storage. That’s true of any premix, but all-purpose mud is particularly prone to skinning. Good lid hygiene and plastic wrap mitigate this, but it’s something to manage.
Not for wet areas or exterior use. Use a setting-type compound and appropriate backer in high-moisture zones, and always prime and paint per spec.
Mesh tape caveat. While it’ll work with mesh, I still prefer paper tape with all-purpose mud to reduce the risk of hairline cracks, especially on butt joints.
Tips for best results
Mix before you start. A minute with a paddle or quick pan work-up eliminates pockets and yields a consistent feel.
Thin for finish coats. Add small amounts of water until it flows cleanly off the knife for your second and third passes.
Use the right knives. A 6-inch for fills, 8–10-inch for second coats, and a 12-inch for final feathering keeps edges invisible.
Sand smarter. Knock down ridges with a damp sponge before a light, final sand to reduce dust and save time.
Prime thoughtfully. A quality drywall primer locks everything in and prevents flashing under topcoats.
Who it’s for
DIYers tackling patches, accent walls, or a bathroom refresh will appreciate its forgiving sanding and reasonable dry times.
Pros needing a reliable premix for small punch-list items, minor skim work, or touch-ups between larger jobs will find it dependable and consistent across tasks.
If your workload is predominantly large-scale finishing or time-critical repairs, keep a hot mud on hand and stock larger pails. For the everyday breadth of interior drywall work, this 3.5‑quart premix checks most boxes.
Recommendation
I recommend the USG all‑purpose joint compound as a dependable, easy-to-sand premixed mud for small to medium interior projects. It spreads cleanly, feathers well, and produces a paint-ready surface with minimal drama. While it isn’t the fastest option for deep fills and requires a bit of care in storage, the overall workability, finish quality, and practical size make it a smart choice for both homeowners and pros who value predictable results without wrestling the product.
Project Ideas
Business
Patch & Texture Match Service
Offer a local handyman niche specializing in drywall repair, texture matching, and seam finishing for homeowners and landlords. Market quick-turn small jobs (holes, water damage, texture blending) where a 3.5 qt tub is the ideal job-size; charge flat-rate service fees plus travel.
Custom Wall Panel Shop
Make and sell bespoke textured wall panels or medallions online (Etsy, Shopify) and to interior designers. Use the joint compound to produce signature textures in batches, then prime, finish, and ship framed panels as ready-to-hang décor.
DIY Workshops & Pop-up Classes
Run hands-on workshops teaching texture art, faux plaster finishes, or small repair skills. Charge per participant and sell take-home kits (including a small portion of compound, a mini trowel, and stencil)—great for craft stores, maker spaces, or weekend markets.
Texture Art Kits & Digital Guides
Productize what you teach: assemble beginner kits (sample of joint compound sized to match the 3.5 qt tub, tools, stencil, instructions) and sell them with downloadable video tutorials. Offer tiered bundles (basic, pro, pro-plus with extra stencils) and use subscription options for seasonal texture packs.
Content & Affiliate Channel
Create short-form video content (TikTok/Reels/YouTube) focused on quick drywall hacks, texturing techniques, and creative transformations using joint compound. Monetize via ad revenue, sponsored posts, affiliate links to tools and materials, and drive traffic to your services or kits.
Creative
Relief Wall Art Panels
Use the joint compound to build low-relief art panels on plywood or stretched wood panels. Apply in layers with trowels and spatulas, carve or press textures while wet (lace, stencils, natural objects), sand smooth when dry, then prime and paint with acrylics or metallics for gallery-style wall pieces sized to fit the 3.5 qt supply range.
Faux-Plaster Planters & Sculptures
Create lightweight sculptural planters and decorative objects by layering joint compound over recyclable forms (cardboard, foam, or recycled plastic). Reinforce with burlap or fiberglass mesh between layers for strength, sand and seal with a weatherproof acrylic or resin for indoor/outdoor use.
Decorative Frames & Architectural Appliqués
Build ornate picture frames, ceiling medallions, or decorative moldings by applying and shaping compound in stages or using simple molds. Once cured, sand, prime, and gild or paint to look like plaster or aged wood—perfect for vintage restoration or bespoke interior accents.
Textured Furniture Makeover
Upcycle tabletops, cabinet doors, or drawer fronts by creating carved or raised textures with joint compound (stenciling, combing, or freehand sculpt). After drying, sand, paint, and seal; the compound fills imperfections and adds a designer finish for a fraction of replacement cost.
Small Sculptural Jewelry & Ornaments
For small, decorative items (ornaments, pendants, charms), press thin layers of compound into silicone molds or texture stamps, allow to cure, then seal and paint. Combine pieces with resin backings or metal findings to stabilize and waterproof—best for decorative rather than wearable-heavy jewelry due to compound weight.