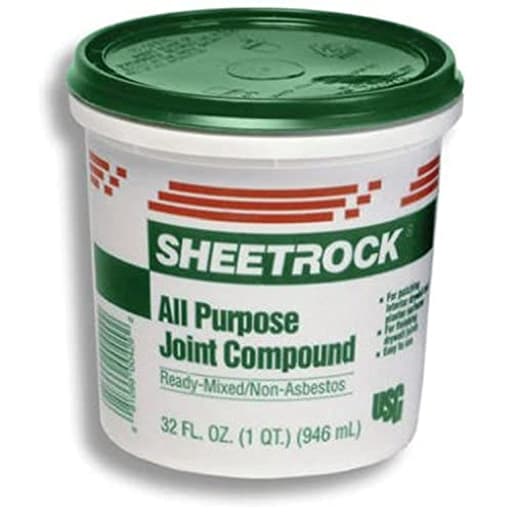
Features
- This item is U S Gypsum #380270 Quart Ready-to-use joint Compound
- Used for Painting Supplies Caulk & Sealants
- This product is Manufactured in United States
- Package Dimensions : 15.68" L x 10.48" W x 5.25" H
Specifications
| Color | Off-White |
| Size | 1.75 pt |
| Unit Count | 1 |
Ready-to-use off-white joint compound supplied in a 1.75-pt container for filling, finishing, and repairing drywall joints, seams, and fastener indentations. Intended for painting and caulk/sealant applications and manufactured in the United States.
U S GYPSUM 380270072 U S Gypsum 380270 Quart Ready-To-Use Joint Compound, Off-White, 1.75 pt Review
Why I reached for this small tub
I keep a rotating cast of joint compounds in the shop, but for small drywall fixes around the house—nail pops, a few seam touch-ups, and the occasional patch—I prefer a ready-mix in a small container. This USG joint compound in the pint-and-change size has become an easy grab for those jobs. It’s a pre-mixed, off‑white compound that comes sealed and genuinely ready to go, no measuring powder or chasing the right water ratio. For quick repairs where pulling out a full gallon or a bag of setting compound feels excessive, this size just makes sense.
First impressions and setup
The tub arrives with a shrink band around the lid, which sounds trivial until you’ve had a container weep its contents in transit. Inside, the compound presents as a medium-bodied mix—thicker than a lightweight spackle, but not so dense that it fights the knife. I still give it a quick stir with a clean 6-inch knife or a small paddle before first use; like most ready-mix products, it benefits from a brief retemper to even out the consistency. If you prefer a slightly creamier spread, a tablespoon or two of clean water worked in thoroughly will loosen it without compromising adhesion.
Color-wise, it goes on a grayish cast and dries to an off-white. That shift is helpful when you’re working multiple areas and want a quick visual check on what’s ready for sanding.
Application: predictable and forgiving
Where this compound shines is predictability. It keys well into properly prepped drywall and tapers cleanly with a 4- to 8-inch knife. For screw holes and small dents, I can fill, blade it nearly flush, and call it good. For wider repairs or taped seams, I apply in thin coats, feather the edges, and plan on at least two passes to manage shrink-back.
Adhesion has been solid. On bare paper, painted walls, and previously primed areas, I’ve had no lifting or edge curl. As always, prep matters: knock down any high spots, remove loose paper, scuff glossy paint, and dust the surface. On deeper divots or cut patches, a quick perimeter coat to prime the edges before the main fill helps keep bubbles at bay.
Dry time and shrinkage
This is a pre-mixed drying-type compound, so expect moisture to evaporate rather than a chemical set. In practice, that means:
- Thin fills and skim coats can be sandable in a few hours in warm, dry conditions.
- Heavier fills or cool, humid spaces can push dry time toward overnight.
- There will be some shrinkage, more noticeable in deeper holes and along butt joints.
None of that is a knock on the product—just the nature of the category. If speed is critical or you’re building out a deep patch in one session, a setting-type compound (e.g., a 20- to 45-minute powder) is faster and shrinks less. For routine patch work and finish coats, I’ve been content to let this sit and come back later the same day or the next morning.
Sanding and finishing
Sanding is pleasantly straightforward. Once fully dry, the surface powders nicely under a fine sanding sponge or 220-grit paper, and it feathers into surrounding paint without clogging the abrasive. To reduce dust in lived-in spaces, I often do a quick “wet sand” with a barely damp sponge to knock down edges and ridges, then finish with a light dry sand. The off-white finish takes primer evenly; I still recommend a dedicated drywall primer before paint, especially on larger repairs, to avoid flashing.
One practical tip: before you sand, run a finger across the patch. If it still feels cool or tacky, it isn’t fully dry. This compound’s color shift is helpful, but touch remains the best indicator.
Handling, storage, and the lid problem
The container itself is compact and easy to tote. The lid seals well, but like most ready-mix tubs, dried crumbs can form around the rim and rain into the surface the next time you open it. Two habits help:
- Wipe the rim clean before closing the lid.
- Lay a piece of plastic wrap directly on the surface of the mud before sealing to prevent a skin from forming.
If you’ve thinned the compound, mix it smooth before adding plastic wrap, and label the lid with the date; a lightly thinned tub holds well for the duration of small projects if stored cool and sealed.
Where it fits in a kit
I reach for this USG tub when:
- I’m doing cosmetic work—nail pops, screw holes, picture-hanger divots, and small corner or seam touch-ups.
- I want a clean, easy-sanding finish coat over setting compound on a deeper patch.
- I’m working in a finished space and don’t want to mix powder or clean a hawk and pan repeatedly.
For truly tiny jobs, a palm-sized spackle is still faster. For larger repairs—multiple linear feet of seam or a full patch that needs building—a gallon box or a setting-type powder is more economical and time-efficient. This small tub sits comfortably between those extremes.
Performance notes from the field
A few observations from real use:
- Consistency out of the tub is a hair thicker than some lightweight compounds, which I like for initial fills—it stays where I put it and doesn’t slump on verticals. For skim coats, a splash of water makes it glide.
- Coverage is good for the size. One tub easily handled a dozen screw holes, several nail pops, and a small 6-by-6-inch patch over two coats, with material to spare.
- It dries harder than lightweights, which is good for durability in high-touch areas, but still sands without much fight.
- The gray-to-off-white color shift is genuinely useful. It’s subtle but noticeable enough to keep you from sanding too soon.
Cost and size considerations
Per ounce, small tubs are rarely the best value. If you’re tackling a room’s worth of work, step up to a larger container. That said, wasting half a gallon that skins over between sporadic projects isn’t value either. For homeowners and pros who do occasional service work, this size makes practical sense: less storage, less waste, and enough material to get through a round of repairs without multiple store runs. Personally, I wouldn’t mind an even smaller option for single-room redecorating, but this strikes a reasonable balance.
Compatibility and limitations
- Interior use only; don’t use joint compound outdoors or in persistently wet locations.
- Avoid trying to bridge gaps that actually need backing or patch support; use proper drywall patches, tape, or backing boards as required.
- Prime before paint, especially on larger or multi-coat areas, to ensure uniform sheen.
- Keep dust in mind. Even “easy-sanding” compounds create fine particulate—use a sanding sponge with a vacuum attachment or wet-sand where you can, and wear a respirator if you’re doing more than a few minutes of sanding.
The bottom line
This USG joint compound earns a spot in my kit for small interior drywall repairs. It spreads predictably, adheres well, sands cleanly, and the subtle color change helps judge dry time. Expect the typical trade-offs of a pre-mixed mud: slower drying than setting compounds and some shrinkage on deeper fills. The compact tub is convenient and well-sealed, though, like most ready-mix containers, you’ll want to keep the rim and surface tidy to avoid dried bits contaminating fresh material.
Recommendation: I recommend this compound for homeowners and pros who need a reliable, ready-to-use mud for patch work, screw holes, light seam repairs, and finish coats. It’s not the fastest option for deep builds and it’s not the cheapest per ounce, but for small jobs where convenience, clean handling, and a predictable finish matter, it does exactly what it should with minimal fuss.
Project Ideas
Business
Micro Patch & Prep Service for Landlords
Offer a fast, low-overhead service that patches nail holes, dents, and seam imperfections between tenants. Use the quart-ready compound for quick turnarounds, charge per patch or per room, and upsell pre-painting and minor touch-ups. Market to local landlords, property managers, and Airbnb hosts.
DIY Mini Patch Kits (Etsy/Amazon)
Package small jars of the ready-to-use compound with a mini putty knife, sandpaper, step-by-step instructions, and a branded label. Sell as 'quick fix' kits for renters and homeowners who need to patch holes before moving or painting. Position kits as convenient and mess-minimizing compared with large tubs.
Workshops: Faux Plaster & Texture Finishes
Host hands-on classes teaching techniques for decorative textures, faux plaster, and furniture upcycling using joint compound. Charge per attendee, provide kits (small jars, tools), and offer follow-up online tutorials or starter kits for additional revenue. Partner with local craft stores or maker spaces for space and audience.
Custom Textured Wall Panels for Short-Term Rentals
Create bespoke textured accent panels or focal-wall inserts to help Airbnbs and boutique rentals stand out in photos. Produce off-site using compound on lightweight substrates, paint/seal, then deliver and install. Market through local property managers, photographers, and interior stylists.
Etsy Shop: Handmade Textured Home Goods
Design a line of small home goods—coasters, decorative tiles, planter covers, and wall hangings—made from shaped and sealed joint compound. Emphasize unique textures, neutral palette, and handcrafted appeal. Use the quart size to prototype and keep inventory small; scale with repeatable molds and branded packaging.
Creative
Low-relief Wall Tiles
Spread the ready-to-use joint compound on small wooden or MDF panels to sculpt low-relief designs (botanical motifs, geometrics, lettering). Let dry, sand smooth, prime, then paint or gild. Create sets that hang as modular wall art or a single statement tile — great for customizing entryways or shelving nooks.
Faux Ceramic Jewelry & Pendants
Press the compound into silicone molds or shape freehand into small pendants, beads, and cabochons. After curing, sand edges, seal with a water-resistant primer, and finish with acrylic paint, metallic wax, or glaze. Lightweight, off-white surfaces take color well and make unique handmade jewelry pieces.
Textured Furniture Accents
Use stencils, palette knives, or stamps to apply raised textures and architectural details to drawer fronts, tabletops, and cabinet doors. Once dry, sand and paint or antiquewash for a shabby-chic or faux-plaster finish — a low-cost way to upcycle thrift-store furniture into boutique pieces.
Scale Model Terrain & Diorama Scenery
Build rocks, cliffs, cobblestones, and ruined walls for model railways, wargaming boards, or dollhouses by carving and sculpting the compound while it’s workable. Paint and flock when cured to achieve realistic terrain features at small scale.
Mini Sculptures & Relief Panels
Create small standalone sculptures or narrative relief panels by layering the compound over an armature (cardboard, wire, or wood backing). Carve details as it firms, sand, then paint or patina. Because the container is convenient for small batches, it’s ideal for experimentation and limited runs.