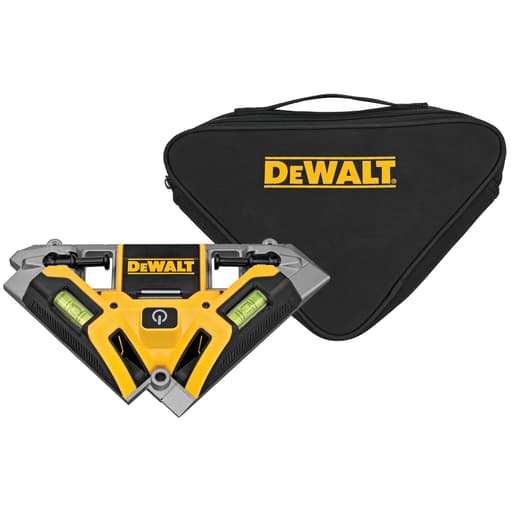
Features
- Includes three integrated mounting pins to affix laser to wall surfaces
- Accuracy ±3/16 in. at 33 ft.
- Three bubble vials for positioning (0°, 45°, 90°)
- IP54 debris/water resistance
- Aluminum base for durability
- Includes tool pouch for storage
Specifications
| Max Laser Distance (Ft.) | 33 ft. |
| Measurement Accuracy | ±3/16 in. at 33 ft. |
| Laser Color | Red |
| Number Of Beams | 2 |
| Laser Classification | Class 2 |
| Compatible Battery Type | AA |
| Number Of Batteries Included | 3 |
| Included Items | (3) AA batteries; 3 mounting pins; tool pouch; owner's manual |
| Ip Rating | IP54 (debris/water resistant) |
| Product Height | 4.1 in |
| Product Width | 9.1 in |
| Product Length | 10.3 in |
| Weight | 1.65 lbs |
| Manufacturer Warranty | 3-Year Limited Warranty; 1-Year Free Service; 90-Day Satisfaction Guaranteed |
Related Tools

Related Articles

Laser square that projects two red beams at 90° for laying out square reference lines. Designed for indoor layout tasks such as tile floors, backsplashes and wall layouts. The unit has an aluminum base, three integrated mounting pins for temporary attachment, three bubble vials for basic leveling, and an IP54 rating for debris and water resistance. Includes batteries and a storage pouch.
DeWalt 33 ft. Twin Red Beam Square Laser Level Review
Why I reached for this laser square
For tile and wall layout, I prefer tools that reduce guesswork rather than add new steps. A laser square does exactly that: it throws a crisp 90-degree reference where you need it so you can start laying out without juggling tapes, squares, and chalk lines. I’ve been using the DeWalt laser square for a string of interior jobs—tile floors, a couple of backsplashes, and a closet system layout—and it’s a straightforward, purpose-built tool that fits neatly into that workflow.
Build and setup
The unit is compact and solid, anchored by an aluminum base that resists flex and dings. It feels more like a layout jig than a delicate electronic, and that confidence matters when you’re dragging it across concrete or setting it down among thinset, spacers, and trowels. The IP54 rating isn’t a license to dunk it, but it shrugged off dust and the occasional splash from a sponge cleanup without complaint.
Setup is intentionally simple. There’s no motorized self-leveling; instead you get three bubble vials—0°, 45°, and 90°—to square and orient the base. For floor work, I set the unit on the substrate, tweak the position until the vials are centered, and start marking. For wall work, the integrated mounting pins are surprisingly practical. A gentle push into drywall or soft wood holds the tool where you want it while you level. You’ll get tiny pinholes, so I avoid them on finished surfaces, tile, or masonry. On painted drywall that’s about to get tiled or covered, they’re a time-saver.
The package includes AA batteries and a pouch. The pouch is basic but decent, and the batteries got me through multiple small jobs before I swapped them. It’s the kind of kit you can toss in a bag and trust to be ready when you arrive on site.
Beams, visibility, and accuracy
This tool projects two red beams at 90 degrees to establish a square. The stated accuracy is ±3/16 inch at 33 feet. In practice, used within typical room ranges, it kept my grids true and repeatable. For tile and wall layout, where you’re working from reference marks and checking as you go, that spec is appropriate. If you’re trying to control long cabinet runs or layout across open-plan spaces at the far end of the tool’s range, keep an eye on cumulative error and re-establish references midway.
The beam profile is on the wider side, which has pros and cons. The upside: it’s easy to see against light surfaces indoors. The trade-off: you need to be consistent about which edge of the beam you reference for measurements and marks. I pick the same beam edge every time (usually the left edge), and that habit alone improves consistency more than any incremental accuracy spec.
Visibility is squarely “indoor red laser.” In dim to normal interior light, it’s fine. In bright, sun-washed rooms or near windows at midday, the line fades. Outdoors in daylight, it’s not practical. If you need outdoor viability or long, sunlit runs, you’ll want a green-beam line laser with a receiver or a different layout method. For what it’s designed to do—interior layout up to 33 feet—it performs as expected.
On floors: tile layout done quickly
Where this tool shines is tile layout. For a bathroom floor, I positioned the base roughly in the center of the space, leveled it, and used the beams to establish a dead-square grid. From there, I marked reference lines, measured to balance cuts at the walls, and snapped chalk lines for the first course. The 45-degree vial earns its keep when you’re laying a diamond pattern; it makes setting an accurate diagonal axis straightforward.
An aluminum base helps it sit flat and resist shifting while you work around it. On uneven floors, I shim with thin tile wedges until the vials read true, then transfer marks. You can move the tool along your snapped lines to extend references into adjacent rooms, repeating the check-and-mark process as you go.
Practical tip: make your marks just off the beam and pull a precise chalk line when you’re happy. That way, traffic and thinset don’t obscure your references, and you’re not trying to sight a laser through dust.
On walls: backsplashes and layout lines that stick
For a kitchen backsplash, I used the mounting pins to park the tool on drywall just above the countertop, leveled the base, and cast an L-shaped reference that made quick work of aligning mosaics. The pins hold well enough that you can reposition between outlets without resorting to tape or a helper. Just remember the pinholes—plan for them to be concealed by tile or caulk.
The beams are useful for stud layout and shelving systems too. Setting the 90-degree beam at a fixed offset from a corner lets you create a vertical/horizontal grid to hang cleats or shelf standards in a square pattern. It’s not a replacement for a dedicated cross-line laser with plumb and level functions, but as a squaring tool, it’s clean and efficient.
Durability and day-to-day use
Nothing about the tool feels fragile. I tossed it in the pouch, into a tote with spacers and levels, and it kept its calibration. The IP54 rating is reassuring on dusty reno sites; I still wipe it down before storing and avoid exposing it to heavy spray or mud.
Power is standard AA, which I prefer on simple lasers. You’re not tied to a charger, and spares are easy to keep on hand. I didn’t notice aggressive drain or flicker—even late in the battery cycle, the beams stayed consistent indoors.
What it doesn’t do
A few limitations are worth calling out so you can match the tool to the task:
- Manual leveling only. You need to read vials and adjust the base. It’s not slow, but it’s not the “set it down and go” experience of a self-leveling line laser.
- Indoor-focused red beams. In strong daylight—especially outdoors—the lines wash out.
- Two-square beams only. It doesn’t project plumb or level planes around a room, and there’s no receiver mode for long-distance work.
- The beam width means you have to choose a reference edge and stick with it for accuracy.
None of these are faults; they’re characteristics of a purpose-built square laser. But it’s important to understand them before you buy.
Who will appreciate it
If your work involves frequent tile layouts, wall paneling, wainscoting, or any task where a reliable 90-degree reference speeds things up, the DeWalt laser square fits nicely. Remodelers, tile setters, and finish carpenters working indoors will get the most from it. If your needs lean more toward general leveling, plumb lines, or exterior layout, a different style of laser is a better investment.
Value and warranty
The package includes the laser, three AA batteries, mounting pins, and a pouch. The aluminum construction and IP54 rating give it a leg up on no-name options, and DeWalt backs it with a 3-year limited warranty, one year of free service, and a 90-day satisfaction guarantee. That support matters if this is a tool that will live in your kit long-term.
Bottom line
I like this tool for what it is: a simple, durable square laser that speeds up indoor layout. It’s quick to set, reliable within its spec, and the mounting pins make wall work easier than balancing a tool on a ledge or hauling out improvised jigs. The trade-offs are clear—manual leveling and limited visibility in bright light—but they’re easy to live with if your work is primarily indoors.
Recommendation: I recommend the DeWalt laser square for interior layout tasks—especially tile and backsplash work—where a dependable 90-degree reference saves time. Choose it if you value a rugged, straightforward tool and don’t need self-leveling or outdoor visibility. If you need bright daylight performance or multi-plane leveling and plumb, look at a green-beam, self-leveling line laser instead.
Project Ideas
Business
Laser-Straight Accent Wall Service
Offer turnkey geometric paint or wood-slat feature walls using the laser to map perfect 90° and 45° lines. Sell flat-rate packages (e.g., small/medium/large wall) with upgrades for layered molding, two-tone schemes, or LED inlays.
Tile Layout and Prep Consulting
Provide pre-install layout: establishing square reference lines, centering patterns, and dry-fitting for bathrooms, backsplashes, and entryways. Charge per room; partner with tile installers to reduce waste and callbacks by keeping layouts true (±3/16 in at 33 ft).
Gallery Wall & Signage Installations
Serve realtors, Airbnbs, and retail by installing gallery walls, menu boards, and wayfinding with clean, square alignment. Upsell hardware, wire management, and quick-turn seasonal refreshes for new listings or promotions.
Event Floor Marking and Booth Layout
Use the twin beams to mark square booth perimeters, aisle lines, and floor decals at expos and pop-ups. The IP54 rating handles dusty halls; charge hourly or per-booth with add-ons for vinyl application and teardown.
Weekend Laser Level Rental Kit
Rent the laser with fresh AA batteries, painter’s tape, chalk line, and a quick-start guide. Offer optional on-site setup for first-time users and sell consumables; target DIYers tackling tile, accent walls, or sign installs.
Creative
Geometric Wall Mural
Project two perpendicular beams to tape out crisp squares, rectangles, or diamonds across a feature wall. Use the 45° bubble vial to add diagonals for chevron or argyle patterns, pinning the laser to drywall with the integrated mounting pins so it doesn’t drift while you paint.
Herringbone Backsplash (Tile or Peel-and-Stick)
Set a consistent 45° baseline with the bubble vial and run materials off the laser for a perfect herringbone or chevron backsplash. The 90° beams keep starts square at corners and the IP54 rating tolerates dust from tile cutting.
Precision Gallery Wall
Lay out a grid for frames, shelves, or acoustic panels so rows and columns are square over long spans (up to 33 ft). The twin beams help establish consistent reveals and spacing around TVs or doorways.
Parquet Tabletop or Wood-Slat Headboard
Build a parquet or checkerboard tabletop by aligning slats to the projecting square lines. The aluminum base keeps the laser steady while you glue and clamp, ensuring tight, true joints.
LED Light Strip Ceiling Design
Create a modern ceiling feature by running LED channels in perfect squares or rectangles using the crossing beams as your reference. Use mounting pins to keep the laser fixed while fastening channels and diffuser covers.