Features
- JAMB REPAIR KIT – With Prime-Line’s Jamb Repair and Reinforcement Kit, you can easily secure weak spots and replace the smaller, vulnerable latch and deadbolt strikes commonly installed with entry door hardware
- HOME SECURITY – This easy fix can add additional home security and help prevent forced entry
- WHITE POWDER-COATED FINISH – The steel components add extra security and come in a white powder-coated finish that will blend right in with your door
- THICKNESS – When fully installed, the kit provides up to 12 gauge thickness at a total height of 59-1/2 inch
- NON-HANDED – The hardware included with this kit is non-handed, allowing it to be used on left or right-handed, single, and double hinged door systems
- NOTE – Please refer to the line art for dimensions and compare with your needs before ordering
- Used to repair and reinforce damaged and vulnerable area of door jamb
- 1-15/16 in. x 59-1/2 in. when all components are installed
- White in color
- Constructed of steel
Specifications
| Color | White |
| Size | 59-1/2 in. |
| Unit Count | 1 |
| Edition | DOORSTOP |
Related Tools
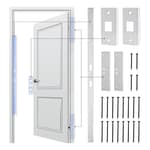
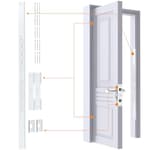
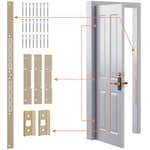
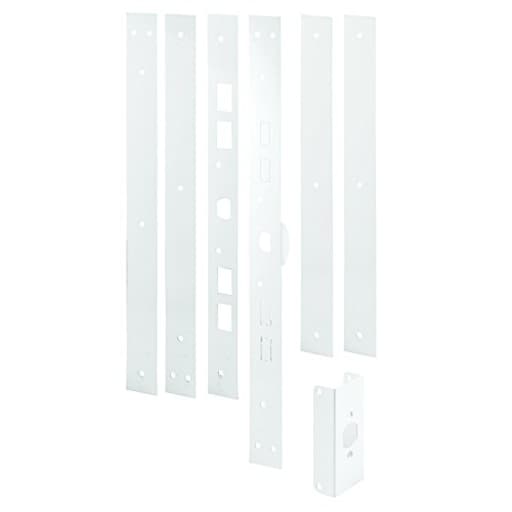
A jamb repair and reinforcement kit designed to repair damaged or vulnerable areas of an entry door jamb and to replace smaller latch and deadbolt strike plates. The steel components have a white powder-coated finish; when fully installed the assembly measures 1-15/16 in × 59-1/2 in and provides up to 12-gauge thickness, and the non-handed hardware fits left- or right-handed, single- and double-hinged door systems.
PRIME-LINE U 11026 Jamb Repair and Reinforcement Kit, 59-1/2 In. Installed, Steel Construction, White Review
Why I chose this kit
I installed the Prime-Line jamb reinforcement kit after spotting subtle pry marks around a back entry door. The door latched and deadbolted fine, but the standard strike plates were the weak link—short screws into soft wood and a small area taking all the force. I wanted a reinforcement that would spread impact into the framing without turning the project into a full jamb replacement. This kit checked the right boxes: steel construction, long coverage, an overlapping design, and a finish that wouldn’t look out of place on painted trim.
Build and design
The kit is made of steel with a white powder-coated finish. Fully assembled, it spans roughly 59-1/2 inches along the strike side and measures 1-15/16 inches wide. It’s a layered system: a main center plate around the latch/deadbolt area plus upper and lower plates that slide under the center, offsetting the seams. When fastened with long screws, the sandwich creates up to 12-gauge thickness over the critical area. It’s non-handed, so it works on left- or right-hinged doors and on single or double doors.
A couple of thoughtful touches stood out in use:
- The overlapping layout means you’re not wrestling a single long, floppy piece during install. Alignment is easier, and the joint offsets help distribute force.
- The cutouts for latch and deadbolt are rectangular punch-outs in the center plate. They accommodate the common spacing between lockset and deadbolt without guesswork. If your spacing is nonstandard, you can still modify the openings.
- The white powder coat blends with most painted jambs and stops. It’s smooth but durable enough to resist scuffs during install.
The kit also includes small door-edge reinforcers for the latch and deadbolt side of the door slab. Whether those fit depends on your door’s existing clearances; more on that below.
Installation experience
On my first door, the install took about 90 minutes with careful layout. The second door went in just under an hour. Here’s how I approached it:
- Mark references: With the door closed, I marked the top and bottom of the latch and deadbolt on the stop, then removed the original strike plates.
- Test-fit the center plate: I popped out the appropriate rectangular cutouts for my latch and deadbolt and aligned the plate with my marks. I checked the door swing to make sure the door wouldn’t rub the plate.
- Predrill: I marked the screw holes, removed the plate, and predrilled pilots into the jamb and framing behind it. For hardwood jambs, don’t skip this; it prevents screw snapping and keeps the plate square.
- Fasten long screws: I set the center plate first, driving the long screws through the jamb into the stud. Then I slid the upper and lower plates under the center piece and fastened those.
- Adjustments: I checked latch engagement and deadbolt throw before fully sinking every screw. On my back door the reveal was snug; backing out a couple of hinge screws and swapping them for longer ones pulled the door over a hair and preserved clearance.
Tools I found helpful: a square, an awl for precise hole marking, a sharp 1/8-inch drill bit for pilots, a countersink to prevent raised fibers, and a Dremel with a small cutoff wheel in case you need to fine-tune the lock openings.
Fit and compatibility
- Door swing: The kit is non-handed and worked cleanly on my inswing doors. If you’re reinforcing an outswing entry, consider how and where you want fasteners exposed; this style is primarily suited to inswing residential doors with interior stops.
- Lock spacing: The pre-scored punch-outs cover common lock spacing, but I encountered a door with a wider center-to-center dimension. A few minutes with a Dremel made it a nonissue. Measure your spacing before you start.
- Jamb clearance: If your door-to-stop gap is already tight, you may need to slightly chisel or plane the stop, or tweak hinge depth. On one jamb I set the plates without modification; on another I relieved the stop a bit for a flush fit.
- Door-edge guards: These are a nice bonus, but on one of my doors they would have added just enough thickness to cause rubbing. I left them off that door and still gained most of the benefit from the jamb reinforcement.
Performance and security impact
After installation, the door feels notably more “anchored.” The latch engages more precisely, and the deadbolt throws into a steel-framed opening rather than a small strike plate pocket. The biggest change isn’t just the thickness around the deadbolt—it’s how the load is spread across nearly five feet of jamb and into the framing with multiple long fasteners.
A few practical points if you’re doing this for security:
- Replace hinge screws: Reinforcing the strike side is only half the equation. Swap at least one screw per hinge (ideally all) for 3-inch or longer screws into the framing. Check the door’s swing after doing so; you may need to adjust.
- Verify bolt throw: Your deadbolt should fully extend (typically 1 inch). If your door shift has limited the throw in the past, correct that during install.
- Anchor into the stud: Long screws are only effective if they reach solid framing. If your jamb is badly damaged from a prior break-in, rebuild the substrate first.
No reinforcement is a guarantee against every attack, but this setup meaningfully raises the effort required for a kick or pry attempt and shifts the likely failure point away from the strike area.
Aesthetics and finish
On painted trim, the white powder coat looks intentional—more like a continuous door stop detail than an add-on. The visible screws read as utility, not decoration, but they’re tidy. On stained or natural wood trim, the white strip will stand out; you can scuff and paint the surface to blend. Powder coat takes enamel well if you lightly sand and degloss first.
What I liked
- Smart overlapping design that’s easier to install than a single long rail
- Steel reinforcement up to 12-gauge thickness where it matters
- Long coverage that spreads load into the framing
- Non-handed hardware and adaptable latch/deadbolt openings
- White powder-coated finish that integrates with painted surrounds
- Solid value compared to piecing together heavy-duty strikes and ad-hoc plates
What could be better
- The pre-scored lock openings cover common dimensions, but atypical spacing requires careful trimming
- Door-edge reinforcers are situational; on tight reveals they can add too much thickness
- If your stop-to-slab gap is minimal, plan on minor chiseling or hinge adjustments
- Instructions could be more legible and explicit about the overlapping sequence and test-fit steps
Tips for a smoother install
- Take five minutes to mark the exact top and bottom of both latch and deadbolt on the stop before disassembly.
- Pilot every hole and consider waxing long screws to reduce friction.
- Dry-fit all three plates and cycle the door before you commit to final screw depth.
- Keep a file or Dremel handy for fine-tuning the rectangular openings if your center-to-center spacing isn’t standard.
- Upgrade the hinge-side screws at the same time.
Who it’s for
This kit makes the most sense for homeowners or landlords who want to shore up an otherwise sound entry door without replacing the jamb. If your door frame is severely splintered or the stud behind it is compromised, rebuild or replace first, then reinforce. If you’re already planning to paint or you have white trim, the visual integration is straightforward.
Recommendation
I recommend the Prime-Line jamb reinforcement kit. It’s a practical, well-thought-out solution that meaningfully strengthens the strike side by spreading force into the framing, and it avoids the bulk and fit problems that come with thicker single-piece plates. Installation is approachable for a careful DIYer with basic tools, and the result is a cleaner close, better bolt engagement, and a sturdier feel. It’s not a substitute for fixing a destroyed jamb and it may require minor fit adjustments, but as a reinforcement or repair on a sound frame, it offers excellent performance and value.
Project Ideas
Business
Door Reinforcement Installation Service
Offer on-site jamb reinforcement installs as a security upgrade service for homeowners, realtors and Airbnb hosts. Package tiers (single door, full-home, priority response) with clear pricing, photos of before/after, and a basic safety inspection. Market via local ads, neighborhood apps and partnerships with realtors.
DIY Retrofit Kits & Video Tutorials
Create downloadable/physical DIY kits that include cut-to-length jamb pieces, screws, templates and step-by-step video tutorials. Sell via an e-commerce site or marketplaces. Upsell with phone/video support and affiliate links to tools (drills, bits) to increase revenue.
Bulk Contracts for Property Managers
Pitch a cost-effective retrofit program to landlords and property management companies to reinforce entry doors across rental portfolios. Offer volume discounts, scheduled maintenance, and a simple invoicing option. Emphasize reduced liability and improved tenant safety.
Locksmith / Security Company Add-On
Form partnerships with local locksmiths and home security installers to offer the jamb kit as an add-on during lock upgrades. Provide installers with pre-sized kits and quick-install training; share referral fees or wholesale pricing. This widens distribution and leverages existing security trust relationships.
Maker Workshops & Upcycled Product Line
Host paid workshops teaching crafters how to repurpose jamb reinforcements into furniture and decor (shelves, racks, frames). Sell finished upcycled products (coat racks, mirror frames) on Etsy or at local markets along with DIY kits. Workshops build brand awareness and create additional product revenue.
Creative
Industrial Floating Shelf Brackets
Cut the jamb reinforcement into matched lengths and use them as heavy-duty L-brackets for floating shelves. Fasten the vertical piece into studs, slide a wooden shelf over the horizontal plate, and conceal fasteners with a routed slot. The powder-coated finish gives a clean look; the steel provides load-bearing strength for books and decor.
Reclaimed Hardware Coat Rack
Mount a full-length strip horizontally to a backer board and attach heavy coat hooks, old door knobs or reclaimed latch hardware to the pre-drilled sections. Paint or keep the white finish for a modern farmhouse look. This yields a durable, long-entryway rack for coats, bags and leashes.
Slim Metal Frame for Mirrors & Art
Use cut sections as a slim metal bezel around mirrors or panel art. Bend or miter corners, then rivet or weld the pieces together and fasten to the back of the mirror. The thin steel edge protects and strengthens the piece while giving an industrial-chic profile.
Vertical Herb Planter / Trellis
Mount one or more strips vertically on an exterior wall or balcony, attach small hanging pots, seedling cups, or wire mesh to create a narrow vertical garden. The steel strip acts as a durable backbone for hooks and fasteners and withstands outdoor conditions when painted or sealed.
Headboard Accent Wall
Install several strips vertically or horizontally behind a bed to create an industrial headboard feature. Leave the white finish for contrast or paint/stencil patterns. Add LED strip lighting along the top or between boards for ambient backlighting.