Features
- CONTAINS all the tools necessary for a professional repair
- ANGLED DRYWALL sanding sponge included in online kit only
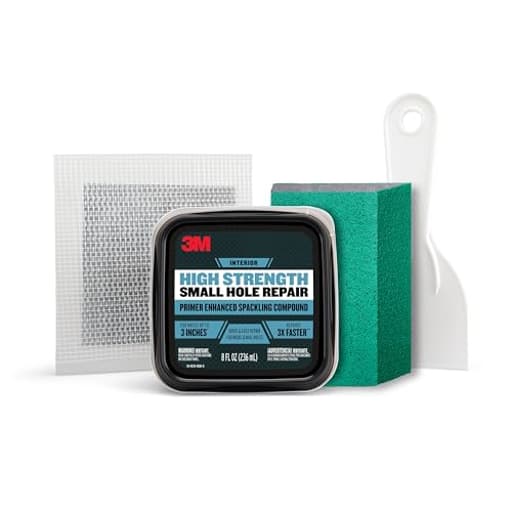
- KIT INCLUDES 8 fluid ounce tub of primer enhanced spackling compound, 4'' self-adhesive patch, 3" putty knife and sanding pad
- FOR HOLE REPAIRS up to 3" in diameter
- 3M SMALL HOLE REPAIR makes repairs 3x faster than traditional spackling
- NO SHRINKING, cracking, or sagging
- SMOOTH with included 3M sanding pad after repair
- EASY TO SAND spackling compound
- Not recommended for structural joints or stress cracks
Specifications
| Color | White |
| Size | 4 Piece Set |
| Unit Count | 1 |
Related Tools
A repair kit containing an 8 fl. oz. primer-enhanced spackling compound, a 4" self-adhesive patch, a 3" putty knife, and a sanding pad/sponge for repairing holes up to 3" in diameter. The compound is formulated to be easy to sand and to resist shrinking, cracking, and sagging; finished surfaces can be smoothed with the included sanding accessory. Not intended for structural joints or stress cracks.
3M High Strength Small Hole Repair Kit, Inlcudes Spackling Compound, Putty Knife, Sanding Sponge, and Self-Adhesive Patch, For Hole Repairs Up To 3" in Diameter, Easy Wall Repair Review
I had a fist-sized doorknob ding staring at me in the hallway—about two inches across—and a constellation of smaller nail holes nearby. Instead of cobbling together materials, I reached for the 3M Small Hole Repair Kit, a compact, all-in-one option meant for holes up to 3 inches. Over a weekend of touch-ups, it handled everything from tiny pinholes to that larger puncture without drama.
What’s in the kit
The kit is straightforward and complete:
- An 8 fl. oz. tub of primer-enhanced spackling compound
- A 4-inch self-adhesive patch
- A 3-inch putty knife
- A sanding pad/sponge (mine included an angled drywall sponge, which is exceptionally handy around corners)
It’s designed to be a single-stop solution for small drywall repairs. Notably, it’s not intended for structural joints or stress cracks; this is for cosmetic fixes, not shifting seams or load-bearing areas.
Setup and application
The compound consistency hits a sweet spot: creamy enough to spread easily, but stiff enough not to slump. For small nail holes and dents, it was a simple one-coat affair—press a dab into the divot with the putty knife, scrape flush, and move on.
For the larger hole, the self-adhesive patch did the heavy lifting. I centered the 4-inch patch over the damage, pressed it firmly, and made sure the mesh was fully stuck down with no bubbles. The first coat of compound went on thin, just enough to embed the mesh and cover the perimeter. After a short dry time, I applied a second thin coat to expand the feathered edge, and a light third coat only where needed. Thin layers really help here; you’ll get a flatter result faster than trying to bury the patch in one go.
Dry time and sanding
The compound dries quickly enough to keep a project moving. Under normal indoor conditions, my first coat was ready to sand in under an hour; heavier fills took longer. The included sanding sponge has the right grit for blending without gouging. On flat expanses, I used light, even strokes; around corners, the angled edge kept me from rounding over drywall profiles.
Sanding dust was manageable, and the compound powders nicely when dry—no gummy clogging. After the final pass, I had a smooth surface that matched the original texture closely once painted.
Finish quality
The primer-enhanced formula pays off. On previously painted drywall, I was able to topcoat directly with a quality interior latex without a separate primer. I didn’t see flashing or dull spots over the repairs, even under side light. On pale matte finishes, one topcoat was fine; on deeper colors or eggshell, two thin coats gave an even sheen. Importantly, I saw no visible shrinking around the patch area as it cured—a common giveaway with lower-quality fillers.
Performance on vertical surfaces
Spackle that sags is a pain; this one didn’t. Even when I hurried a bit on a vertical section, the material stayed put and didn’t slump. I still recommend thin coats, especially over the patch seam where the mesh transitions into the field of the wall. Two or three thin passes will always beat one heavy smear.
Durability after paint
Weeks later, the repairs remain flush with no hairline cracking or telegraphed mesh pattern. That’s partly application technique—don’t leave a hard ridge where the patch meets bare wall—and partly the compound’s stability. For high-traffic areas (behind doors, near switches), I intentionally pressed on the finished spots and haven’t seen any surface denting or powdering under paint.
What I liked
- All-in-one convenience: I didn’t need to run back for a patch, knife, or sanding block. The kit moves smoothly from hole to paint-ready.
- User-friendly compound: Easy to spread, easy to sand, and it doesn’t shrink or crack in normal use.
- Fast turnaround: With careful thin coats, I can complete a multi-hole repair and be painting same day.
- Patch quality: The self-adhesive mesh is strong and lies flat, giving you a solid base for holes up to 3 inches.
Where it falls short
- Only one patch: The tub has enough compound for many repairs, but you get one 4-inch patch. If you’ve got multiple larger holes, plan on buying extra patches.
- Small putty knife: The included 3-inch knife is perfectly usable, but it’s flexible. For larger areas or wider feathering, a 6-inch knife speeds things up and helps keep the repair flatter.
- Keep it sealed: Like any spackling, exposure to air will dry it out. Press the lid on firmly after each use; laying a piece of plastic wrap directly over the compound before sealing helps prevent skinning.
- Not for movement-prone cracks: If you’re dealing with stress cracks at doorways or ceiling seams, you’ll want tape and joint compound or an elastomeric solution—not this kit.
Practical tips for a better result
- Clean the edges: Cut away any loose paper around torn drywall before applying the patch. Solid edges make for a cleaner seam.
- Feather wide: Extend each coat a bit farther than the last to disguise the patch perimeter. A second, wider tool (if you have one) helps.
- Go thin: Two or three thin coats sand faster and flatter than one heavy application.
- Light pressure when sanding: Let the abrasive do the work. Over-sanding can expose the mesh or create a shallow dish.
- Check lighting: Rake a work light across the repair before paint; it will reveal ridges you can knock down in seconds.
Comparing to a traditional multi-step repair
A classic repair—cutting a backer, setting a plug, taping, mudding, priming—yields great results but demands more time and materials. The 3M Small Hole Repair Kit streamlines that workflow for the specific niche of small, non-structural holes. The primer-enhanced compound reduces the need for a separate primer, and the included patch eliminates carpentry for holes in the 1–3 inch range. For renters and homeowners looking to execute a clean fix without a shop’s worth of supplies, the time savings are real.
Value
Given the amount of compound (enough for many small holes and at least a couple larger patches) and the inclusion of the essential tools, the kit makes economic sense for most households. If you’re regularly patching multiple 2–3 inch holes, budget for additional mesh patches; the compound goes much further than the single patch suggests.
Final thoughts
The 3M Small Hole Repair Kit strikes the right balance between simplicity and results. It doesn’t pretend to be a pro drywall setup, and it doesn’t need to be. For the jobs it’s intended to solve—small holes, quick turnarounds, a paint-ready finish—it delivers consistently and with minimal hassle.
Recommendation: I recommend this kit for homeowners, renters, and property managers who need reliable, good-looking repairs on drywall holes up to 3 inches without investing in a full arsenal of drywall tools. It’s fast, tidy, and produces a paint-ready surface with minimal effort. Just remember its limits—one patch in the box, not for structural or stress-prone areas—and you’ll get excellent value and results.
Project Ideas
Business
Speed Patch Service for Airbnb/Landlords
Offer on-demand small-hole repair and cosmetic touch-ups between tenants or guests; advertise fast turnaround for holes up to 3" to help hosts avoid damage fees and keep listings five-star ready.
Renter-Friendly DIY Repair Kits
Bundle the product with branded instructions, before/after photos, and a short how-to video aimed at renters who want to fix damage before move-out; sell on Etsy, Amazon, or at local rental offices.
Pop-up Repair & Staging Add-On
Partner with realtors and home stagers to provide small cosmetic repairs as a pre-listing add-on service—patch holes, sand, and leave surfaces ready for a quick paint touch so homes photograph better.
Workshops and Micro-Classes
Host short hands-on workshops (community centers, hardware stores, maker spaces) teaching basic wall repair and creative uses of spackle; charge per seat and upsell take-home kits.
Digital Courses and Membership Content
Create an online course or subscription with step-by-step videos for repairing common tenant damage, creative spackle crafts, and finishing techniques; monetize via one-time sales or monthly access.
Creative
3D Spackle Wall Art
Use the spackling compound like modeling paste to build raised geometric shapes or organic textures directly on a canvas or MDF panel; sand smooth or leave rough, then prime and paint for a gallery-style relief piece.
Custom Raised Letter Plaques
Cut simple letter shapes from cardboard or thin wood, adhere them to a backing, cover with the spackling compound to create a seamless raised surface, sand the edges, then paint for house numbers, name plaques, or signage.
Furniture Gouge Upcycle
Fill dings, gouges and nail holes in thrifted wood furniture with the primer-enhanced spackle, sand flush, then refinish or distress for a renewed vintage look—great for one-of-a-kind pieces to sell at markets.
Textured Mixed-Media Backgrounds
Apply varied thicknesses of spackle across canvas to create tactile backgrounds (use the putty knife for swipes and the adhesive patch as a stencil), sand selective areas, then layer paint, ink, and collage for mixed-media art.
Handmade Ornaments & Castings
Use silicone molds or improvise molds from cardboard, press spackle into shapes (thin layers work best), let cure, sand smooth and paint — make ornaments, charms, or embellishments for home decor.