Features
- Compatibility: the bathtub and shower 3 handle remodel/rebuild trim kit is compatible with Gerber 3 Handle tub and shower faucets; There is a socket wrench in the repair kit, makes it easy to install by yourself (Please Make sure it is compatible with your shower parts before ordering)
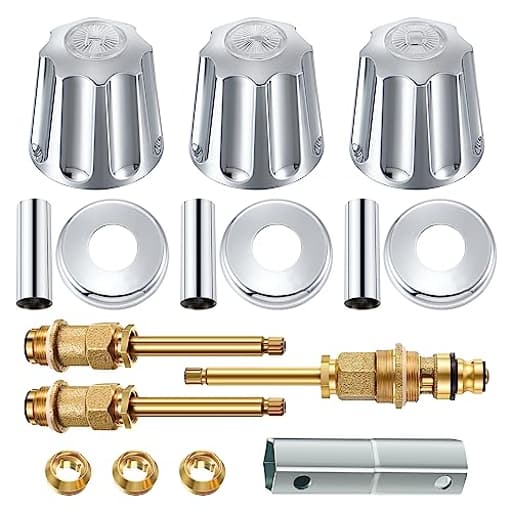
- Shower Rebuild Kit: This bathtub remodel trim kit includes a 11B-1H Stem, a 11B-1C Stem, a 11B-4D Stem, three #28 seats (5/8"-20), 3 handles with H/C/D index buttons, 3 handle flanges, 3 sleeves, and a socket wrench, you can purchase all the parts needed to rebuild an existing valve body in one purchase
- Nice Material: made of durable brass stems and metal handle construction, the bathtub repair kit provides long term strength and reliable performance, chrome plated coating is rust resistant and wear resistant, complement your existing bathroom decor
- Stem Repair Kit: no need to replace the entire bathtub fixture, this valve remodeling kit replacement for your original knob handle is specifically designed to repair your tub and shower leaky shower valve, ensuring to make the installation or repair process easy with these parts
- Application: the 3 handle remodeling trim kit includes all the parts you need to restore your faucet and the knob handles add a more conventional look, suitable for indoor or outdoor environment, like at home, office, outdoor showers, gyms and even mobile homes
Related Tools
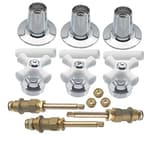
A 3-handle bathtub and shower valve remodeling kit that includes three replacement stems, three seats, three handles with H/C/D index buttons, flanges, sleeves, and a socket wrench to rebuild an existing valve body. The stems are brass and the handles are metal with chrome plating for corrosion and wear resistance; the kit is compatible with Gerber 3-handle tub and shower faucets.
Enhon Bathtub and Shower 3 Handle Valve Remodeling Kit Compatible with Gerber 3 Handle Tub and Shower Faucets, Chrome Knob Handle Replacement for 39617, 11B-1H, 11B-1C, 11B-4D Review
Why I reached for this kit
An older rental of mine still runs a classic Gerber three-handle tub/shower valve—reliable, but lately it had developed a slow drip and a diverter that only half-committed to the shower head. Replacing the entire valve would have meant cutting tile and reworking copper. I wanted a same-day fix that would freshen the trim and stop the leaks without opening the wall. That’s exactly why I picked up the Enhon Gerber 3‑handle rebuild kit.
What’s in the box
The kit arrives as a full rebuild set for a 3‑handle Gerber tub and shower:
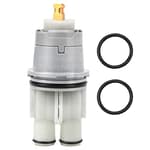
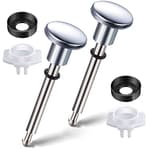
- Hot stem (11B‑1H), cold stem (11B‑1C), diverter stem (11B‑4D)
- Three #28 seats (5/8"-20 thread)
- Three metal knob handles with H/C/D index buttons
- Three flanges and three sleeves
- A seat socket wrench
The stems are brass, the handles are metal with a chrome finish, and the included seat wrench is sized correctly for the supplied seats. In other words, it’s everything you need to rebuild the valve body you already have, without hunting down separate part numbers.
Compatibility and fit
This kit is purpose-built for Gerber three-handle tub/shower valves. If you don’t have a Gerber body behind the wall, this isn’t the solution. Before starting, I verified the original stems by comparing length and broach count, and I confirmed the old seats were #28 (5/8"-20). Once in hand, all parts matched what I pulled from the valve body. The stems threaded cleanly, seated fully, and the broaches accepted the included handles without play.
If you’re unsure of your valve brand, pull a handle and stem before ordering and snap a photo of the seat and stem—matching those two components will make or break your experience.
Installation experience
The job took me about 60–90 minutes at a relaxed pace:
- Shut off water to the bathroom and open a lower faucet to depressurize.
- Remove the old handles, flanges, and sleeves.
- Back out the old stems. If yours are stubborn, a deep socket or adjustable wrench on the packing nut usually helps.
- Use the included seat socket to remove the old seats. Mine were worn and pitted; they came out without drama.
- Before installing the new seats, I cleaned the valve body threads and used a flashlight to confirm the sealing surface was clean. I installed the new seats snugly—snug is key; don’t over-torque and risk cracking the valve body.
- Lightly grease the new stem threads and washers with plumber’s grease, then threaded each stem in until seated.
- With the stems installed, I test-pressurized the system (handles not yet installed) and checked for drips. A slight weep at one packing nut went away with a quarter-turn tighten.
- Finally, I slid on the sleeves, threaded the flanges, installed the handles, and pressed in the H/C/D buttons.
The included seat tool was genuinely useful; it engaged the seat ports cleanly and spared a run to the truck for a dedicated seat wrench. My only addition was a small tube of plumber’s grease and a rag.
Performance and feel
Once buttoned up, the difference was immediate:
- Shutoff: Both hot and cold sealed tightly with no drip at the spout, even after a hot soak when thermal expansion can reveal marginal seats.
- Diverter: The new diverter stem fully routed water to the shower head with no cross-flow. The tub spout backflow ceased, and the shower stream firmed up as expected.
- Handle feel: Torque is even through the travel, with a predictable stop at both ends. No gritty spots, no stick-slip as the washer takes a set.
After a week of daily use, I rechecked for weeps around the packing nuts—still dry. If you do notice a drip from behind a handle after install, a small additional turn on the packing nut usually resolves it. Avoid over-tightening; it can make the handle stiff.
Build quality and materials
The stems are brass, and the machining looked clean at the threads and bonnet surfaces. Washers and seats mated well—no chatter marks or eccentric wear after installation. The handles are metal, not plated plastic, and the chrome finish was uniform out of the box. The flanges and sleeves thread smoothly and sit flush against the wall with a conventional look that suits older bathrooms.
No burrs, no casting sand, and nothing felt out of spec. Tolerances matter in compression-type valves, and this kit’s parts behave like they’re cut to the right dimensions.
Design and ergonomics
This is a faithful three-knob arrangement: hot, cold, and diverter. If you’re chasing a modern single-handle aesthetic or pressure-balancing for anti-scald compliance, this kit isn’t meant to deliver that. It’s for preserving and refreshing what’s already behind the tile.
The knobs are the classic round style with clear H/C/D buttons. They’re easy to grip with wet hands and simple to clean. The sleeves and flanges sit proud enough to cover old escutcheon marks in the tile, which is helpful in older installations.
Tips to get the most out of it
- Verify brand and seat size first. Gerber uses #28 (5/8"-20) seats in this configuration; mixing seats from another brand will cause chronic leaks.
- Replace the seats. New stems on old, pitted seats are a recipe for drips. The included seats are there for a reason—use them.
- Grease smartly. A dab of plumber’s grease on stem threads and packing surfaces helps smooth operation and extends life.
- Set packing tension last. With water on, open/close each valve several times, then snug the packing nut just enough to stop any weep at the stem.
- Flush debris. Before installing the shower head, briefly open the hot and cold to flush any scale loosened during the rebuild.
- Inspect the body. If the valve body is cracked, severely eroded, or the threads are stripped, no rebuild kit will save it—time for a full replacement.
Where it falls short
- Limited compatibility. This is Gerber-specific; it won’t bail you out on a Price Pfister, Moen, or Delta three-handle.
- Classic look only. The included knobs are traditional. If you were hoping for lever handles or a contemporary trim upgrade, you’ll be shopping elsewhere.
- Packaging variability. Mine arrived complete and well-packed, but I’d recommend checking all components before you shut off the water and start the job. Count stems, seats, flanges, sleeves, handles, and the buttons.
- No pressure balance. This preserves your legacy valve; it doesn’t add modern scald protection features. That’s a limitation of the design, not the kit, but it’s worth stating.
Who it’s for
- Owners of older Gerber three-handle tub/shower valves who want to stop drips and refresh trim without opening walls.
- Landlords and maintenance techs who need a reliable, complete kit for a quick turnaround.
- DIYers with basic plumbing comfort who want to rebuild rather than replace.
If you’re remodeling down to the studs or upgrading to a pressure-balanced or thermostatic valve, skip any rebuild kit and do the full valve swap while the wall is open.
Final recommendation
I recommend the Enhon Gerber 3‑handle rebuild kit. It’s a complete, well-machined set that replaces the wear points—stems and seats—while updating the visible hardware with solid metal, chrome-plated knobs. Installation is straightforward, the included seat wrench is genuinely useful, and the result in my case was tight shutoff, a decisive diverter, and smooth handle feel. Provided you confirm compatibility and take a few care-and-feeding steps during install, it offers an economical, low-hassle way to extend the life of an existing Gerber valve without tearing into tile.
Project Ideas
Business
Mobile Shower Rebuild Service
Offer on-site rebuilds for homes, rentals and mobile homes that use Gerber 3-handle valves. Service includes diagnosis, parts replacement using the kit, leak testing and small cosmetic touch-ups. Charge a service call + parts fee; aim for fast turnarounds (1–2 hours) and an upsell for handle/trim upgrades.
DIY Video Course + Kit Sales
Create a short step-by-step video series (beginner-friendly) showing how to rebuild a 3-handle tub/shower using this kit. Sell the videos bundled with the physical kit (or link to purchase kits) on a website or marketplaces. Offer tiered packages: basic kit, kit+support call, and kit+on-site tune-up.
Refurbish & Resell Vintage Faucets
Source worn Gerber three-handle fixtures from thrift stores, estates or contractors. Use the remodel kit to rebuild internals and re-chrome or polish exposed metal, then resell as refurbished fixtures on Etsy, eBay or local marketplaces. Add higher-margin custom options like powder-coated handles or antiqued finishes.
Hands-On Plumbing Workshops
Host small-group workshops at a makerspace, hardware store or community center teaching homeowners how to rebuild a three-handle valve. Provide one kit per attendee, printed instructions, and an instructor demo. Revenue from ticket sales plus on-site kit/parts sales; workshops can generate repeat business and local referrals.
Creative
Steampunk Faucet Lamp
Turn the chrome handles, brass stems and flanges into a tabletop/desk lamp. Mount stems and seats on a reclaimed wood or metal base as an exposed-pipe scaffold, use one handle as an on/off rotary switch, wire an Edison bulb or LED bulb into the assembly, and finish with dark wax or bronze paint for a steampunk industrial look.
Wall-Mounted Towel & Robe Rack
Create a bathroom or entryway rack by mounting three flanges horizontally on a plank or tile backboard and fitting the stems/handles as peg-style hooks. The metal handles make comfortable hangers for towels, robes or coats; chrome plating gives a cohesive restored look that matches bathroom fixtures.
Mini Indoor Fountain Planter
Build a small tabletop fountain/planter using the valve stems as decorative spouts. Hide a submersible pump and tubing beneath a ceramic basin; thread water through a seat/nozzle to produce a gentle spout over succulents or moss. The chrome hardware acts as industrial accents and helps channel flow.
Shower Refresh Makeover Kit
Assemble a ready-to-install ‘refresh kit’ for owners of older three-handle showers: pre-fit the supplied stems, sleeves and handles onto a decorative plate/backer (wood or tile panel), add illustrated install instructions and small finishing touches (new index buttons, silicone sealant). Sell as a weekend bathroom facelift project for DIYers.