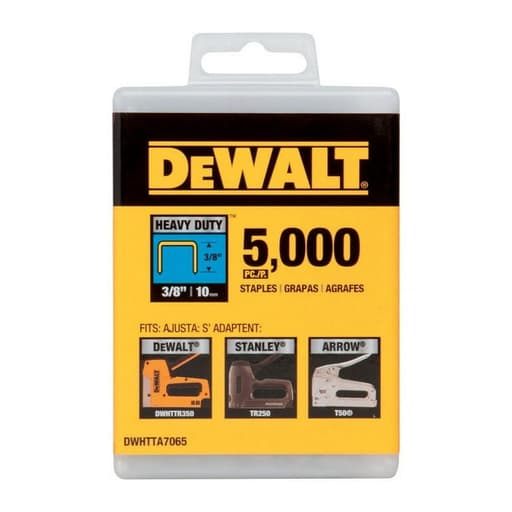
Features
- Engineered To Work Seamlessly With DEWALT 3/8 in. Crown Staplers
- Ideal for Insulation, Upholstery, House Wrap/Vapor Barrier, and Screen
- Staple Coating Suitable For Interior Use Only
- Chisel Point To Reduce Splitting of Material
- Fits Most 3/8 in. Crown Staplers
Specifications
| Crown Width [In] | 3/8 |
| Fastener Type / Gauge | 3/8 inch staples |
| Finish | Coated |
| Head Type | Chisel Point |
| Product Length [In] | 9/16 |

DEWALT's Heavy Duty 3/8 in. Crown Staples are manufactured to our highest standards and engineered to work seamlessly with DEWALT 3/8 in. Crown Staplers.
DeWalt Heavy Duty 3/8 in. Crown Staples Review
A box of staples doesn’t get much attention until you’re halfway through a project and your fasteners start splitting trim or jamming the stapler. I put these DeWalt 3/8-in. crown staples through a handful of common tasks—upholstery touch-ups, installing weatherstripping, hanging a vapor barrier on studs, and stretching screen—using both an electric 3/8-in. crown stapler and a pneumatic upholstery stapler. The short version: they’re predictable, clean-driving staples with a few important limitations worth knowing about.
What I tested and how
I ran multiple strips through:
- A corded electric 3/8-in. crown stapler for upholstery and weatherstripping
- A pneumatic stapler (rated for 3/8-in. crown) set between 70–90 PSI for wood-to-wood and membrane fastening
Materials included pine, fir, poplar, birch plywood, MDF, and screen frame stock. I kept an eye on drive consistency, splitting, tear-out on fabrics and membranes, and long-term hold after some light prying and peel tests.
Specs-wise, these are 3/8-in. crown staples with a 9/16-in. leg and a chisel point, finished with a coated (non-corrosion-resistant) surface intended for interior use.
Fit and compatibility
The strips load smoothly and sit square in the magazine. I didn’t encounter curled or misaligned legs out of the box, and the bond that holds the strip together is firm without being gummy—important for reducing feed hang-ups. They fit every 3/8-in. crown stapler I tried. As always, check your stapler’s manual for compatibility, but these seemed to match the common heavy-duty 3/8-in. crown footprint most users expect.
Driving performance
In both the electric and pneumatic tools, drive consistency was solid. Staples seated flush in softwoods at modest power/pressure, and I had to bump up pressure a hair for plywood and poplar. With 9/16-in. legs, over-penetration wasn’t an issue; the legs fully set without crushing fibers dramatically, and the 3/8-in. crown provided a broad bearing surface that’s friendly to fabric, plastic membranes, and screening.
Misfires were rare. I didn’t experience jamming in either tool during normal-paced work. Two practical notes:
- Pneumatic: 80 PSI was the sweet spot for most framing lumber and plywood; 90+ PSI was only helpful when I was stapling through a particularly dense area near knots.
- Electric: Use the high-power setting for hardwood frames or multi-layer fabric; reduce power on thin veneers to avoid kiss-outs.
Chisel point and splitting
The chisel-point tips make a difference, particularly when stapling near the edge of thin trim or into the end grain of softwood. The legs splay just enough to lock in without blowing out edges. I could safely staple within 3/8 in. of a pine edge if I kept the staple parallel to the grain; for hardwoods, I gave myself a 1/2-in. margin to be safe. This is about as good as I’ve seen from a general-purpose 3/8-in. crown staple.
In MDF and plywood, the chisel point helps reduce surface bulging. You still need proper support under thin panels; a simple backer board under the workpiece keeps the face clean and prevents marring.
Holding power
A 3/8-in. crown spreads load well on flexible materials. For upholstery, the crown width grips fabric without cutting, and I could run a single pass to secure fabric folds before final tacking. In membranes—vapor barriers and house-wrap-type materials—the staples pin securely without tearing the sheet, assuming the tool is square to the surface and you’re not overdriving.
For wood-to-wood fastening, 9/16-in. legs are best suited to attaching thin stock or securing materials to a framing substrate, not structural joining. Think screen frame cloth, thin trim to softwood, or stapling through a membrane into studs. For thicker or harder stock, you’ll want a longer leg or a different fastener altogether.
Material-specific notes
- Softwoods (pine/fir): Fast, clean seating. Minimal splitting even near edges with the chisel points.
- Plywood: Reliable hold; ride the edge of an 80–85 PSI setting and keep the tool square.
- Poplar and similar hardwoods: Drives well but prefers a bit more power. Keep staples 1/2 in. from edges for safety.
- MDF/particleboard: Good bite; use a backing board to avoid surface pucker on thin pieces.
- Fabrics and foam (upholstery): The 3/8-in. crown is friendly to fabric; it doesn’t knife through like narrower crowns can, and 9/16-in. legs are a practical length for most chair-seat repairs.
- Screening: Easy, uniform tensioning with less risk of tearing compared to a narrower crown, though you still need a spline on standard screen frames for a permanent install.
Interior-only finish
The coated finish is intended for interior environments. In practice, that means:
- For vapor barriers, interior trim, and upholstery, you’re in the clear.
- For exterior-facing work—true house wrap behind siding, screen doors, or anything that may see moisture—these staples can discolor or corrode over time. If you’re doing permanent exterior installations, choose stainless or galvanized staples instead. I used these for mock-ups and positioning outdoors, but I would not rely on them for long-term exterior exposure.
Consistency and quality control
Across the box I used, leg length was uniform, the crowns were straight, and the points were sharp. I didn’t find bent or crushed staples in the strips, which matters more than it sounds; a single deformed staple can cause a stoppage at the worst time. Feed was smooth, and I didn’t see adhesive build-up in the nose of the staplers after a day of work.
Practical tips
- Choose leg length wisely: At 9/16 in., these are versatile but not universal. If you’re tacking thin carpet or delicate veneers, consider shorter legs to avoid dimples telegraphing to the surface.
- Control drive depth: On pneumatics, start at 75–80 PSI and adjust up; on electrics, use the higher power only as needed.
- Mind edge distance: The chisel point helps, but physics still wins—keep a small margin from edges in hardwoods to avoid splits.
- For membranes: Use plastic caps or follow manufacturer spacing guidelines for long-term installs; staples alone may not meet all code or warranty requirements.
Where they shine
- Upholstery repairs and light furniture work
- Securing interior vapor barrier to studs
- Attaching weatherstripping to wood door frames
- Temporary positioning of materials where a broad crown is beneficial
- Screen cloth test-fitting and light-duty interior screen work
In these roles, they deliver predictable drive, minimal surface damage, and enough hold without over-penetrating.
Limitations
- Interior use only: The coated finish isn’t corrosion-resistant.
- Fixed leg length: If you routinely work with thicker stacks or dense hardwoods, you’ll want additional lengths on hand.
- Not a substitute for narrow-crown staples or brads where a smaller footprint is required; the 3/8-in. crown will show on fine trim.
Value and alternatives
Given the consistent manufacturing and smooth driving, these staples justify choosing a branded option over bargain-bin fasteners, especially if you’ve struggled with jams or edge blowouts in the past. If you need exterior-rated fasteners or specialized lengths, look to stainless/galvanized lines or a pneumatic narrow-crown system for trim work.
Recommendation
I recommend these DeWalt 3/8-in. crown staples for interior fastening tasks that benefit from a broader crown and a reliable, clean drive—upholstery, interior membranes, weatherstripping, and light trim-to-softwood applications. They load easily, seat consistently in both electric and pneumatic staplers, and the chisel-point legs reduce splitting near edges better than many generic alternatives I’ve used.
Just keep the limitations in mind: they’re not corrosion-resistant and they’re not the right choice for delicate finish work or exterior permanence. Within their lane, though, they’re dependable, straightforward consumables that help you focus on the task instead of fighting your stapler.
Project Ideas
Business
Mobile Upholstery Touch-Ups
Offer on-site reupholstery for dining chairs, benches, and ottomans. Fast turnarounds with clean staple work on plywood and hardwood frames; market to homeowners, realtors staging homes, and small cafes needing quick refreshes.
Acoustic Panel Fabrication & Install
Design and build fabric-wrapped acoustic panels for home offices, content creators, and podcasts. Provide standard sizes and custom prints; staples keep fabric tensioned for a crisp, professional finish. Upsell installation and layout planning.
Window and Porch Rescreening Service
Repair or replace torn window and door screens and build custom screen panels. The staples secure screen to frames before applying screen trim, speeding production; offer seasonal packages for property managers and landlords.
Fabric Pinboards and Wall Organizers
Produce decorative, fabric-wrapped cork or foam pinboards for home offices, classrooms, and boutiques. Staples provide tight, smooth edges on the back, enabling clean front faces; sell online with custom sizes and fabrics.
Basement/Attic Vapor Barrier & Insulation Fastening
Provide labor-focused services stapling insulation facings and vapor barriers in attics, basements, and utility rooms. Target energy auditors and renovation contractors for subcontracting; interior-rated staples suit these controlled environments.
Creative
Dining Chair Reupholstery Refresh
Strip old fabric and padding from dining chair seats and re-cover with new foam, batting, and upholstery fabric. Use 3/8 in. crown, 9/16 in. leg staples to secure fabric to the plywood seat underside; the chisel point helps prevent splitting on thin seat bases.
DIY Acoustic Panels
Build simple pine frames, fit mineral wool or fiberglass inside, then wrap with breathable fabric and staple on the back side. The 9/16 in. leg length bites through fabric and into the frame without poking through, creating sleek, sound-absorbing wall panels for studios or home theaters.
Stretched Canvas Art Frames
Assemble stretcher-bar frames and stretch primed canvas over them, stapling the canvas on the back for a gallery wrap. The chisel-point staples reduce splitting in softwood rails and the coated finish is ideal for indoor display pieces.
Tufted Headboard
Cut a plywood backer, add foam and batting, and upholster with fabric. Use the staples to secure the fabric and backing neatly on the rear of the panel. Optional button-tufting can be added; staples make tensioning fabric corners clean and strong.
Custom Screen or Fabric Privacy Panels
Create lightweight wood frames and staple insect screen or privacy fabric to them, then cap edges with trim for a finished look. Great for indoor porch nooks, plant rooms, or dividing open spaces; chisel-point staples help avoid splitting thin frame stock.