
Features
- Outlet Repair: When your outlet or electrical box gets stuck in the wall or becomes loose, use wall plate spacer to secure loose, crooked, recessed into wall outlets, keeping them level with the wall and securely in place.
- Easy Installation: First, turn off the power for safety, then remove the cover plate, install the electrical outlet spacer between the wall and the device, and finally replace the wall panel. Easy to install and safer to use.
- Perfect Fit: You will receive 20 pcs device leveling plates, measuring 4.2 x 2.2 inch to fit any standard single outlet device, providing precise compatibility for a variety of outlets fastening.
- Reliable Material: Our electrical outlet spacers shims are made of quality galvanized metal, waterproof, rust resistant, not easy to deform or damage, solid, stable and can be used for a long time.
- Widely Used: It is suitable for all home decoration projects, meeting most wall outlets fixed requirements, and can be used in bedrooms, living rooms, bathrooms, offices, laundry rooms, etc.
Specifications
| Color | Silver-20pcs |
| Unit Count | 20 |
Related Tools
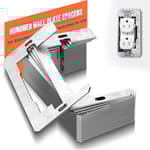
Pack of 20 galvanized metal device-leveling plates (4.2 × 2.2 in) designed to secure and level recessed, loose, or crooked single electrical outlets and wall boxes. They are rust-resistant and durable; installation involves turning off power, removing the cover plate, inserting the spacer between the device and the wall, and replacing the cover.
DECOHS 20 Pcs Wall Plate Spacer- Metal Flush Fit Device Leveling Plates- Receptacle Spacers Shims Leveler for Fixing Walls Electrical Outlet Electrical Boxes Review
A wobbly, recessed outlet is one of those small annoyances that can turn into a safety issue if ignored. I picked up the DECOHS wall plate spacers to fix a handful of crooked boxes and devices sitting back from the drywall after a backsplash and some hasty drywall work. After putting them through several real-world fixes around the house, I came away impressed by how fast they turn a sloppy install into a solid, flush device—though there are a few limits to keep in mind.
What they are and how they’re built
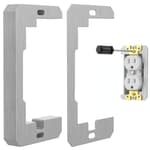
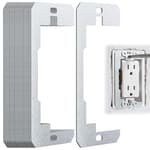
The kit is a 20-pack of galvanized metal plates, each roughly 4.2 by 2.2 inches and sized for standard single-gang devices. They’re thin, flat, and meant to sit between the wall surface and the device yoke (the metal frame of a receptacle or switch). The galvanization is a smart touch; it adds corrosion resistance for bathrooms, laundry rooms, and kitchens. I wouldn’t treat them as a solution for wet-location boxes, but for typical indoor spaces, they’ll shrug off humidity just fine.
The metal is not tank-thick, and that’s mostly a positive here. It needs to be stiff enough to support the device ears without bending, but thin enough to disappear behind the device without binding. These strike a workable balance. I did notice you can flex a plate by hand if you try, which matters if you over-torque the mounting screws—more on that below. As a value pack, you get enough to solve a dozen or more outlets, and having extras on hand is handy when you run into a box that’s set way back.
Installation and setup
Installation is straightforward and takes a few minutes per device:
- Kill power at the breaker and verify with a non-contact tester.
- Remove the cover plate.
- Loosen the two device mounting screws just enough to create a small gap between the device yoke and the wall.
- Slip a plate between the wall and the device yoke, center it, then snug the screws.
- Reinstall the cover plate and check for flushness.
In many cases I could slide the plate in without completely removing the device screws. On one particularly recessed light switch in a tiled kitchen, I stacked two plates to bring the device nearly flush. If you’re stacking, I recommend tightening gradually and checking for even compression so you don’t bow the plates. Also, if your box is set back significantly (approaching half an inch or more), you might need longer 6-32 mounting screws or, in some situations, a listed box extender may be the better fix.
One practical tip: keep an eye on the side terminals of the device when you position the plate. The metal sits behind the yoke, not the terminals, but on tight boxes with a lot of conductors, it’s easy for things to get crowded. I usually wrap the sides of a receptacle with a couple turns of electrical tape as a belt-and-suspenders precaution—standard practice for me anyway.
How they perform in use
Across a half-dozen outlets and switches, the spacers did exactly what I needed: they supported the device ears on a solid surface, eliminated wobble, and brought the face of each device level with the wall. The difference is most dramatic on crumbly drywall where the device ears used to sink in when I tightened the screws. With the spacer providing a rigid bearing surface, I could snug everything up without crushing the drywall or distorting the device.
The plates also help with crooked boxes. I had a receptacle skewed a few degrees, and with a plate in place I could coax the device square against the wall and lock it there. The resulting wall plate gap disappeared, and both the switch and the receptacle actuated cleanly without binding.
In tiled areas, the spacers were particularly useful. After a backsplash install, a couple of boxes ended up recessed relative to the new surface. One or two plates per device brought the devices out to the plane of the tile and made the cover plates sit properly. For minor set-backs (around 1/8 inch), a single plate was usually enough; for deeper recesses, stacking two worked fine.
Ergonomics and user experience
- Speed: These are faster than futzing with plastic shim strips or washers, and there’s less chance of the device twisting as you tighten.
- Fit: The plates are sized right for single-gang receptacles and switches, including duplex, toggle, and rocker/Decora-style devices. They disappear behind a standard cover plate.
- Rigidity: They’re stiff enough for most residential fixes. If you crank down excessively on the device screws, you can bow the plate slightly—just tighten until snug and square, not “impact driver tight.”
- Finish: The galvanization is consistent and burr-free in my set. I didn’t encounter sharp edges.
Where these spacers shine
- Fast remediation of recessed or wobbly outlets: A plate or two can restore flushness and stability in minutes.
- Damaged drywall around a box: The plate acts like a mini backer, giving the device ears a firm surface instead of crumbling gypsum.
- Post-renovation adjustments: Tile, paneling, or thicker wall finishes often leave boxes recessed; these bring devices back to the surface plane without a full box extender.
- Service work: Keeping a few in the bag pays off on older homes where box placement and drywall cuts are inconsistent.
Where they fall short
- Deep recesses: If the box is more than about 1/2 inch behind the finish surface, stacking plates starts to feel like the wrong solution. At that point, a listed box extender is the cleaner, code-friendlier fix, and you may need longer device screws regardless.
- Multi-gang or specialty boxes: These are for single-gang devices. For two-gang or larger, you’ll want a different approach.
- Absolute rigidity: They’re not as thick as some premium alternatives. For typical outlets, no problem; for heavy commercial devices or metal cover plates in high-abuse areas, you may want thicker hardware.
Alternatives and how to choose
- Plastic stackable shims: Good for fine adjustments and non-conductive, but they don’t reinforce torn drywall and can creep as you tighten.
- Box extenders: The right choice when a box is significantly recessed or you need to restore the enclosure to the wall plane for inspection. Slower to install but most robust.
- Thicker metal reinforcement plates: Offer more rigidity but usually cost more and aren’t necessary for most residential scenarios.
In practice, I keep all three solutions on hand. For 80% of issues in finished spaces, the DECOHS spacers are the first tool I reach for.
Safety and code notes
- Power off at the breaker and verify de-energized before you touch anything.
- Ensure the plate doesn’t contact hot terminals. If clearance is tight, wrap the device sides with electrical tape.
- The NEC generally requires devices to be installed flush to the wall surface within a small tolerance. These spacers help achieve that. If the box itself is well behind the surface, a listed box extender is often the correct remedy.
- Don’t use a spacer to compensate for damaged wiring, loose backstabs, or cracked devices—replace faulty parts as needed.
Durability and value
Given the quantity (20 plates), material (galvanized steel), and the time they save, the value is excellent. I used four plates to fix three trouble spots and still have plenty left in the drawer for the next project. They’ve held up well after installation—no loosening, no telegraphing through the wall plates, and no signs of corrosion in a bathroom application.
The bottom line
The DECOHS wall plate spacers are a simple, effective fix for loose, recessed, or slightly crooked single-gang devices. They install quickly, provide solid support under the device ears, and bring outlets and switches flush to the wall so cover plates sit clean and tight. They’re not a cure-all—deeply recessed boxes and multi-gang situations call for different hardware—but for common residential punch-list problems, they’re the right tool at the right price.
Recommendation: I recommend these spacers for homeowners, DIYers, and service electricians who need a fast, reliable way to stabilize and flush-mount standard outlets and switches. They’re easy to use, stackable for moderate recesses, and durable enough for long-term use. Keep a pack on hand; you’ll reach for them more often than you expect.
Project Ideas
Business
Quick Outlet Fix Service
Offer a local handyman service specializing in fast outlet and switch leveling/repair using these spacers. Market as 'same-day outlet leveling' to realtors and landlords; charge per outlet (flat fee + travel) or offer multi-outlet/whole-home pricing. Emphasize safety procedures (power off, testing) and provide before/after photos for listings and reviews.
DIY Repair Kits for Homeowners
Package the spacers with a short instruction booklet, an insulated screwdriver, drywall anchors, spare cover plate screws, and a link to a branded how-to video. Sell single-kits and 5- or 20-packs on Etsy, Amazon, and your own store. Include clear safety warnings and a QR code to a video showing power-off testing and installation to reduce returns and liability.
Tradesperson Bulk Supply & Subscription
Create a B2B bundle targeted at electricians, property managers, and remodeling contractors: offer bulk discounts, recurring monthly shipments, and co-branded packaging with contractors' phone/website. Include labeling for quick job-site distribution (sizes, qty). Offer next-day shipping for emergency calls to keep contractors supplied.
Workshops & Digital Tutorials
Run paid local workshops or online classes that teach safe outlet repair plus creative reuse projects (e.g., steampunk art, magnetic racks). Monetize via ticket sales, downloadable step-by-step PDFs, and upsell physical kits of spacers. Partner with makerspaces, Home Depot classes, or community centers to reach hobbyists and DIY homeowners.
Creative
Industrial Floating Picture Frames
Use one or two spacers behind picture frames or small canvases to create a clean recessed/float look with a consistent gap from the wall. Screw the spacer to the wall box or drywall anchors, attach the frame to the spacer to keep it perfectly level and add an industrial metallic accent around the frame edge. Great for gallery walls where uniform spacing and level alignment matter.
Steampunk Wall Tile Mosaic
Create a decorative wall panel by arranging several metal spacers into a repeating pattern, securing them to a backing board. Add small found objects (gears, bolts, vintage hardware) glued or riveted to each spacer for texture. Finish with a clear matte sealer or patina for an aged industrial look — use as a headboard accent, backsplash art, or shop signage.
Slim Cable-Management Rails
Mount a row of spacers behind TVs, desks, or workbenches as low-profile anchor points to route and hide cables. The spacer's flat shape makes a reliable surface to tie or clip zip-ties, adhesive cable clips, or small conduit. This yields a tidy, professional wire run that keeps devices flush with the wall while protecting the outlet box.
Magnetic Key and Tool Strip
Attach powerful magnets to the face of several spacers mounted horizontally to form a slim magnetic strip. Use it in entryways for keys, in the garage for small hand tools, or in craft rooms for metal scissors and rulers. The galvanized metal spacer is sturdy enough to act as the mounting plate; conceal screws with decorative caps for a polished look.