Features
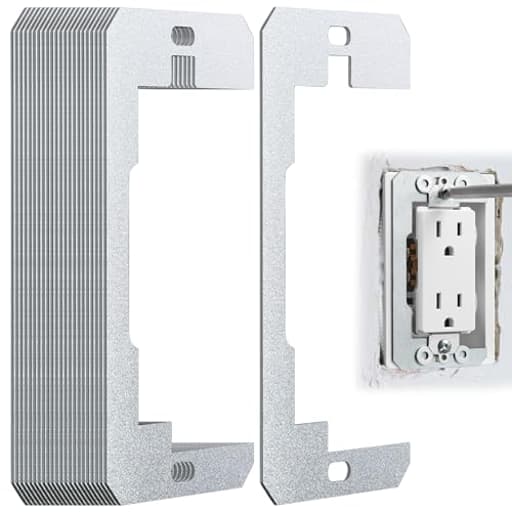
- 【HIGH QUALITY】: Our outlet spacers from quality galvanized metal, Rust resistant, Solid, Stable, Not easy to damage and can be used for a long time.
- 【EXACT SIZE】: Outlet Spacers for electrical box measure 0.83 x 0.75 x 0.047 inch, Offering a precise fit for a wide range of outlet fix and to maintain a seamless and professional appearance.
- 【EASY TO INSTALL】: Installing these Spacers for electrical outlets, Just turn off the power, Remove the cover plate, Slide the spacer behind the outlet, and close the cover plate. Your sockets will return to their original level.
- 【FIX FOR LOOSE OUTLETS】:Our outlet box extender is an effective way to quickly fix a sunken outlet or light switch, keeping the outlet or switch level with the wall and securely in place.
- 【WIDE USAGE】:Our outlet shims are universal for most switch of outlets in any office and home, These spacers can effectively prevent and repair switches that are prone to sinking or loosening due to long-term use and external forces.
Specifications
| Unit Count | 24 |
Related Tools
24 galvanized metal outlet spacers designed to level and secure loose or sunken electrical outlets and switches so the device sits flush with the wall. Each spacer measures 0.83 x 0.75 x 0.047 inch, is corrosion-resistant, and installs by sliding the plate behind the outlet after removing the cover plate.
YAMAJA 24 PCS Outlet Spacers, Wall Plate Spacer, Metal Flush Fit Device Leveling Plates for Fix Loose Electrical Outlet and Switch Review
Why I reached for these spacers
I run into loose, sunken, or cockeyed outlets more often than I’d like—especially after drywall work or when an existing plastic box has taken a few too many years of heavy use. Bending device ears or stacking makeshift shims works in a pinch, but the results are inconsistent and rarely look professional. I picked up the YAMAJA metal outlet spacers to see if a small, purpose-made plate could make outlet leveling faster, cleaner, and repeatable across a houseful of devices.
Design and build
These are galvanized steel plates with a cutout that lets you slide them behind a receptacle or switch without removing wires. The metal is stiff and doesn’t deform under the clamping force of the device screws, which is key; softer plastic shims can compress or tilt as you tighten. The galvanization helps with corrosion resistance, which matters in damp spaces or garages. At roughly 3/64-inch thick per plate (about 0.047 inches), each spacer adds a predictable bump that you can rely on across multiple devices.
The pack includes 24 pieces—plenty for a small remodel or to keep on hand for fixes as you find them. The bright, galvanized finish makes them easy to spot in a tool bag, and the cutout is shaped to sit flat behind the device yoke while clearing the mounting screw.
A couple of notes from handling them:
- Edges are a bit sharp out of the box. I didn’t cut myself, but I treated them with the same respect I give drywall knives and metal box knockouts. Gloves help.
- They’re rigid enough to bridge minor overcuts in drywall, but they’re not meant to cover large voids. If the wall opening is oversized on multiple sides, these won’t create new “structure”; you’ll want a box extender ring or a patch.
Installation experience
The process is straightforward:
1. Turn off the breaker and verify the power is off at the device.
2. Remove the wall plate.
3. Loosen the device’s 6-32 mounting screws enough to pull the outlet or switch slightly forward. You do not need to remove the device or disconnect wires.
4. Slide a spacer behind the device’s metal ears so it sits between the device and the wall surface.
5. Retighten the screws while you square the device to the wall.
6. Reinstall the plate and check for uniform gaps.
Most of my fixes were one-plate jobs. In spots where I’d added new 3/8-inch drywall over old plaster, I stacked two plates per side and swapped in longer 6-32 machine screws. The consistency is what I appreciated most: once you know how much lift each plate provides, it’s easy to repeat across a room and end up with every plate sitting flush, with no rocking.
Because these are metal, I was extra mindful about clearance to hot terminals. On back- or side-wired devices, keep the spacer flat to the wall and behind the device yoke so it doesn’t wander into contact with exposed screws. The cutout geometry helps, but the onus is still on you to route and tuck conductors neatly.
How they performed in real jobs
- Sunken receptacles in tiled backsplash: Two plates brought a duplex receptacle perfectly flush with subway tile, and the faceplate tightened down without a gap. No wobble when plugging and unplugging.
- Smart switches: Bulkier electronic switches sometimes fight wall plates because the yoke sits proud. A single spacer behind the opposite side gave me the micro-adjustment I needed to square the plate and eliminate a corner gap.
- Overcut drywall around a single-gang box: One side of the opening was sloppy. The spacer added enough bearing surface behind the device to keep it from tilting into the void. It won’t patch the hole, but it prevents the device from “falling” toward the weak side.
- Workshop outlets that loosen over time: The rigidity of these plates makes a noticeable difference. With the spacer taking the compression instead of the drywall edge alone, the device stays tight after repeated use.
Where they fall short
- Not a cure-all for big gaps: If your drywall opening is oversized on multiple sides or the box is buried more than 1/4 inch behind a combustible surface, you’re beyond shim territory. Use a box extender to bring the box itself out to the finished surface.
- Thickness is fixed: At roughly 3/64 inch each, there’s no micro-tuning beyond stacking. Stacking works, but too many plates can push the device—and then the wall plate—proud of the wall. Two plates per side was my practical limit before I switched to an extender.
- Conductive by nature: Metal is great for rigidity, but it’s also conductive. You need to manage wire placement and be deliberate during tightening so the spacer never contacts live parts.
Safety and code considerations
These spacers are for leveling devices and improving mechanical stability. They do not increase the box’s internal volume and they do not “extend” the box to meet the finish surface. If your box is recessed beyond what’s allowed in your jurisdiction (often more than 1/4 inch from the finished surface for noncombustible walls; flush for combustible), use a listed box extender ring.
Always:
- De-energize the circuit and test before touching conductors or device screws.
- Keep spacers behind the device yoke, away from terminal screws and bare copper.
- Use appropriately long 6-32 screws if you stack spacers; don’t try to “make do” with too few threads engaged.
Alternatives and how these compare
- Plastic wedge shims: Cheap, adjustable, and non-conductive. They can compress under torque and sometimes “walk” as you tighten, leading to crooked devices or uneven plate pressure. I still keep them in the bag for tiny tweaks, but metal beats them for repeatable, rigid support.
- Box extenders: The right answer for boxes set too deep or when you need to address code-required flush. They take longer to install and require removing the device, but they solve a different problem. I use extenders for large offsets; I use spacers for leveling and modest depth corrections.
- Bendable device ears: Free and quick, but inconsistent and easy to overdo. Bent ears also reduce the contact area and often end up biting into drywall, which doesn’t hold long-term.
YAMAJA’s metal spacers occupy a sweet spot: faster than extenders, more reliable than plastic shims, and far cleaner than bending ears.
Durability and value
The galvanized steel holds its shape under repeated torque, and I haven’t seen any corrosion despite using a few in a damp basement. With 24 pieces in the pack, the cost per fix is low, especially when you account for the time saved and the professional-looking results. The only durability gripe is the slightly sharp edges; it’s a one-time annoyance that’s easy to manage.
Practical tips
- Keep a pair of longer 6-32 machine screws in your bag (1.5 to 2 inches). If you stack spacers, you’ll need them.
- Square the device before final tightening. The rigidity of the plate will lock in whatever angle you set.
- If your wall plate doesn’t sit flat after adding spacers, back off and reassess. You may have stacked one side more than the other, or you might have reached the point where a box extender is the right tool.
Who they’re for
- DIYers fixing loose or sunken outlets after paint, tile, or a drywall overlay.
- Pros who want consistent results across a remodel without pulling every device.
- Anyone installing smart switches or GFCIs who needs to fine-tune alignment without fuss.
Recommendation
I recommend the YAMAJA outlet spacers. They’re rigid, predictable, and fast to install, and they solve the two problems I see most with devices: lack of support and small depth mismatches after finish work. They won’t replace box extenders for deeply recessed boxes, and you need to respect their conductive nature and sharp edges. But for everyday leveling and bringing outlets and switches neatly flush to the wall, these metal spacers deliver clean, repeatable results with minimal effort.
Project Ideas
Business
Landlord/Property Manager Bulk Kits
Package spacers in bulk kits (100–500 pcs) with replacement cover screws and simple instructions, marketed directly to property managers and landlords. Offer volume pricing and a reorder subscription for routine maintenance; emphasize time savings for turnover repairs and improved curb appeal.
Handyman & Electrician Branded Packs
Create branded small packs (6–12 pieces) that electricians and handymen can include in their service kits. Offer co-branding options and printed instruction cards. Sell through trade channels or local supply houses so pros always have a quick fix for sunken outlets during service calls.
Retail Bundles for DIYers
List bundle SKUs for consumer retail: combine spacers with universal screw sets, adhesive pads, and a one-sheet safety checklist. Position the product for RV owners, Airbnb hosts, and DIY homeowners on marketplaces (Amazon, Etsy) with how-to videos and clear before/after photos to boost conversions.
Workshops & Local Fix Clinics
Host short community workshops or pop-up clinics teaching simple electrical aesthetic fixes (how to use spacers, swap faceplates, basic safety). Charge a small fee or use workshops as lead generation for selling kits on-site. Partner with hardware stores or makerspaces to reach DIY audiences.
Value-Added Inspection Service
Offer a combined home inspection add-on where you inspect and visibly correct sunken outlets as part of a turnover or staging service. Bundle labor with a supply of spacers and charge a per-outlet fee. Market to realtors and home stagers who want a turnkey cosmetic fix before showings.
Creative
Magnetic Photo Tile
Glue a small strong disc magnet to one side of the spacer and paint or stamp the other side. Use as a low-profile magnetic photo tile or fridge magnet — the metal shim gives a clean square edge and enough thickness for a recessed look when paired with thin photos or printed artwork.
Mini Industrial Jewelry
Turn spacers into pared-down, industrial-style jewelry: file edges smooth, drill a tiny hole for jump rings, patina or powder-coat for color, then assemble into necklaces, cufflinks, or earrings. Their flat, uniform shape makes them great as minimalist pendants or layered metal accents.
Mixed-Media Hardware Accents
Incorporate the spacers into mixed-media wall art or shadow boxes as structural or decorative hardware. Use them as consistent repeating elements (grids or rows), mount them on canvas with rivets or adhesive, or stack/paint them to create textured, metallic insets.
Tiny Frame & Cable Spacer
Use spacers as invisible standoffs behind small picture frames or plaque hangings to create a slight gap from the wall for a floating look. They can also be assembled into a low-profile cable guide behind desks: glue a spacer to the underside of a desk and route cables over it so plugs clear the surface.
DIY Outlet-Cover Art Kits
Create a craft kit that lets customers personalize their outlet covers: include decorative faceplates, paints/stickers, and a few spacers so the finished cover sits perfectly flush even if the box is slightly recessed. Market as an easy weekend project for renters who want a change without electrical work.