Wood carving demands precision, patience, and the right tools. This guide breaks down the essentials of specialized tools for detailed wood carving, from knives to power tools, and offers practical tips on tool care, organization, and safety.
Key Takeaways:
- Tools for Precision: Detail knives, chip carving knives, micro tools, gouges, and V-tools are designed for specific tasks like fine cuts, geometric patterns, and texturing.
- Power Tools: Rotary tools like Dremel units speed up carving while maintaining accuracy, ideal for hardwoods and larger projects.
- Maintenance Tips: Clean tools after every session, sharpen regularly, and store in a dry, organized space to extend their lifespan by up to 50%.
- Organization Tools: Platforms like Toolstash help track, maintain, and manage tool collections efficiently, reducing loss and improving workflow.
Whether you're crafting miniatures or working on large sculptures, using the right tools and maintaining them properly ensures better results and a smoother carving experience.
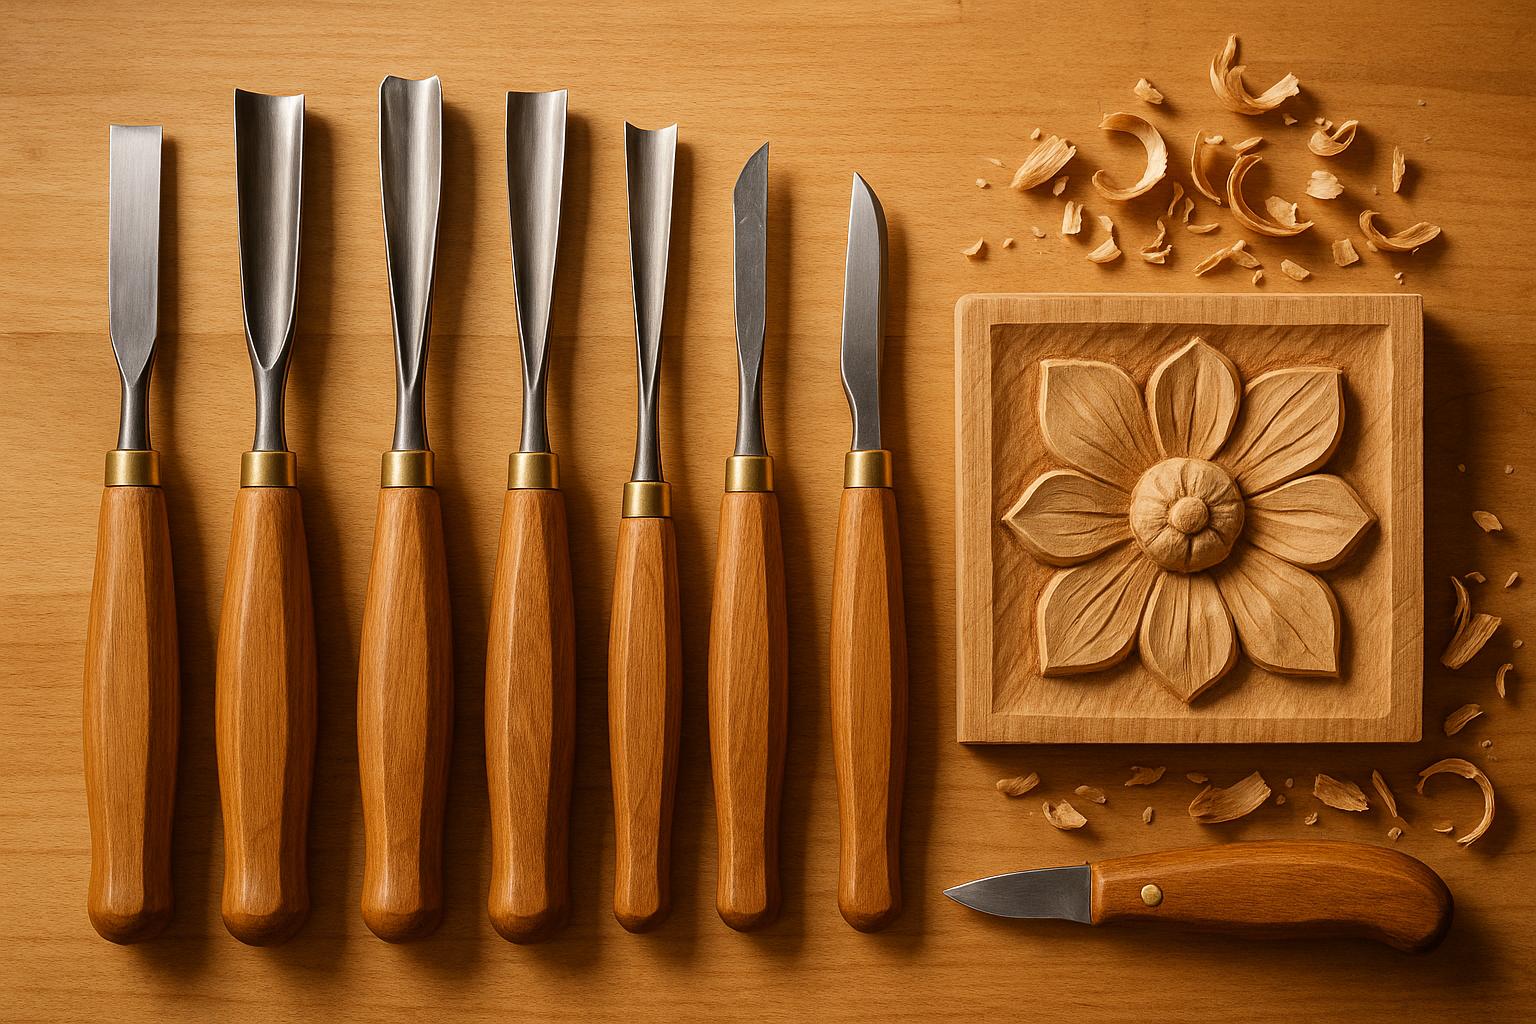
Main Wood Carving Tools and Their Uses
Knives and Chisels
Detail knives are perfect for intricate carving, allowing you to add fine features to miniature figures or textured designs on jewelry. These knives have small, pointed blades that offer precise control, making them ideal for working in tight spaces where larger tools can't reach [2].
Chip carving knives are designed for creating geometric patterns by removing small chips of wood with controlled cuts. Their straight or slightly curved blades make them well-suited for the repetitive precision needed in traditional chip carving [2].
For larger, rougher tasks, sloyd knives are the tool of choice. These sturdy knives are built to handle hardwoods and are excellent for quickly removing large amounts of material before moving on to finer details. Their thick blades make them a reliable option for heavy-duty carving [2].
Chisels come in different forms to tackle specific tasks: straight chisels for general shaping, skew chisels for angled cuts, and fishtail chisels for reaching into tight spots [3]. The angle of the bevel also plays a role - lower angles work better for detailed carving, while higher angles are suited for tougher jobs [3].
Micro carving tools, essentially smaller versions of standard tools, are designed for fine work. These tools are indispensable for carving tiny figurines or creating intricate jewelry, offering the precision needed when every millimeter matters [2].
Gouges and V-Tools
Gouges and V-tools bring depth and texture to wood carvings, expanding the possibilities beyond flat surfaces. Gouges, with their curved cutting edges, are ideal for hollowing out areas, creating concave shapes, and adding smooth contours. The curve, or "sweep", determines how deep or wide the cut will be [6].
Specialized gouges include bent gouges, which help carve around obstacles or into recessed areas, and spoon gouges, which are particularly favored for hollowing out bowls in spoon carving [4]. Palm gouges are another option, offering better control and reduced fatigue during detailed work, making them great for small projects or intricate details [2].
V-tools, on the other hand, excel at creating sharp grooves and lines. Their V-shaped edges make them perfect for texturing, lettering, and decorative patterns. These tools are especially valuable in relief carving, where clean edges and shadow lines enhance the overall design [5].
Together, gouges and V-tools allow carvers to achieve textures and dimensions that flat chisels simply can't replicate [6].
Power Tools and Attachments
Rotary tools, like Dremel units, have transformed wood carving by combining speed and precision. These tools remove material quickly while still offering detailed control. With adjustable speed settings, they can handle everything from rough shaping to fine finishing [2].
The real versatility of rotary tools lies in their attachments. Burrs come in various shapes, such as ball-shaped for hollowing and flame-shaped for detail work. Cutting discs and sanding attachments further expand their capabilities, allowing for precise cuts and smooth finishes [2].
Power carving tools are particularly useful for hardwoods or larger projects, drastically reducing the time it takes to complete tasks that would otherwise require hours of manual effort. Many carvers use power tools for rough shaping and switch to hand tools for detailed finishing, striking a balance between efficiency and precision [3].
Modern power carving systems are designed to handle everything from initial shaping to polishing, making them a practical choice for those juggling multiple projects [2]. However, these tools require steady hands and careful technique, as their speed can lead to mistakes if not used properly.
Mallets, Hammers, and Drilling Tools
Impact tools like mallets and hammers are essential for controlled force in wood carving. Mallets, typically made from hardwood or synthetic materials, are used to drive chisels and gouges without damaging their handles. Weighing between 12 and 24 oz (340–680 g), lighter mallets are ideal for precision work, while heavier ones are better suited for rough shaping [3].
Hammers, which are heavier - ranging from 16 to 32 oz (453–907 g) - are used for more forceful tasks, such as removing large chunks of wood or working with tough hardwoods. Dead blow hammers, filled with sand or lead shot, provide controlled strikes and reduce vibration, minimizing the risk of damaging your workpiece [3].
Japanese saws are another valuable tool for wood carving. Their thin blades and sharp teeth produce clean, precise cuts with minimal waste, making them ideal for intricate or angled cuts that require accuracy [2].
Drill presses, while not traditional carving tools, serve specific purposes in woodwork. They excel in creating repetitive patterns and ensuring consistent hole placement, which is invaluable for projects like furniture making or decorative panels. Their precision can elevate the overall quality of the finished piece [2].
| Tool Category | Weight Range | Primary Use | Best For |
|---|---|---|---|
| Mallets | 12–24 oz (340–680 g) | Controlled chisel strikes | Detail work, precision cuts |
| Hammers | 16–32 oz (453–907 g) | Heavy-duty material removal | Hardwoods, rough shaping |
How to Choose the Right Tools for Your Projects
Matching Tools to Wood Types
The type of wood you’re working with plays a big role in determining the tools you’ll need. Both the hardness and grain of the wood influence your choices.
For softwoods like basswood and pine, simple tools such as standard knives, chisels, and gouges are usually sufficient. These woods are easier to carve and require less force, making them ideal for detailed work. On the other hand, hardwoods like oak and walnut demand sturdier tools with sharper, high-bevel blades (angled between 25–30°). Power carving tools can also be helpful here, as they reduce the physical strain of working with harder materials.
Grain direction is another factor to consider. Woods with straight, even grain are easier to carve with standard tools, while irregular or interlocked grain can be trickier. In these cases, specialized tools like V-tools and skew chisels provide better control for making precise, angled cuts.
Once you’ve matched your tools to your wood type, the next step is to think about the scale of your project.
Project Size and Detail Considerations
The size and level of detail in your project are just as important as the material when selecting tools. A small, intricate project will require a different approach than a large, rough-hewn piece.
For miniatures, jewelry, or delicate decorative work, micro carving tools, detail knives, and palm tools offer the precision you need. Medium-sized projects like figurines or relief panels are well-suited to standard knives, gouges, and chisels. Larger projects, such as sculptures or furniture components, are best tackled with heavy-duty tools like drawknives, power carving systems, and mallets.
Your desired level of detail also affects your tool choices. For highly detailed work, opt for tools with smaller, sharper blades, like detail knives, micro gouges, and V-tools. Medium-detail projects can be handled with standard-sized tools, while rough shaping or low-detail work calls for larger chisels, drawknives, or power tools.
To help you decide, here’s a quick comparison of common tool types and their ideal uses.
Tool Comparison Table
Each tool type has strengths and limitations, and knowing these can help you build a toolkit that matches your carving style.
| Tool Type | Best Applications | Key Advantages | Main Limitations |
|---|---|---|---|
| Knives | Fine detail work, whittling, small projects | Precise control, versatile, portable, affordable ($15–$40) | Slower on large projects, frequent sharpening, limited for hardwoods |
| Gouges | Hollowing, concave shapes, medium to large projects | Great for curved surfaces, efficient material removal, many sizes available | Less precise for details, may need a mallet for hardwoods, tricky to sharpen |
| Power Tools | Large projects, hardwood carving, initial shaping | Fast, handles tough materials, reduces fatigue | Expensive ($60–$120+), less control for detail, safety concerns, needs power |
| Mallets/Hammers | Driving chisels, rough shaping, hardwood work | Adds controlled force, reduces hand fatigue, boosts efficiency | Not for fine details, requires skill to avoid mistakes, adds extra weight |
If you’re just starting out, begin with a basic set of tools. As your projects grow in complexity, platforms like Toolstash can help you expand your collection. With features like AI-powered selection and smart categorization, these tools make it easier to find what you need, saving you time and effort.
Wood Carving Tools Explained -Beginners Guide to Gouges/V-Tools etc
Maintenance and Care for Wood Carving Tools
Taking care of your carving tools is just as important as choosing the right ones. Proper maintenance not only keeps them in top shape but can also extend their lifespan by 30–50%, ensuring they’re ready to perform whenever you need them [7][3].
Cleaning and Sharpening Methods
After every carving session, it’s essential to clean your tools. Start by wiping them down with a dry cloth to remove debris and moisture, which helps prevent sap buildup that can dull the edges. For any stubborn resin, use a cloth dampened with denatured alcohol. If your tools are made of high-carbon steel, applying a thin layer of mineral oil after cleaning creates a protective barrier against rust.
Power tools need a different approach. Use compressed air to blow out dust from vents and moving parts, preventing overheating and motor damage. Wipe the exterior with a damp cloth, being careful to avoid getting moisture into electrical components. Regularly inspect bits and attachments, replacing them as soon as they show signs of wear or dullness.
Sharpening is another key part of maintenance. The right method depends on the tool’s condition. Severely dulled edges benefit from sharpening stones, such as oil or water stones, while stropping is ideal for keeping tools razor-sharp between major sharpening sessions. Many professionals strop their tools after each use and perform a full sharpening about once a month.
When using sharpening stones, it’s crucial to maintain a consistent angle - typically 20–30° for chisels and knives. Start with a coarse grit to restore the edge, then move to finer stones for polishing. A leather strop paired with a polishing compound, like chromium oxide, can give your tools a mirror finish, allowing them to glide effortlessly through wood.
For quick touch-ups, sharpening paddles are a convenient option. These paddles, with their stable wooden bases, help you maintain consistent angles. Different compounds on the paddles serve various purposes: green for fine polishing and white or red for heavier sharpening tasks.
Once your tools are clean and sharp, proper storage is the next step in protecting your investment.
Storage and Organization
Storing your tools correctly is essential to prevent damage. A dry, climate-controlled space with stable temperature and humidity levels is ideal. Avoid areas like basements or garages, where moisture fluctuations can lead to rust or swelling.
To keep blades safe, use tool rolls, wooden racks, or foam-lined drawers. Ensuring that blades don’t touch each other prevents nicks that would require extra sharpening to fix. Adding silica gel packs to your storage setup can help absorb excess moisture, providing extra protection for high-carbon steel tools.
For a more modern approach, digital systems like Toolstash can streamline your storage and maintenance routine. Toolstash helps organize your tools by cataloging them and sending maintenance alerts. Its AI-powered features can categorize your collection and track tool locations, so you always know where to find what you need.
Keeping your tools well-maintained and organized not only extends their lifespan but also enhances safety during long carving sessions.
Safety Practices
Safety should always be a priority when working with carving tools. Start with proper protective gear: cut-resistant gloves for handling blades and safety goggles to shield your eyes from wood dust and metal particles, especially when using power tools or sharpening.
A clutter-free workbench is equally important. Arrange tools by type and how often you use them. Magnetic strips or pegboards are great for keeping frequently used tools within reach while preventing them from rolling off the bench or getting lost in piles of materials. Labeling storage areas ensures each tool has a designated spot.
Before using any tool, inspect it carefully. Check handles for cracks or looseness and blades for chips or excessive wear. Dull tools should be sharpened immediately to maintain control and reduce the risk of accidents. Never force a dull blade through wood - this can lead to chipping, handle breakage, or loss of control. If a tool isn’t cutting cleanly, stop and sharpen it instead of applying extra pressure.
Your workshop should also be equipped with a well-stocked first aid kit in an easily accessible location. Adequate lighting reduces eye strain and helps you spot potential hazards, while proper ventilation clears out dust and fumes, protecting both your health and your tools.
Digital platforms like Toolstash can also help by automating maintenance reminders, ensuring you won’t overlook important upkeep tasks while diving into new projects.
Organizing and Managing Your Tool Collection
Keeping your tools well-organized is just as important as maintaining them. A tidy and structured setup not only makes your work more efficient but also sparks creativity, especially as your wood carving projects grow more complex. Over time, your collection will likely expand from basic chisels and knives to a variety of specialized tools, making organization a key priority.
Tool Categorization Methods
When it comes to organizing tools, a layered approach works best. Many professional woodcarvers sort their tools by function first - grouping items like knives, chisels, gouges, V-tools, power tools, and mallets into distinct sections. From there, they further divide tools by size or project type to make them easier to locate [2][3].
For those who juggle multiple projects, a project-based organization system can be a game-changer. This involves creating dedicated tool sets tailored to specific carving styles, such as relief carving, chip carving, spoon carving, or miniature work [2][6]. Having everything you need for a particular project in one place saves time and reduces frustration.
If space is tight, consider size-based categorization. Divide your tools into categories like micro (under 2 inches), standard (2–4 inches), and large (over 4 inches). Storage solutions can then be tailored to match: foam-lined drawers are perfect for micro tools, while wall-mounted racks or pegboards work well for larger items.
To keep things neat and accessible, try modular toolboxes, magnetic strips, or custom foam inserts. These options not only protect your tools but also make it easy to see and grab what you need.
While physical organization is crucial, digital tools can take your workshop management to the next level.
Benefits of Digital Tool Management
Digital platforms like Toolstash are reshaping how woodcarvers manage their tool collections, offering features that go beyond traditional storage methods.
With real-time inventory tracking, you can instantly check what tools you have and where they are. No more rummaging through drawers or shelves for that specific gouge - your entire collection is just a few clicks away on your phone or computer.
Workshops that adopt digital inventory systems report impressive results. According to industry surveys, these systems can reduce tool loss by up to 40% and speed up project setup times by 25%. Features like precise location tracking and smart categorization ensure tools are always where they should be, organized by type, size, or usage patterns.
Another handy feature is lending and borrowing management. If you share tools with friends or within a woodworking club, this function tracks who borrowed what and when. It eliminates the hassle of searching for a missing tool only to realize it’s not even in your workshop.
Professional woodcarvers who use platforms like Toolstash often see noticeable improvements in their workflow, thanks to automated categorization and tracking features.
Using AI Help for Tool Selection
Digital platforms have gone beyond basic inventory management by incorporating AI to assist with tool selection and project planning.
For example, project-based tool recommendations can help you choose the best tools for a specific task. If you’re working on a miniature figure, AI can analyze factors like wood type, detail level, and project size to suggest the most suitable tools from your collection [2].
Adding new tools to your inventory is also easier than ever. With features like Toolstash’s AI Snap, you can simply take a photo of a tool, and the system will automatically identify it, record its details, and categorize it.
AI can even offer personalized carving advice. If you’re tackling a tricky technique or working with an unfamiliar wood type, the system suggests tools from your collection that are best suited for the job. Over time, it learns from your habits - if you frequently use specific gouges for hardwood projects, it will prioritize those in future recommendations.
Another time-saver is automated categorization. AI evaluates each tool’s characteristics and places it into the appropriate category for you. It also generates usage reports, giving you insights into your carving patterns. These reports can guide future purchases and help you refine your workshop setup.
Conclusion
Excelling in wood carving isn’t just about artistic talent - it’s about having the right tools, keeping them in excellent condition, and staying organized. These elements are crucial for achieving precision and can cut carving time by as much as 40% [1][2]. Whether you’re crafting delicate miniatures or working on large-scale reliefs, specialized tools are indispensable for achieving the level of detail and accuracy that standard tools simply can’t provide.
Investing in high-quality tools, like high-carbon steel blades sharpened at a 20° to 30° angle, can increase their lifespan by over 50% [1][2]. This not only reduces long-term costs but also improves performance, making your carving experience smoother and more efficient.
Keeping your tools organized isn’t just about convenience - it’s also about safety and preserving their quality. A well-organized workspace minimizes setup time and ensures your tools stay sharp and free from damage [1][2]. Digital platforms now make this process even easier, helping carvers maintain and organize their tools for optimal performance.
For carvers at any skill level, digital management tools like Toolstash are transforming the way workshops operate. With features such as AI-powered tool identification, smart categorization, and real-time inventory tracking, finding the right tool becomes a breeze. Maintenance reminders ensure your tools remain in peak condition, while lending and borrowing management fosters seamless collaboration among fellow carvers.
FAQs
How can I maintain my wood carving tools to keep them in top condition?
Proper care goes a long way in keeping your wood carving tools in top shape and extending their lifespan. Start by cleaning your tools after every use. Wood debris and sap can build up, leading to rust or dull edges. A soft cloth or brush works well for this task - skip the harsh chemicals, as they can harm the metal.
Make it a habit to sharpen your tools regularly. A sharpening stone or honing guide is perfect for maintaining a sharp edge, which not only makes carving smoother but also reduces the risk of accidents. For tools with more intricate shapes, opt for specialized sharpening tools designed for detailed edges.
Lastly, store your tools properly to keep rust at bay. A dry, cool spot is ideal, and adding a light coat of oil to the metal surfaces provides extra moisture protection. Follow these straightforward steps, and your tools will stay dependable and ready for your next carving session!
How can Toolstash help me organize and manage my wood carving tools more efficiently?
Toolstash takes the hassle out of managing your wood carving tools with features like inventory tracking, AI-assisted tool addition, and smart categorization. It lets you effortlessly track where your tools are, organize them by type or purpose, and even handle lending and borrowing with ease.
With Toolstash, you can spend less time worrying about tool management and more time focusing on your wood carving projects. It ensures your tools are always organized, accounted for, and ready when you need them.
What should I consider when selecting wood carving tools for different types of wood and project sizes?
When selecting wood carving tools, it's important to match them to the type of wood you're working with and the size of your project. For tougher woods like oak or maple, you'll need sturdy tools with sharp, durable edges. On the other hand, softer woods such as pine or basswood are much easier to carve and pair well with lighter, less heavy-duty tools. If you're working on fine details, smaller precision tools are your best bet, while larger projects often call for tools that are heavier and more robust.
Your skill level and the tool's comfort are equally important. If you're just starting out, beginner-friendly kits with a variety of versatile tools can be a great choice. Seasoned carvers, however, might lean toward more specialized tools tailored to their needs. Also, make sure the tool handles feel comfortable in your hand, especially if you'll be using them for extended periods. Investing in well-made tools may seem like a bigger upfront cost, but it can save you both time and effort down the road.