Choosing the right wood carving tools as a beginner can make the difference between a fun new hobby and a frustrating experience. Here's what you need to know:
- Start Simple: A good beginner set includes a whittling knife, a few chisels, and gouges. These tools let you practice basic techniques without overwhelming you.
- Prioritize Quality: Look for high-carbon steel blades - they stay sharp longer and are easier to maintain than stainless steel. Comfortable, ergonomic handles reduce hand strain.
- Safety First: Tools like chisels and gouges are safer for beginners because they keep your hands behind the blade. Cut-resistant gloves and finger guards are essential.
- Budget-Friendly Options: Beginner sets range from $30 to $100. Popular choices include the Schaaf Tools 12-piece set ($60–$80) or the Hi-Spec 12-piece set ($25–$50).
- Maintenance Matters: Keep tools sharp with a sharpening stone or strop ($10–$30) and store them properly to prevent rust and damage.
Key takeaway: Start with a few high-quality tools, focus on safety, and maintain them well. This approach ensures a smooth learning experience while building confidence in your wood carving skills.
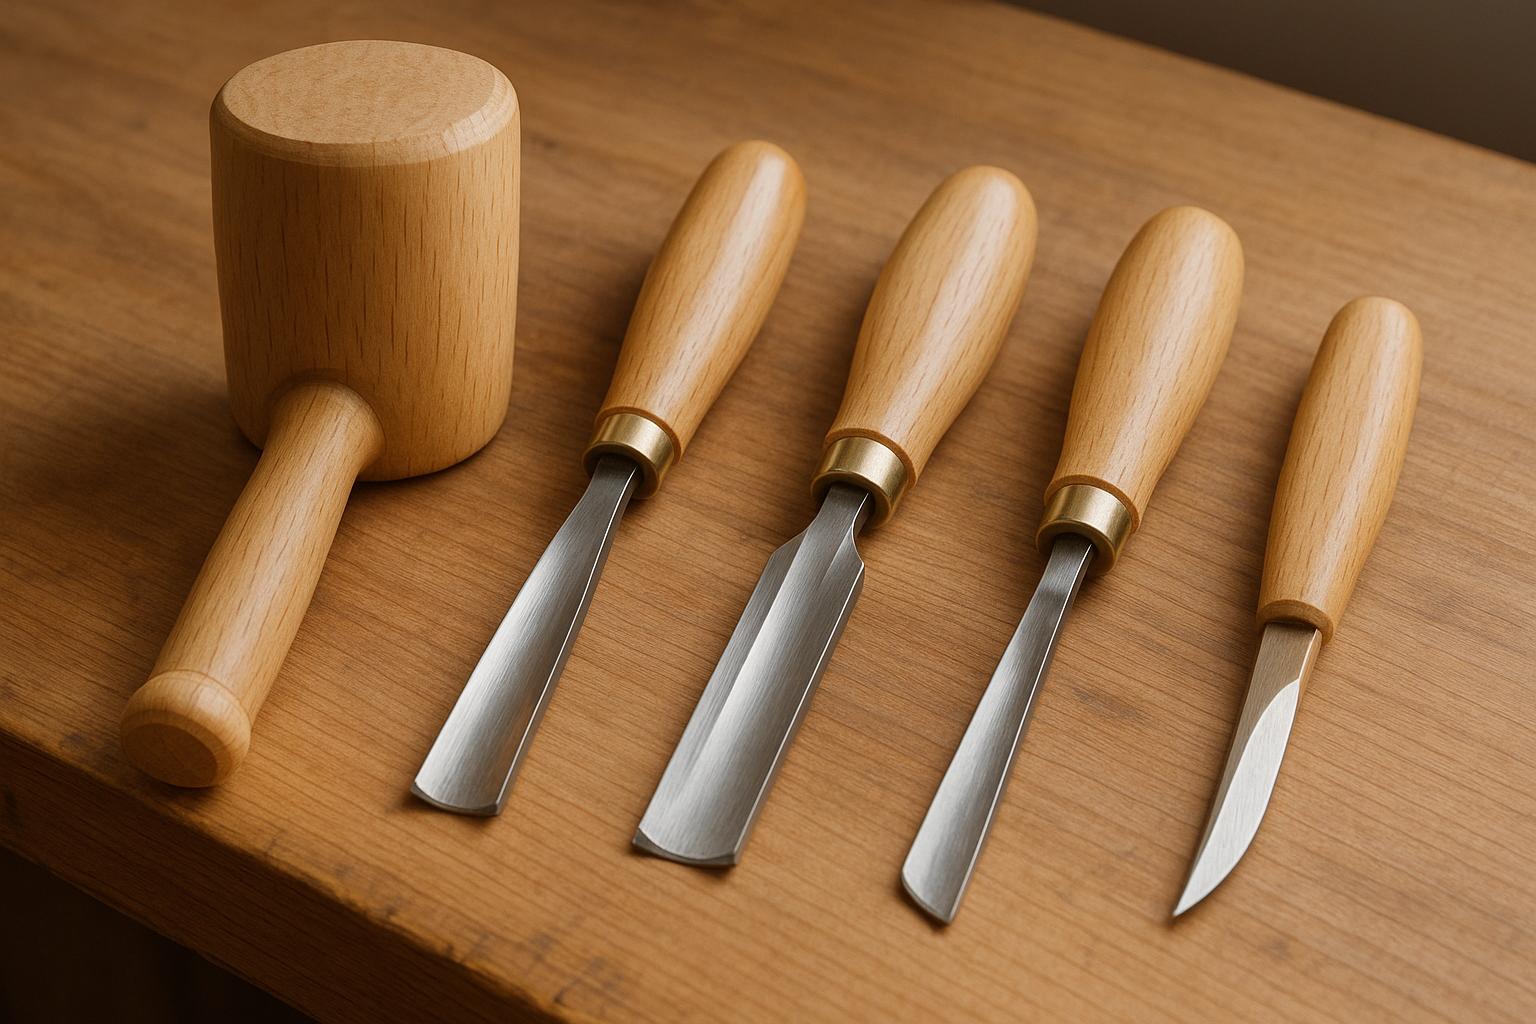
5 Carving Tools Every Beginner Needs
Types of Wood Carving Tools
Building a reliable toolkit starts with understanding the variety of wood carving tools available. From knives for shaping to chisels and gouges for detailed cuts, and finally to finishing tools, each serves a specific purpose in the carving process.
Carving Knives
Whittling knives are a great starting point for beginners. These knives are perfect for general shaping and creating simple figures. Whittling is often recommended for newcomers because all you need is a sharp knife and a piece of wood to get started[2].
Detail knives are designed for precision. With shorter, finer blades, they’re ideal for adding intricate features or delicate patterns to your carvings. These knives give you the control needed for refined, detailed cuts.
Chip carving knives are used to remove small, controlled chips of wood, making them perfect for creating geometric patterns. They work best with softwoods like basswood or butternut, which are more forgiving for detailed designs[1].
Chisels and Gouges
Straight chisels are versatile tools with flat, beveled edges. They are excellent for flattening surfaces, removing background material in relief carvings, and defining sharp edges. Available in various sizes, they can handle both fine details and larger surface work.
V-profile chisels (also called V-tools or parting tools) feature a V-shaped blade that excels at creating sharp grooves and lines. They’re great for outlining designs, adding texture, and crafting decorative details with precision[1][2].
U-gouges are indispensable for carving rounded or concave shapes. Their curved blades scoop and hollow out wood, making them ideal for projects like bowls, spoons, or background areas in relief carvings. These tools offer both control and versatility[1][2].
Spoon gouges have a curved shaft and blade, allowing them to reach into tight spaces and carve concave surfaces that straight tools can't handle. They’re particularly effective for hollowing out bowls or adding curved details in confined areas.
Rasps, Files, and Mallets
Rasps and files are finishing tools that refine your work after the initial shaping. Rasps, with their coarse teeth, remove material aggressively, while files are better suited for smoothing surfaces and removing tool marks for a polished finish[1][4].
Mallets are used to apply controlled force to chisels and gouges. With heads made of wood or soft polymer, they protect tool handles while helping you work through tougher woods or remove larger amounts of material. Mallets also reduce hand fatigue during long carving sessions[1][4].
Together, these tools form the foundation of a well-rounded carving toolkit.
| Tool Category | Primary Function | Best Beginner Applications | Typical Price Range |
|---|---|---|---|
| Whittling Knife | General shaping, simple figures | Small animals, basic forms | $10-$30 |
| Detail Knife | Fine work, intricate cuts | Facial features, delicate patterns | $10-$25 |
| Straight Chisel | Flat cuts, surface prep | Relief backgrounds, edge definition | $10-$40 |
| U-Gouge | Hollowing, curved shapes | Spoon carving, rounded details | $10-$40 |
| V-Tool | Lines, grooves, outlining | Design outlines, decorative lines | $10-$40 |
| Mallet | Controlled force | Background removal, hard woods | $10-$25 |
Each tool plays a unique role in the carving process, and using the right one can make all the difference in your results.
What to Look for When Choosing Beginner Tools
Picking the right wood carving tools as a beginner is more than just a shopping decision - it’s about setting yourself up for a safe and enjoyable learning experience. The tools you choose can influence how quickly you improve, how much fun you have, and how safe you feel while carving. Here's a breakdown of what to consider when assembling your first set of tools.
Quality and Material
The most important factor in any tool is the material of its blade. High-carbon steel stands out because it’s durable, keeps its edge longer, and is easier to sharpen. This is a big deal, as dull tools can be frustrating and even dangerous - they require more force to use and are prone to slipping[2]. Look for blades labeled high-carbon steel or professional-grade steel. Steer clear of stainless steel blades, which are harder to sharpen and don’t hold their edge as well.
Handles matter too. Comfortable, ergonomic handles reduce hand fatigue and allow for natural grip positions. For whittling knives, curved handles that fit easily in your palm are ideal for repetitive motions. Bench carving knives, on the other hand, often have larger handles paired with smaller blades, which improves control during detailed work[1]. Once you’ve confirmed the tools are high-quality, balance your choices with what fits your budget.
Affordability
For beginners, affordability doesn’t mean sacrificing quality - it’s about finding the right balance. Tool sets are a smart starting point. They typically include the essentials at a reasonable price, giving you everything you need to explore the craft without overspending[1][2].
A good beginner set, like a 12-piece wood carving kit, often provides a mix of basic and slightly more advanced tools. These sets are usually priced between $30 and $100, making them accessible while still offering decent quality. For instance, the Schaaf Tools 12-piece set is a popular choice, priced around $60–$80. It provides excellent value for newcomers. Another option is the Hi-Spec 12 Piece Wood Carving & Crafting Set, which is more affordable, typically ranging from $25–$50[3]. As you gain experience, you can gradually invest in specialized or higher-end tools that match your evolving interests.
Ease of Maintenance
Once you’ve found tools that fit your needs and budget, keeping them in good shape is key. High-carbon steel tools are easier to maintain than stainless steel, making them a better choice for beginners who will need to sharpen their tools regularly[2][3]. Basic maintenance gear like a sharpening stone or honing steel (costing $10–$30) is simple to use and will keep your tools working smoothly.
Proper care goes beyond sharpening. Store your tools in a dry place to prevent rust, wipe the blades clean after each use to remove wood dust and moisture, and avoid tossing them loosely into a drawer where they can get damaged[1]. Many beginner kits include maintenance tips, so look for sets that offer this kind of guidance.
Safety Features
Safety should always come first, especially for beginners. Some tools are naturally safer to use than others. For example, gouges with curved blades are often recommended because they keep your hands behind the blade, reducing the chance of cuts[2].
Tools with larger handles, like palm tools and bench carving knives, provide better stability and control, which helps prevent slips. These smaller, hand-held tools are specifically designed for beginners and hobbyists, making them a safer option[3]. When choosing tools, prioritize designs that promote safe hand positioning and allow for steady control during carving.
Handles that offer a secure grip - even when your hands are slightly damp from extended use - are another important feature. Beginner sets often include safety tips and instructions for proper hand positioning, so opt for kits that emphasize these aspects. Many instructors recommend starting with chisels and gouges rather than knives, as they’re generally safer and keep your hands out of harm’s way[2].
When evaluating a tool set, check for high-carbon steel blades, read reviews from other beginners to gauge durability and ease of use, and avoid sets with vague material descriptions or suspiciously low prices (under $15)[1][2]. Good beginner kits often include detailed guides, instructions, or even video tutorials to help you get started[2].
Building a Beginner's Starter Kit
Now that you know what to look for in quality tools, it’s time to put together your first carving kit. A well-thought-out starter set will give you the flexibility to try different carving techniques without overwhelming you with too many choices.
Basic Tool Recommendations
A beginner’s starter kit should cover seven essential categories of tools to handle a variety of projects. Start with a whittling knife - this all-purpose tool is perfect for shaping and carving small figures. Add a chip carving knife for precise, detailed cuts, and include a bench carving knife for intricate work that requires maximum control.
For chisels, it’s best to have three sizes: large, medium, and small. These will cover everything from rough shaping to finer details. You’ll also need a basic gouge, which is great for creating hollows and scooped shapes.
Don’t forget sharpening tools. A paddle strop is highly recommended for beginners because it’s simple to use and keeps your knives and chisels sharp. You can find these for around $10 to $25, and maintaining sharp tools is crucial for both effective carving and your safety.
Safety gear is equally important. Invest in cut-resistant gloves and finger guards to protect your hands while you’re learning proper carving techniques.
This setup provides everything you need to explore whittling, relief carving, chip carving, and basic sculpting. Many affordable 12-piece starter sets bundle essential tools, along with a few extras to help you grow your skills.
Let’s break down the role of each tool in your kit.
Tool Comparison: Types and Their Uses
Each tool in your kit serves a specific purpose. Here’s a quick overview of what each one does and why it’s important:
| Tool Type | Function | Pros |
|---|---|---|
| Knives | Whittling, chip carving, detail work | Versatile, easy to control, ideal for fine details |
| Chisels | Rough shaping, straight cuts, flat surfaces | Efficient at removing large amounts of wood quickly |
| Gouges | Hollowing, scooping, creating curves | Perfect for rounded shapes; safer hand placement |
| Rasps/Files | Smoothing, refining, and finishing surfaces | Great for fine-tuning and adding finishing touches |
Each tool comes with its own strengths and trade-offs.
Knives are incredibly versatile, making them a great starting point for beginners. They’re ideal for learning basic cuts and improving hand control.
Chisels are excellent for roughing out shapes. They remove wood quickly and, when paired with a mallet, can make powerful cuts. Many instructors recommend starting with chisels because they encourage safer hand positioning - keeping your hands behind the cutting edge.
Gouges are your go-to tools for creating curves or hollowed-out areas. Their curved edges scoop out wood efficiently, while their design naturally keeps your hands away from the blade.
Rasps and files are all about the finishing touches. While they won’t remove large amounts of material, they’re essential for smoothing surfaces and refining shapes before you add the final details.
To get started, aim to include at least one tool from each category in your kit. This balanced approach ensures you can tackle all stages of a project - from rough shaping with chisels to fine detailing with knives and finishing with rasps. As you gain experience, you can expand your toolkit with specialized options like V-tools for grooves or micro chisels for intricate designs.
Finally, pair your tools with basswood blocks, a beginner-friendly material known for its softness and ease of carving. With your starter kit and some basswood, you’ll be ready to dive into the world of wood carving.
How to Organize and Maintain Your Tools
Once you've gathered your starter kit, taking care of your tools is key to keeping them in great shape and ensuring they perform well over time. A well-organized system not only makes your carving sessions safer but also more enjoyable as you continue to hone your skills.
Start Small and Build Over Time
Begin your journey with just a few essential tools - like a dependable whittling knife, a medium chisel, and a basic gouge. This allows you to focus on mastering the basics without overwhelming yourself or breaking the bank. Avoid the temptation to buy an extensive set right away; too many tools can lead to clutter and unnecessary expense. As you gain more experience and figure out your preferred carving techniques, you can gradually add tools that suit your evolving style. This methodical approach ensures that every tool in your kit has a purpose and remains dependable as your skills grow. Once your collection begins to expand, keeping it organized becomes even more important.
Use Digital Tools for Organization
To keep your growing collection in order, digital platforms like Toolstash can be a game-changer. These platforms help you track your tools, categorize them, and even note their storage locations. Whether it’s a carving knife, a chisel, or a gouge, you’ll know exactly where each tool is at all times. For those who share tools with others, features like lending and borrowing tracking can help you avoid mix-ups or lost items. Staying organized not only boosts efficiency but also reduces the risk of accidents during carving sessions.
Regular Maintenance for Long-Lasting Tools
Good organization is just one part of the equation - routine maintenance is just as important. After each carving session, inspect and clean your tools to prevent rust and damage. Wipe them down with a dry cloth, and if there’s any sticky residue, use a small amount of mineral oil to clean it off. Make sure your tools are completely dry before storing them.
Sharpening is another critical task. When you notice your tools struggling to make clean cuts or requiring extra pressure, it’s time to sharpen them. Use the right sharpening tools, like a sharpening stone or strop, to restore their edges. Beginners typically find they need to sharpen their tools after several hours of carving.
To protect the cutting edges, use blade guards or wrap sharp tools in cloth. Store them in individual slots or compartments in your toolbox to prevent them from knocking into each other. Regularly check for signs of wear, loose handles, or damage. Addressing these issues early can prevent them from becoming bigger problems - or even safety hazards. With consistent care and smart organization, your starter tools can last for years, setting the stage for a well-curated, more advanced collection as your carving journey progresses.
Conclusion: Finding the Right Tools for Your Wood Carving Journey
The right tools can turn wood carving from a frustrating experience into an enjoyable and rewarding hobby. It’s not about buying everything at once - it’s about making thoughtful choices that support your progress and prioritize safety.
When starting out, quality matters more than quantity. A few reliable tools from trusted brands like Schaaf Tools or Hi-Spec can outperform a collection of cheaper alternatives. Many experts suggest beginning with chisels and gouges rather than knives, as these keep your hands safely behind the blade - a crucial safety feature for beginners.
Taking a gradual approach to building your toolkit is just as important. Starting with a basic set - a whittling knife, a straight chisel, and a simple gouge - gives you the foundation to practice essential techniques. As your skills grow and your projects become more ambitious, you’ll naturally discover which specialized tools will best suit your needs.
FAQs
What safety tips should beginner wood carvers follow?
When you're just starting out with wood carving, safety isn't just important - it's non-negotiable. By taking the right precautions, you can avoid injuries and make your carving experience both enjoyable and productive. Here are a few essential safety tips:
- Keep your tools sharp: It might seem counterintuitive, but dull tools are actually more dangerous. They require extra force, which makes them harder to control and more likely to slip.
- Use protective gear: Invest in cut-resistant gloves to shield your hands and safety goggles to protect your eyes from flying wood chips.
- Carve away from yourself: Always direct the blade away from your body, keeping your hands and any other part of you out of harm’s way.
- Secure the wood: A stable workpiece is a safe workpiece. Use a clamp or carving vise to keep the wood from shifting unexpectedly while you work.
By sticking to these guidelines, you can focus on honing your skills without worrying about unnecessary risks. Wood carving should be as safe as it is rewarding!
What’s the best way to maintain and sharpen wood carving tools?
To keep your wood carving tools performing at their best, consistent maintenance and sharpening are essential. Start by cleaning them thoroughly after each use. This helps remove any debris and keeps rust at bay. A soft cloth paired with a small amount of oil works well to protect the metal from corrosion.
When it comes to sharpening, a good-quality sharpening stone or honing kit is a must-have. Begin with a coarse grit to refine the edge, then move to a finer grit for a smooth, polished finish. Make sure to maintain the tool's original bevel angle during the process. Between sharpening sessions, regular stropping with a leather strop can help maintain that razor-sharp edge.
Taking care of your tools not only prolongs their lifespan but also ensures safer, more precise carving every time.
What are the best types of wood for beginners to start carving?
For those just starting out, it's a good idea to begin with softwoods that are easier to carve and more forgiving as you hone your skills. Basswood is a top choice - it’s soft, has a smooth, fine grain, and is easy to find. Pine is another solid option, though it often comes with knots that can make carving a bit more challenging. If you’re looking for something with a bit more character, Butternut is a great pick. It’s soft to carve and features an appealing grain pattern.
These woods are not only beginner-friendly but also budget-friendly and widely available across the U.S. Once you feel more confident, you can challenge yourself with harder woods to take your carving skills to the next level.