Keeping your wood carving tools sharp is non-negotiable for precision, safety, and durability. Dull tools lead to rough cuts, higher injury risks, and faster wear. Here’s what you need to know:
- Sharp Tools Work Better: Clean cuts, detailed designs, and less effort.
- Safety Matters: Sharp edges mean better control and fewer accidents.
- Longer Tool Life: Regular sharpening prevents damage and preserves geometry.
Key sharpening tips include maintaining correct edge angles (15–20° for knives, specific bevels for gouges and V-tools), using the right materials (water stones, diamond plates, leather strops), and understanding when to hone versus grind. Avoid overheating to protect the steel’s temper.
Organizing tools is just as important. Platforms like Toolstash help track inventory, schedule maintenance, and manage tool lending. With proper care, your tools will stay sharp, safe, and ready for any project.
Sharpening Carving Tools 101
Wood Carving Tool Edges Explained
Understanding the geometry of a tool's edge is essential for achieving sharp, durable results. The shape of each tool determines not only how it should be sharpened but also how it performs during cutting.
Common Wood Carving Tool Types
Carving knives are indispensable for most projects. They typically feature a straight or slightly curved edge, making them versatile for general shaping and intricate details. The blade tapers to a fine point, allowing for precise cuts and clean, crisp lines.
Gouges bring a different dynamic with their curved cutting edges. These tools have a U-shaped or V-shaped profile, with varying degrees of curvature, often referred to as the "sweep." Shallow gouges are great for gentle shaping, while deeper ones excel at creating bold scoops and hollows. Most gouges are "outcannel", meaning their bevel is on the outside of the curve, while the inside is flat or lightly polished. Maintaining the original bevel angle - usually between 15–20° - during sharpening is critical. Altering this angle can negatively affect the tool's performance and geometry[4].
V-tools feature a distinctive V-shaped cutting edge, offering yet another unique configuration. These tools require extra care during sharpening due to their multiple bevels. The outer faces typically need an outside bevel of 20–25°, while the inner facets must be precisely maintained to preserve the V shape[4]. This complexity makes V-tools one of the trickiest tools to sharpen.
Knowing these basic tool types is the first step toward understanding how to sharpen them effectively.
Edge Angles and Performance
The sharpening angle you choose for your tools plays a crucial role in balancing sharpness, durability, and control. For carving knives and gouges, angles between 15–20 degrees per side tend to deliver optimal results[3][4].
- A sharper angle, closer to 15°, reduces cutting resistance and creates cleaner cuts, making it perfect for detailed work. However, this fine edge is more fragile and can chip when used on harder woods or knots.
- A steeper angle, closer to 20° or more, provides better durability. The thicker edge can withstand tougher tasks and holds its sharpness longer, though it may require more effort to cut and might not achieve the same level of detail.
The table below summarizes typical edge angles and their characteristics for each tool type:
| Tool Type | Edge Shape | Typical Angle | Key Characteristics |
|---|---|---|---|
| Carving Knife | Straight/Curved | 15–20° | Balanced for general use |
| Gouge | U-shaped/Curved | Match existing bevel | Outside bevel only |
| V-Tool | V-shaped | 20–25° | Multiple bevels needing precision |
V-tools, in particular, benefit from a slightly steeper outside bevel of 20–25°, which helps them handle the stress of parting cuts while maintaining their unique geometry.
The type of wood you’re working with also affects the ideal edge angle. Softer woods like pine or basswood can accommodate sharper, more delicate angles without risking damage. Harder woods, such as oak or maple, often require steeper angles for added durability. Many seasoned carvers keep two sets of similar tools - one with sharper angles for fine detail work and another with steeper angles for rougher tasks.
To ensure your tools perform at their best, stick to the bevel angle recommended by the manufacturer. If you're unsure, measure the existing angle and replicate it during sharpening[3][4].
With these basics in mind, the next step is to explore the sharpening materials and techniques that work best for each tool's unique profile.
Sharpening Tools and Materials You Need
Having the right tools can make sharpening your carving tools a smoother and more efficient process. Selecting the correct sharpening tools is just as important as understanding the geometry of your tools. The good news? You don’t need to break the bank - a few carefully chosen items will cover most of your sharpening needs.
Sharpening Stones and Grit Selection
Water stones are a favorite among carvers because they cut quickly and are easy to clean. These stones need to be soaked in water for about 10–15 minutes before use. They’re great for removing metal efficiently while leaving a clean surface. Brands like Norton and Shapton provide dependable options at various price points[4].
Oil stones offer a more traditional option with excellent durability. While they cut slower than water stones, they don’t require soaking, and the oil helps clear away metal particles, keeping the surface clean. Beginners often appreciate their forgiving nature and long-lasting performance.
Arkansas stones, made from natural materials, are highly valued for their ability to produce smooth, polished edges. These stones are especially popular for the final stages of sharpening, leaving tools with a refined finish[4].
Diamond plates are the fastest when it comes to cutting and can handle even the hardest steels. Although they come with a higher upfront cost, they don’t require flattening and can last for years. Because of their aggressive cutting power, it’s important to use a light touch to avoid removing too much metal[4].
When it comes to grit, the progression is straightforward. Start with coarse grits (200–400) for reshaping damaged edges or fixing nicks, move to medium grits (800–1,200) for refining the edge, and finish with fine grits (3,000–8,000) for a polished, razor-sharp edge[3][4]. For example, a heavily damaged gouge might need coarse grit, while a slightly dull knife can be touched up with fine grit.
Next, let’s look at how leather strops and honing compounds add the final touch to your tools.
Leather Strops and Honing Compounds
Leather strops are used for the final polishing step, removing any small burrs left from sharpening stones. Basic strops are affordable, but premium versions - like double-sided strops - cost a bit more. Brands such as Flexcut and BeaverCraft make strops durable enough for regular use[4].
To enhance the polishing process, many carvers apply green chromium oxide compound to the strop. This compound acts as an ultra-fine abrasive, creating a razor-sharp finish. The technique is simple: pull the tool across the strop, moving away from the cutting edge while maintaining the correct angle. For small gouges or intricate curves, even a strip of leather or bent cardboard with compound can work wonders[4].
Now, let’s dive into tools designed for sharpening curves and fine details.
Slip Stones and Specialty Tools
Slip stones are ideal for sharpening the inside curves of gouges and the tight angles of V-tools, areas where flat stones can’t reach. These stones are shaped to match your tool’s profile, helping you maintain the correct edge geometry. For instance, Norton slip stones are widely available and reasonably priced. It’s important to choose a slip stone that fits your tool’s specific curve - a shallow gouge requires a different stone than a deep U-gouge. Use short, controlled strokes to avoid altering the tool’s shape[4].
For those working on intricate edges, profiled honing wheels from Tormek offer precision but come at a higher cost. Many carvers find that a few well-selected slip stones are more than sufficient. A handy tip is to use the Marker Trick: color the bevel with a marker to ensure you’re sharpening at the correct angle, which helps preserve the tool’s original geometry[4].
The Scary Sharp Method
The Scary Sharp method is known for delivering impressively sharp results using simple, inexpensive materials[1]. This technique involves using wet/dry sandpaper in progressively finer grits, adhered to a flat surface like glass or granite. Wet/dry sandpaper packs are affordable, making this method budget-friendly[1]. Start with 400 grit and work your way up to 2,000 grit or higher for a polished edge. The key is to use a completely flat surface - plate glass or a granite countertop works well.
The process is similar to traditional stone sharpening: hold your tool at the correct angle and use consistent strokes across the sandpaper, switching to finer grits as you go. This method is cost-effective and precise, but sandpaper tends to wear out quickly, especially with heavy use. It’s best for straight or slightly curved edges, while deeply curved gouges are better suited for slip stones or traditional sharpening stones[3][1].
Keep the sandpaper moist to reduce friction and prevent overheating, which could damage the tool’s temper[3][4]. Regardless of the method, light and controlled pressure always yield better results than heavy grinding.
How to Sharpen Different Tool Types
Understanding edge geometry is just the beginning. To get the best performance and extend the life of your tools, you need to adapt your sharpening techniques to match the specific profile of each tool. Let’s dive into some practical methods for sharpening common tools.
Sharpening Straight-Edged Knives
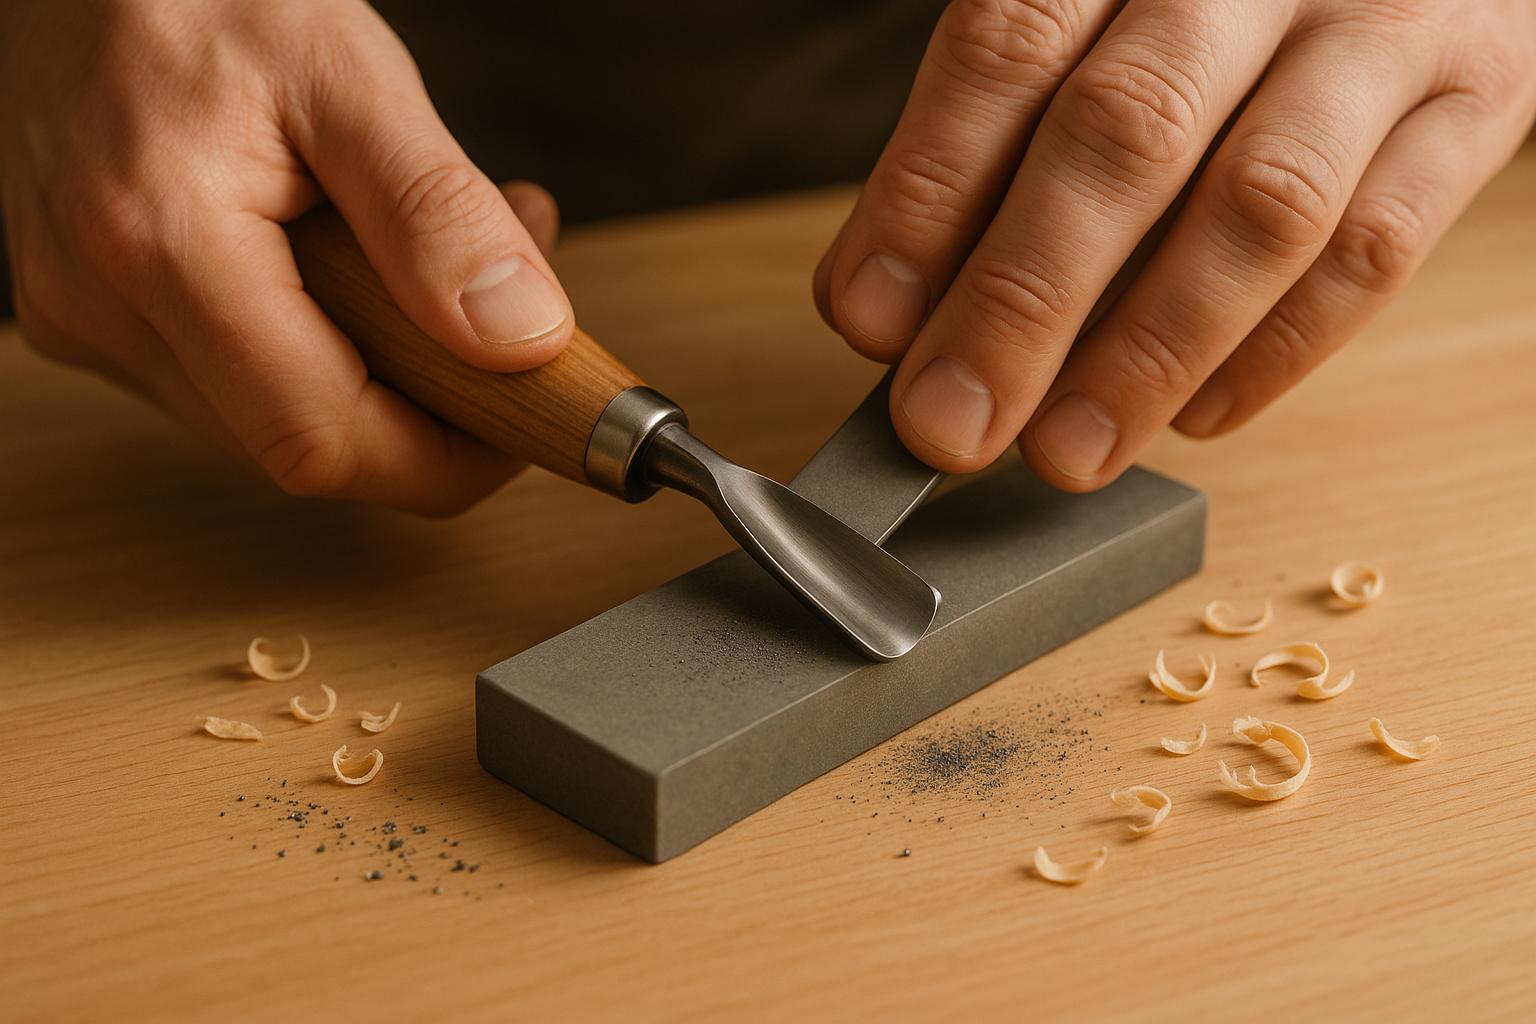
Start by soaking your water stones for about 10–15 minutes. A consistent sharpening angle - between 15° and 20° - is key to achieving a sharp, even edge.
Place the knife on the stone at the correct angle and use consistent strokes. Alternate sides evenly to keep the edge centered and avoid uneven wear. Use light pressure, letting the stone do the work. Begin with a 1,000-grit stone for basic sharpening, then move to 3,000–8,000 grit to polish the edge. You’ll know you’re on the right track when you feel a slight burr forming on the opposite edge - this burr means you’ve sharpened all the way to the cutting edge.
Here’s a tip: Use a permanent marker to color the bevel before sharpening. The areas where the color wears off show where metal is being removed, helping you maintain the original angle.
Finish up by stropping the blade on leather treated with green chromium oxide compound. Pull the blade across the strop, moving away from the cutting edge while keeping the same sharpening angle. This final step removes any lingering burr and gives the blade a razor-sharp finish.
Now, let’s look at how to handle tools with curved or more complex edges.
Sharpening Gouges and V-Tools
Gouges, with their curved profiles, require a slightly different approach. Most gouges are "outcannel," meaning the bevel is on the outside curve, while the inside remains smooth. Preserving the original bevel angle is crucial for maintaining performance.
For the outside bevel, use a flat sharpening stone. Use a rocking and twisting motion: start with the gouge perpendicular to the stone, then rock your wrist to follow the curve as you move it across the stone. This ensures the entire curved edge makes even contact with the stone. Work until you feel a burr forming along the inside edge.
For the inside curve, use slip stones - small, shaped stones that match the profile of your gouge. Choose a slip stone with a smaller radius than the gouge to avoid altering its geometry. Use short, controlled strokes, being careful not to let the stone ride up the inside surface.
V-tools are trickier, as they have four separate bevels - two on the outside and two on the inside. Sharpen the outside bevels on a flat stone, treating each side as you would a small knife. For the inside bevels, use a slip stone with a sharp angle that fits into the V-shaped channel. Each bevel needs individual attention to maintain the tool’s precise geometry.
To finish, strop the outside curves on regular leather. For the inside curves, wrap leather around a dowel or shaped cardboard, then treat it with honing compound. This step is essential for removing burrs from hard-to-reach areas.
Honing vs. Grinding
Knowing when to hone and when to grind is essential for keeping your tools in top shape. Honing is a light sharpening process that uses fine stones or strops to maintain an already-sharp edge. It’s ideal for regular maintenance and minor touch-ups, removing minimal metal in the process.
Grinding, on the other hand, is for more serious fixes. If your tool has chips, severe dullness, or damage, you’ll need coarse stones (200–400 grit) to reshape the edge. Common signs that grinding is necessary include visible nicks, rounded edges that won’t sharpen with honing, or tools that require too much force to cut effectively.
Honing regularly can help you avoid the need for grinding. A quick test for sharpness is slicing paper - if your tool cuts cleanly and smoothly without tearing or crushing, it’s ready to go. If not, it might be time to hone - or grind, if the damage is significant.
Keeping Tools Sharp and Long-Lasting
Maintaining sharp tools isn’t just about sharpening - it’s about consistent care that keeps them reliable for the long haul. With disciplined upkeep between sharpening sessions, you can extend the life of your tools and ensure they’re always ready for the task at hand.
Regular Maintenance Tips
Stropping and honing are your go-to maintenance practices after every carving session or whenever you sense a slight dip in sharpness[3][1]. These methods help retain razor-sharp edges without grinding away unnecessary metal.
For straight knives, stropping on leather after each use is key. Gouges and V-tools, however, require a bit more finesse. You’ll need to strop both the outside and inside bevels to maintain their performance. Flat strops, dowels wrapped in leather, or custom-shaped strops are perfect for this job. For gouges, match the leather-wrapped dowel to the curve of the tool. For V-tools, specialty slip stones can help you reach those tricky inside angles.
Don’t overlook burrs after sharpening - they can weaken the edge if not removed properly[5][4]. Use slip stones or profiled leather wheels to hone both the inside and outside of the edge, especially for curved tools. Leaving a burr intact can cause it to break off during use, leaving a rough edge behind.
The main difference between regular maintenance and full sharpening lies in how often and how intensely you perform each. Stropping and honing should be routine, done after every session. Grinding, on the other hand, is reserved for when tools are visibly dull, chipped, or have lost their proper angle[3][1]. If you’re struggling to make clean cuts, notice nicks, or see a rounded edge that stropping can’t fix, it’s time to grind. These maintenance habits not only extend the life of your tools but also ensure they’re always ready for your next project.
Preventing Overheating and Damage
Overheating is one of the quickest ways to ruin a tool’s edge. When steel overheats, it loses its temper, becoming softer and more prone to dulling and chipping[3][1]. To avoid this, use water or oil stones during sharpening and keep them moist. Apply light, even strokes, and if you’re using power tools, stick to low speeds and take frequent cooling breaks. Thin-edged tools are especially delicate, so hand sharpening is often the safer option[3][1].
High-speed grinders are particularly risky for carving tools. The heat they generate can destroy the temper in seconds, and their aggressive action makes it nearly impossible to maintain the precise angles carving tools require. Instead, opt for water-cooled systems or stick with hand sharpening for better control and results.
If you spot a blue or purple tint on your tool’s edge, it’s a sign the steel has overheated and lost its hardness. At this point, professional re-tempering or even tool replacement might be necessary.
Testing Tool Sharpness
Knowing when your tools are sharp enough can save you time and frustration. To check sharpness, try slicing a piece of paper or lightly running the edge across your thumbnail. A sharp tool will slice cleanly and catch just enough to shave a tiny curl with minimal pressure.
For a more practical test, make controlled cuts in softwood, like pine. A sharp tool will produce thin, smooth shavings with little effort. If you’re crushing fibers, needing excessive force, or seeing torn cuts, it’s time to revisit your sharpening routine.
Each test serves a purpose: the paper test gauges overall sharpness, the thumbnail test checks the edge’s bite, and wood cuts reveal how the tool performs in real-world conditions.
Safe Storage and Handling
Proper storage is just as important as sharpening when it comes to protecting your tools. Keep them in individual sheaths, tool rolls, or dedicated racks to prevent edges from hitting hard surfaces or other tools[3]. Even a brief bump against metal or stone can create tiny chips that affect cutting performance.
Always clean and dry your tools before putting them away to prevent rust[3]. Handle tools by their handles, not their blades, and avoid dropping them. Even minor impacts can damage the edge. To control humidity, consider adding silica gel packs to your storage containers.
Canvas or leather tool rolls are excellent for keeping your tools organized and portable. In your workshop, a dedicated rack can keep tools visible, accessible, and safe. Taking these precautions not only preserves the sharpness of your tools but also makes it easier to keep your workspace organized and efficient.
Organizing and Tracking Your Wood Carving Tools
Even the sharpest tools are useless if you can’t find them when you need them. Woodworkers often accumulate a wide range of specialized carving tools, so keeping them organized is key to avoiding wasted time and disruptions to your workflow. Let’s explore how digital solutions can help you stay on top of your tool collection.
Digital tool management has become a go-to solution for professional woodworkers. A 2023 survey by Woodworking Network revealed that over 60% of professionals use digital tracking or inventory systems to cut down on tool loss and boost productivity [2].
Tool Inventory Tracking and Categorization
A platform like Toolstash makes managing your wood carving tools easier by offering detailed inventory tracking and categorization. Whether it’s your everyday gouges or rare specialty tools, you can catalog everything in one place.
The AI Snap feature makes setup a breeze. Snap a photo of a carving knife, gouge, or V-tool, and the AI automatically identifies it and logs the details for you. This feature is a huge time-saver, especially if you’ve got a collection of 50 or more tools. No more manual data entry!
With Smart Categorization, your tools are grouped logically. You can organize them by type (e.g., knives, gouges, specialty tools), edge profile (straight, curved, angled), or even sharpening grit requirements. This way, you can quickly locate tools that need maintenance before starting a project.
Lost tools? Not anymore. The Location Tracking feature records where each tool is stored, saving you from endless searches. This is especially helpful in busy or shared workshops where tools can easily go missing.
Toolstash also lets you document purchase dates, brands, conditions, and maintenance histories. You’ll know when it’s time to sharpen a blade, check a warranty, or replace a tool. Keeping these records ensures your tools stay sharp and ready for action.
DIY Help and Lending Management
Toolstash goes beyond just organizing - it’s packed with features to improve workshop efficiency. For example, the AI-powered DIY assistant uses your tool data to offer helpful tips. It can recommend when to sharpen a tool based on how much you’ve used it, suggest the right grit for sharpening, or provide storage advice to prevent damage. These small touches can make a big difference in keeping your tools in top condition.
The Lending Management feature is a lifesaver for community workshops or anyone who shares tools. Nearly 40% of woodworkers report losing tools due to lending them out without proper tracking [2]. Toolstash fixes this by logging every loan, tracking who borrowed what, and sending reminders for return dates. This creates accountability and avoids those awkward “Hey, can I have my tool back?” conversations.
By combining organized records, location tracking, and maintenance logs, Toolstash supports better sharpening and storage practices. It works with both imperial and metric units, catering to U.S.-based woodworkers who use inches and pounds. Plus, with secure cloud storage, your tool data is safe and accessible from any device - whether you’re in the workshop or checking your inventory at the lumber yard.
Toolstash offers a free version for basic tracking and DIY tips, while premium plans start at $9.99/month. These include advanced features like AI categorization, location tracking, and lending management. For woodworkers, it’s an affordable way to protect your tools and keep your workflow running smoothly.
Conclusion: Sharp Tools and Good Organization
Keeping your wood carving tools sharp and well-organized isn’t just a nice-to-have - it’s the backbone of quality woodworking. Sharp tools make clean cuts, reduce fatigue, and improve precision. But it’s not just about ease of use; it’s also about protecting your tools and boosting your craftsmanship over time.
To maintain sharpness, a layered approach works best. Regular stropping helps preserve the edge, fine grit stones (2,000–8,000) refine it, and coarse grits are reserved for reshaping damaged tools. This method reduces wear and tear, ensuring your tools are always ready when you need them. And how do you know they’re properly sharpened? Simple tests like slicing through paper or creating smooth wood shavings will give you the answer.
But sharp tools are only part of the equation - good organization is just as important. Platforms like Toolstash make it easier to stay on top of tool management by logging purchase details, sharpening schedules, and maintenance histories. If you share tools, especially in community workshops, lending management features can help track who has what and when it’s due back, protecting your investment and ensuring accountability.
An organized sharpening station also makes a huge difference. When everything has its place - whether it’s grit stones, strops, or slip stones - you’re more likely to stick to a regular maintenance routine. Combine this with digital tracking, and sharpening becomes less of a hassle and more of a seamless part of your workflow.
Ultimately, investing in proper sharpening techniques and efficient organization pays off. Your tools will last longer, your projects will look better, and your workshop will run more smoothly. Sharp, well-maintained tools aren’t just tools - they’re the key to making every carving session as productive and enjoyable as possible.
FAQs
What mistakes should I avoid when sharpening wood carving tools?
When it comes to sharpening wood carving tools, steering clear of a few common mistakes can make all the difference in keeping them in great shape and working efficiently.
One frequent misstep is using the wrong sharpening angle. This can either weaken the blade or make it less effective. To avoid this, stick to the angle recommended for your specific tool - precision here is key.
Another issue to watch for is applying too much pressure during the sharpening process. Pressing too hard can create uneven edges or even cause cracks in the blade. Instead, aim for light, steady pressure to maintain control and achieve a smoother finish.
Finally, failing to clean and care for your tools after sharpening can lead to rust or dullness over time. Make it a habit to wipe your tools clean and store them properly after each use. A little maintenance goes a long way in keeping your tools sharp and ready for your next project.
What is the ideal edge angle for wood carving tools, and how can I choose the right one for my project?
The best edge angle for your wood carving tools depends on a couple of key factors: the type of wood you're carving and how detailed your project needs to be. For softwoods or projects requiring fine, intricate details, a sharper angle (around 15–20 degrees) works well. On the other hand, if you're working with hardwoods or making rougher cuts, a steeper angle (25–30 degrees) is more effective.
To find the right angle, think about the hardness of the wood and how you’ll use the tool. Testing on a small piece of wood can help you tweak the angle for the best results. And don’t forget - regular upkeep, like honing and stropping, is key to keeping your tools sharp and ready to perform.
How can a digital tool management platform like Toolstash help me organize my wood carving tools?
Toolstash makes managing your wood carving tools a breeze with features like inventory tracking and smart categorization, allowing you to locate your tools quickly and easily. Its AI-powered tool addition streamlines the process of adding new tools to your inventory, saving you time and effort.
Beyond organizing, Toolstash lets you keep tabs on your tools' locations, manage lending or borrowing, and securely store essential information. These features help you stay on top of your tool collection while ensuring they last longer.