Features
- Large Capacity: 22" to 40"ceiling dropdown provides up to 105 cu.ft. of storage. Dimensions:96 in. L x 48 in. W x 22-40 in. H. (Hooks sold separately)
- Strong and Secure: Buy overhead storage racks with long ceiling brackets designed to be attached to 2 studs. Combined with 6 vertical posts, it is the optimal structure choice to ensure safety.
- 1200 lbs Tested, 600 lbs Rated: Our overhead garage storage rack undergoes rigorous double load testing (1200 lbs) to ensure unmatched safety and durability, supporting up to 600 lbs for your tools and equipment.(The items need to be distributed evenly)
- Integrated Grid Design: More stable and sturdy compared to others with separate frame and wire deck.
- DIY Installation: Installation template helps make plan. This overhead storage rack fits all ceiling joist spacing≤24", if joist spacing>24", only fits the ceiling spacing of 48".
Specifications
| Color | 2-pack-black |
| Size | 4x8 ft |
Related Tools
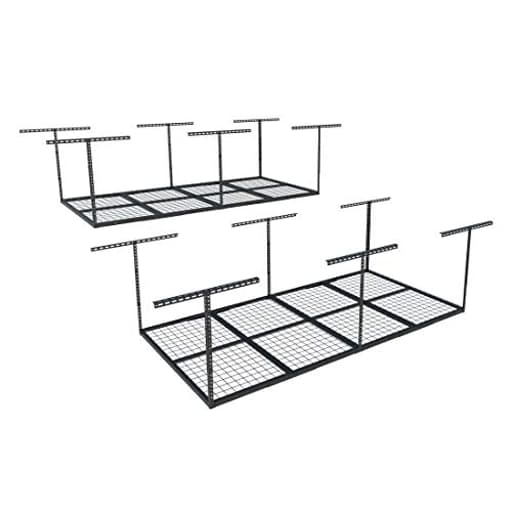
A two-pack of 4x8 overhead ceiling storage racks that provide a 96" x 48" platform with an adjustable drop height of 22" to 40", offering up to 105 cubic feet of storage. Made from heavy-duty metal with an integrated grid deck, long ceiling brackets for attachment to two studs and six vertical posts, the system is tested to 1,200 lbs and rated for 600 lbs of evenly distributed load; fits ceiling joist spacing ≤24" (or 48" spacing in certain installations); hooks sold separately.
FLEXIMOUNTS 4x8 Overhead Garage Storage Rack, Adjustable Organization System, Heavy-Duty Metal Ceiling Racks, 2 pack, Black Review
Why I installed overhead racks—and why these stood out
My garage was overflowing with seasonal bins, camping gear, and the occasional box I swore I’d sort “next weekend.” Floor space was the bottleneck, not cubic footage. Overhead storage was the obvious solution, so I put a pair of Fleximounts 4x8 racks to the test. After a full install and a few months of use, I have a good sense of where this system excels and where it asks for a little patience.
Design and build quality
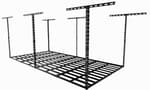
The Fleximounts 4x8 rack is a ceiling-mounted platform measuring 96 by 48 inches per unit, with an adjustable drop height from 22 to 40 inches. The headline details are reassuring: a welded, integrated grid deck (no separate wire panels to rattle), six vertical posts per rack, and long ceiling brackets that tie into two joists each. The result is a structure that feels well thought out for its size and intended load.
Fleximounts rates each rack for 600 pounds when evenly distributed, and they claim a 1,200-pound test load. I’m not one to stand on an overhead rack to verify anything, but I did load each unit with roughly 350–400 pounds of totes and gear (spread across the platform) and saw no sagging or shifts. Hardware quality is above average for this category: zinc-coated fasteners, solid brackets, and clean welds on the deck. The powder-coated finish has resisted scuffs and humidity in my space so far.
The integrated grid deck is a meaningful difference from platforms that piecemeal a frame with loose wire panels. Here, the deck is part of the structure, which cuts down on flex and makes sliding bins easier because the surface remains flatter under load.
Capacity and real-world use
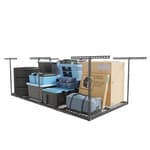
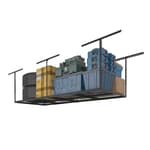
Two 4x8 racks create a significant amount of usable storage—up to 105 cubic feet per unit at maximum drop. Practically speaking, the grid spacing supports standard 27-gallon totes, camp bins, holiday containers, and even odd shapes like coolers. The 22–40 inch adjustment range is wide enough to clear a typical garage door track while leaving room for tall bins where your ceiling height allows. I set one rack to 24 inches (over the garage door area, using otherwise dead space) and the other to 32 inches along a side wall for taller containers.
One small note: if you want to hang items underneath—bikes, hoses, ladders—you’ll need accessory hooks, which are sold separately. I added a few and found they integrate cleanly into the grid.
Installation experience
Overhead installations are inherently more demanding than wall shelves, but this system makes the process as straightforward as practical. There’s a paper template that helps map bracket positions and joist spans. I still recommend doing your own layout with a chalk line and a tape measure; the template is a guide, not a substitute for careful measuring.
My tools for the job:
- Stud finder plus a rare-earth magnet (to confirm joist edges)
- Drill/driver and impact driver
- Long 3/16" and 1/4" drill bits for pilot holes
- Socket set and torque wrench (or just finish by hand)
- Two 6-foot ladders and a second set of hands
A few tips from my install:
- Confirm joist spacing before you buy. This rack fits ceiling joists at 16 or 24 inches on center; if your spacing is greater than 24, it only works with 48-inch spacing. Non-standard framing (metal furring, angled chords, etc.) complicates things.
- Hit two joists per ceiling bracket. That long-span bracket is the system’s safety backbone. Take your time and pilot every hole centered on the joist.
- Assemble the deck in halves and lift a 4x4 section at a time. It’s lighter and far easier to handle overhead. I hung the first half on the hooked arms, then brought up the second and bolted the center joint.
- Hand-start all bolts into threaded inserts. If you rely entirely on an impact driver, it’s easy to cross-thread or over-tighten. I hand-started, then snugged with a driver, and finished by hand.
- Don’t mount flush against a wall. Leave a few inches for tool access on the wall-side hardware.
Time-wise, the first rack took me just under two hours with help for the lifting steps. The second went quicker. I’d call this a capable DIY project for an intermediate homeowner; beginners can pull it off with patience and a helper, but it’s not a solo “after dinner” task.
Stability and safety
Once secured into two joists per bracket and tightened down, the rack feels solid. There’s minor lateral sway if you push it from the side while loading a bin—normal for suspended platforms—but not enough to inspire concern in daily use. If you live in an area with seismic activity or you plan to load to the upper end of the capacity, consider:
- Keeping heavier totes toward the bracket lines and spreading weight evenly across the deck
- Setting the drop height closer to 22–28 inches, which reduces perceived sway
- Adding a simple diagonal brace from the vertical posts to the ceiling joist (check local code and always attach bracing to structure, not drywall)
Critically, this is a storage platform, not a mezzanine. Don’t climb on it, hang from it, or exceed the distributed load rating. Keep an eye on local code clearances if you have sprinklers, and check garage door travel with the rack fully installed before loading.
Layout considerations
- Ceiling height: At maximum drop (40 inches), you’ll want a 9-foot ceiling or higher, depending on vehicle height. If you drive a taller SUV or truck, measure twice.
- Over-door mounting: The space above the garage door is perfect for the lower end of the drop range, but test the door’s full open arc to ensure nothing interferes.
- Lighting and opener placement: Map around openers, lights, and sensors. You can often tuck the rack just outside the opener rails.
- Access: Store light, less-used items deeper in; heavy or frequently accessed totes near the edge. I added a step stool hanging beneath one rack—small quality-of-life upgrade.
What I’d improve
- Optional lateral bracing: Including a pair of diagonal braces in the kit (or at least offering them as an accessory) would satisfy users who want extra rigidity without sourcing their own parts.
- More granular height increments: The adjustment works, but more intermediate hole spacing could make fine-tuning easier in tight clearance scenarios.
- Clearer guidance for non-standard framing: The instructions are solid for standard joists; a supplementary guide for truss ceilings, 48-inch spacing specifics, or furring-strip scenarios would save some head-scratching.
None of these are deal-breakers, but they’re realistic areas for refinement on an otherwise robust system.
Longevity and maintenance
After months loaded, the racks haven’t drifted out of square or developed squeaks. I check the bolts quarterly, especially after large temperature swings, and give the grid a quick wipe to keep dust from caking. If you’re near the coast or in a damp garage, the powder coat helps; just avoid gouging the finish when sliding metal cases.
Who it’s for
- Homeowners with standard 16–24 inch joist spacing who need to reclaim floor space
- Renters with permission to anchor into ceiling joists
- Anyone storing seasonal items, camping gear, or bulky but not daily-use items
- DIYers comfortable with overhead work—or those willing to hire a pro for install
If your ceiling framing is non-standard or your space is under 8 feet high, this system becomes a tougher fit. In those cases, wall-mounted shelves or a smaller 3x6 platform might make more sense.
Recommendation
I recommend the Fleximounts 4x8 rack for homeowners who want serious overhead capacity with a clean, integrated design. The long ceiling brackets and six-post layout inspire confidence, the deck is sturdier than segmented alternatives, and the adjustable drop makes it adaptable across different garage zones. Installation demands careful layout and a helper, and I’d like to see optional bracing for users in seismic regions, but once it’s up, it’s a dependable, high-capacity way to turn wasted air into organized storage. For most garages with standard joists and reasonable ceiling height, this system strikes the right balance of strength, value, and usability.
Project Ideas
Business
Turnkey Overhead Storage Installation Service
Offer a service installing these 4x8 racks (plus hooks and accessories) for homeowners, targeting garages, basements, and workshops. Package options: basic install, load assessment and reinforcement, and custom outfitting (hooks, bins, decking). Charge per-rack plus hourly labor and include joist inspection and safety certification as a premium.
Garage-to-Maker Conversion Packages
Create conversion packages for crafters and small makers: install overhead inventory racks, designate floor workspace, provide labeled storage systems, and offer layout consulting. Market to Etsy sellers, woodworkers, and hobbyists who need organized inventory above the workspace—sell a few tiered packages (starter, pro, premium) that include one or more 4x8 racks.
Micro-Warehouse / Short-Term Storage Rentals
Use client garages or partner sites fitted with overhead racks as micro-storage units for local e-commerce sellers or seasonal businesses. Offer monthly rentals for extra inventory storage that frees up sellers’ floor space. Because racks provide 105 cu.ft. each, you can advertise compact, safe, elevated storage and include optional pick-up/drop-off or inventory handling for an extra fee.
Kits & Hands-On Workshops
Assemble and sell kits that include the rack plus recommended hooks, labeled bins, decking, and a simple install template—market them as 'garage organization kits.' Run paid workshops (virtual or in-person) teaching installation, joist assessment, load planning, and creative uses (greenhouse, loft, bike storage). Upsell installation or custom accessory bundles after the class.
Creative
Garage Mezzanine Loft
Turn one or both 4x8 racks into a lightweight mezzanine platform for boxes, seasonal gear, or a small studio nook. Use plywood or removable decking on the integrated grid, add guard rails, and create a ladder or fold-down stair. Keep loads evenly distributed, respect the 600 lb rated load (per platform if used separately), and confirm ceiling joist spacing and stud attachment points during installation.
Hanging Greenhouse Shelves
Mount a rack above a bench to create an elevated seed-starting/propagation station. Hang LED grow lights from the rack, place seed flats and trays on the grid deck, and use the adjustable drop to set ideal plant-to-light distance (22"–40"). The metal deck drains well and the heavy-duty frame supports multiple trays and water trays—just plan for even distribution and occasional watering runoff protection.
Suspended Bike & Outdoor Gear System
Convert the rack into a suspended storage zone for bikes, kayaks, ladders, and bulky sports gear. Add appropriate hooks, straps, or a simple pulley/lift system so heavy items can be raised to the ceiling platform. Use the long ceiling brackets to anchor into studs and keep within the tested load limits; label hang points and balance weight across the 4x8 footprint.
Seasonal/Costume Rotating Storage
Build an organized seasonal bin system: stack labeled clear tubs on the rack, add a lightweight rolling drop shelf (or pulley-assisted lowering) for easy access, and store holiday decor, costumes, or party supplies overhead to free floor space. The integrated grid makes it easy to secure bins with bungee cords or straps to prevent shifting.