Features
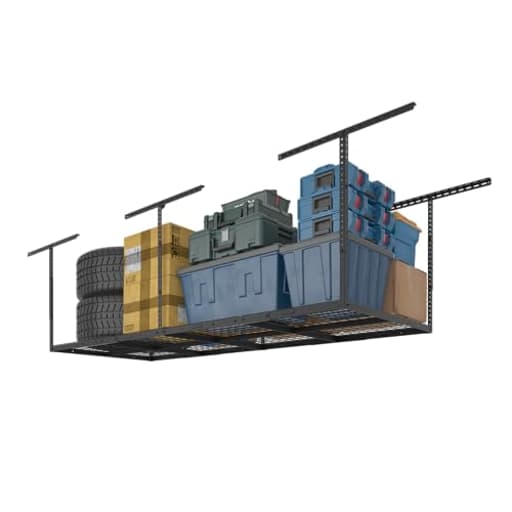
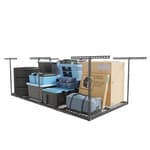
- RECLAIM YOUR GARAGE:Use garage ceiling space to store seasonal and unused items.22"to 40"ceiling dropdown provides up to 80 cu.ft of storage.Dimensions:96 in. L x 36 in. W x 22-40 in. H.(Hooks sold separately)
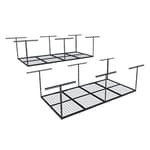
- STABILITY & SAFETY-With our specially designed longer ceiling brackets that attach to two joists, FLEXIMOUNTS overhead garage storage racks are more stable and secure compared to others!
- HIGH QUALITY:Thicker M8 screws selected and all hardwares have gone through strict tests.Heavy duty cold-rolled steel construction provides safely loading up to 600 lbs.
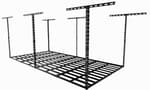
- INTEGRATED GRID DESIGN:More stable and sturdy compared to others with separate frame and wire.
- DIY INSTALLATION:Installation template helps make plan.This overhead storage rack fits all ceiling joist spacing≤24",if joist spacing>24",only fits the ceiling spacing of 36".
- IMPORTANT:Can NOT be mounted to metal wall.Suitable for wood studs/joists and concrete wall.
Specifications
| Color | Black |
| Size | 3x8 ft |
Related Tools
Ceiling-mounted metal storage rack measuring 96 in × 36 in with an adjustable drop height of 22–40 in, providing up to 80 cu ft of overhead storage for seasonal or infrequently used items. Constructed from heavy-duty cold-rolled steel with an integrated grid and longer ceiling brackets that attach to two joists, it is rated for up to 600 lb and must be mounted to wood studs/joists or concrete (cannot be mounted to metal wall).
FLEXIMOUNTS 3x8 Overhead Garage Ceiling Storage Rack, Adjustable Garage Organization System, Heavy Duty Metal, 600lbs Weight Capacity, Black Review
Why I put storage on the ceiling
Floor space is precious in any garage, and mine was losing the battle to camping bins, holiday totes, and off-season gear. I went looking for a ceiling solution that wouldn’t rattle itself loose or feel sketchy when loaded up. The Fleximounts 3x8 overhead rack has been the best balance of capacity, rigidity, and price I’ve tried, with a few quirks worth knowing before you start drilling.
Build quality and design
The rack spans 96 by 36 inches, with an adjustable drop between 22 and 40 inches. That range matters: it let me clear the garage door track while still giving enough room for stacked totes. The frame and grid are an integrated assembly of cold-rolled steel, which is noticeably stiffer than the separate-frame-and-wire designs I’ve used before. Under load, it doesn’t “drum” or oilcan; the grid keeps its shape and spreads weight well.
The ceiling brackets are longer and designed to tie into two joists each. That’s a big deal for stability. Instead of point-loading a single joist, the load spreads and the rack doesn’t feel twisty when you push on a corner. Hardware quality is solid: proper M8 fasteners, decent lag screws, and a consistent black finish that has held up fine to scuffs from bins sliding in and out.
Rated capacity is 600 pounds when properly anchored. I didn’t push that limit, but I did load it with six large plastic totes, a pair of spare wheels/tires, and a few loose long items (tent poles, lumber offcuts). The rack took it in stride—no visible sag, no creaks, and no hardware settling after a week.
Planning pays off
Before you touch a tool, map the joists. The rack is pretty accommodating: it fits typical joist spacing up to 24 inches on-center, and if your spacing is wider, it can work at 36 inches with the specified configuration. If your garage has nonstandard spacing or obstacles (lights, opener, door track), the installation template helps with layout.
A few practical checks that made my install smoother:
- Check garage door travel with the door open and closed. Measure the highest points the door and track reach.
- Decide which way your ceiling brackets need to run. You can mount brackets parallel or perpendicular to joists, but the hanger orientation needs to match. If you mix directions across the span, confirm the center hanger lines up with a mating hole.
- Confirm you’re anchoring into wood joists or concrete. This is not for metal framing. If you’re unsure what’s behind the drywall, use multiple detection methods (stud finder plus pilot holes).
- If you need to land one side at the wall top plate and the other in the ceiling, plan your drop lengths accordingly to keep the grid level.
Installation experience
Two people make this a safe, sane afternoon project. I spent about two hours from layout to final tightening with a helper. Doing it solo is possible, but handling the long grid sections on a ladder isn’t my idea of a good time.
Tools I found essential:
- Impact driver and socket set for the lag screws
- Cordless drill with good bits for pilot holes
- Torpedo level and tape measure
- A unibit/step bit came in handy to slightly open a couple of misaligned holes
Most holes lined up, but I did have two uprights where a bolt was reluctant to start dead straight. Backing the bolt out, starting it at a slight angle, and then drawing the pieces together worked. In one spot I lightly enlarged a hole to get perfect alignment—nothing major, but it saved time. There’s not much extra hardware in the box, so avoid cross-threading and dropping bolts into the abyss behind drywall.
Mounting sequence that worked well for me:
1. Locate and mark joists; dry-fit the template at height.
2. Set and level the ceiling brackets first, lagging to two joists per bracket where possible.
3. Hang the vertical uprights loosely; don’t fully tighten yet.
4. Assemble the perimeter and grid in sections on the floor.
5. Lift the grid into the hangers and bolt in, then square and tighten everything in stages.
Expect a small amount of lateral sway when the rack is empty. That’s common with overhead grids that don’t have diagonal cross-bracing. Once loaded, the mass damps most movement, and the longer ceiling brackets help a lot. If you want absolutely zero side-to-side motion with no load, you’ll need a system with triangulated bracing or add your own tensioning.
In daily use
The 3x8 footprint is excellent for standardized storage bins; I can run two rows of 27-gallon totes with a narrow lane for long items. The 22–40 inch drop lets me fine-tune clearance above our SUV, and access hasn’t been an issue with a small step ladder. The integrated grid makes loading easier: no worrying about a tote foot catching on a separate wire panel, and there’s no bounce at the edges.
A few notes from living with it:
- Hooks are not included. If you plan to hang bikes or tools, order compatible hooks separately.
- The black finish hides dust and scuffs nicely and doesn’t look out of place above a workbench.
- Because the grid is integral, you don’t get “floating” edges that flex down when you load one corner. That’s confidence-inspiring if you stash heavy items like tire sets.
- Keep heavier items toward the bracketed zones and distribute weight evenly. It’s common sense, but it also makes the platform feel rock solid.
Safety and limitations
- Anchoring matters more than anything. Use correct pilot sizes for lags, and don’t cheat on lag length or spacing.
- This setup is intended for wood joists or concrete. Skip it if your garage ceiling uses metal studs unless you’re willing to reframe or add wood blocking.
- If your joist spacing is nonstandard, plan on adding blocking or rethinking the span. The rack supports up to 24 inches on-center out of the box; at wider spacing, follow the manufacturer’s 36-inch option precisely.
What I’d change
- A couple of extra fasteners in the hardware bag would be reassuring.
- Minor hole tolerances on a few parts could be looser to make initial bolt starts less finicky.
- Optional diagonal stiffeners or tension wires would eliminate the light empty-rack sway without relying on load mass.
None of these are dealbreakers, but they’re worth noting if you’re a perfectionist about rigidity or if you’re installing alone.
Tips for a cleaner install
- Pre-assemble subcomponents on the floor and label them with painter’s tape to speed the lift.
- Snap a chalk line for bracket centers after finding joists; it keeps everything square.
- If your ceiling is textured, use flat shims to keep brackets from rocking while you set lags.
- Have a magnetic parts tray on the ladder—small bolts like to disappear into insulation.
- Consider adding adhesive-backed edge guards to the grid perimeter if you frequently slide metal items on and off.
The bottom line
The Fleximounts 3x8 overhead rack hits the sweet spot for capacity, rigidity, and sensible engineering. The integrated grid and longer two-joist brackets make it feel more secure than generic “wire shelf on straps” solutions, and the adjustable drop gives you real flexibility around doors and vehicles. Installation is approachable for a confident DIYer with a helper and the right tools. Expect a couple of fussy bolt alignments and plan carefully around joist direction and bracket orientation, but once up, it’s a set-and-forget platform that genuinely frees floor space.
Recommendation: I recommend it. If you can anchor into wood joists or concrete and you’re comfortable with a methodical install, this rack provides sturdy, high-capacity storage without drama. It’s not a zero-sway showpiece and it doesn’t include hooks or extra fasteners, but for a durable, 600-pound-rated overhead solution with smart load distribution, it’s an excellent value and a meaningful upgrade for any cluttered garage.
Project Ideas
Business
Ceiling-Storage Installation Service
Offer a local service that sells and installs overhead storage racks—include site assessment, joist/concrete suitability check (note: cannot mount to metal studs), professional mounting, and organization consultation. Upsell accessories (hooks, bins, pulley kits) and offer maintenance checks; charge a flat install fee plus markup on hardware for steady revenue.
Accessory Product Line
Design and sell complementary accessories: custom-fit sliding bins, labeled tote systems, padded kayak cradles, specialty hooks, and pulley hoists engineered for the rack's grid. Sell via Etsy/Shopify or bundle with installation; recurring sales come from modular add-ons and replacement parts.
Pop-up Retail / Display Rentals
Rent or sell modular overhead display systems to pop-up shops, craft fairs, or trade shows—use the rack as a portable hanging fixture to showcase clothing, bikes, or décor at eye-catching overhead heights. Offer delivery/installation and branded layouts to events and small retailers who need temporary, high-impact displays.
Workshops & DIY Classes
Host paid hands-on workshops teaching garage optimization, small-space gardening, or tool organization where participants build and install their own overhead racks or accessories. Charge per seat, provide materials kits (rack hardware, hooks, pulley kits), and cross-sell installation services or accessory bundles after class.
Photography & Studio Rental
Convert garages into rentable studio space using the rack as a ceiling rig for lights, backdrops, and props—the integrated grid supports grip gear and the adjustable drop height helps set up varied shots. Market hourly studio rental to product photographers, content creators, and local businesses; offer gear rental and staging services to increase income.
Creative
Hanging Mini Greenhouse
Convert the rack into a suspended seed-starting greenhouse: mount under grow lights and hang shallow trays from the integrated grid at adjustable heights (22–40 in) for seedlings, herbs, or microgreens. Use drip trays and a humidity dome system; the 600 lb capacity easily supports lights, trays, and water. Great for year-round gardening in a garage or apartment-style studio.
Adjustable Art Drying & Storage Shelf
Use the rack as an overhead drying grid for large paintings and prints—suspend canvases or boards with clips/hooks and lower or raise the platform to suit working height. The integrated grid prevents sagging and keeps works flat and organized while freeing floor space; excellent for printmakers, muralists, or ceramics that need overhead drying racks.
Suspended Kayak & Bike Hoist System
Turn the rack into a high-capacity storage hoist for kayaks, SUPs, and bicycles: add padded straps and pulley systems to store gear horizontally and free floor/garage space. The long brackets that attach to two joists give the stability needed for heavy, awkward loads and the adjustable drop height helps with loading and unloading.
Overhead Mobile Workshop Grid
Create an elevated, modular workshop by attaching bins, magnetic tool bars, spool holders, and peg-style hooks to the grid—store power tools, hardware, and supplies overhead but within easy reach. This keeps countertops clear, is customizable by project, and the steel grid allows zip-ties and custom brackets for bespoke tool layouts.
Seasonal Decor & Costume Cloakroom
Build a hanging display for seasonal decorations or costume pieces: use heavy-duty garment rails and hooks (sold separately) fixed to the grid to hang wreaths, lights, or costumes out of the way but easy to access. The rack's 80 cu ft of space and 600 lb rating make it ideal for bulky holiday storage or an at-home costume wardrobe for makers.