Features
- Increases visibility of plow edges for added safety 17.5" Tall
- Easily bolts to sides of plow blades
- Fitment to blades at 45° bend base
- Sold as a pair
- Included Mounting Hardware: (2) 5/16" x 1" Bolt, (4) Flatwasher 5/16", (2) Locknut 5/16" Nyloc
Specifications
| Color | Yellow |
| Release Date | 2013-04-12T00:00:01Z |
| Size | 22" |
| Unit Count | 1 |
Related Tools

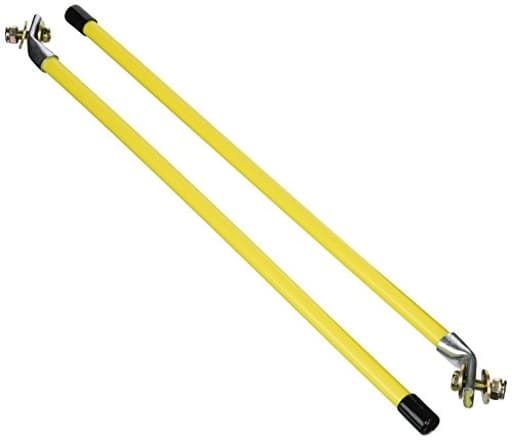
Bright yellow 22" blade edge markers that bolt to the sides of plow blades to increase visibility of the blade edges. Each 17.5" tall marker fits at a 45° bend base, is sold as a pair, and includes mounting hardware: two 5/16" x 1" bolts, four 5/16" flat washers, and two 5/16" Nyloc locknuts.
Kolpin Snow Plow Blade Marker Kit - 10-0140 , Yellow , 22" Review
Why edge markers matter
After a few seasons pushing snow with an ATV and a compact UTV, I’ve learned that the hardest part isn’t the heavy accumulation—it’s the edges you can’t see. At night, in sleet, or when you’re feathering the blade near landscaping or garage doors, knowing exactly where the ends of your plow sit is the difference between a clean pass and an expensive mistake. That’s the niche the Kolpin blade markers fill, and they do it with minimal drama: bright, flexible markers that bolt onto the blade ends and just work.
Design and build quality
These markers are a straightforward, purpose-built pair. They’re bright yellow for maximum contrast against snow and gray winter skies. Kolpin lists the size at 22 inches, but the effective height above the blade once installed is closer to 17.5 inches. That’s a helpful distinction: it’s the protruding height you actually see from the seat, not the overall length of the rod, that matters.
Each marker has a base designed to sit at the 45-degree bend on many ATV/UTV blades, which helps keep the rods angled slightly forward and visible from the operator’s position without sticking straight up like antennas. The rods themselves are flexible, so when they catch a snowbank or brush a fence post, they deflect and spring back rather than snap. I’d call the stiffness “medium”—rigid enough to be easily seen at a glance, pliable enough not to turn every contact into a broken mount.
Kolpin includes basic mounting hardware in the box:
- Two 5/16" x 1" bolts
- Four 5/16" flat washers
- Two 5/16" Nyloc locknuts
The inclusion of Nyloc nuts is a smart touch. Plowing produces a lot of vibration, and Nylocs resist backing off better than standard nuts. The washers help spread the load on thinner blade skins so you’re not dimpling metal around the holes.
Installation: five to fifteen minutes, depending on your blade
On my ATV blade, mounting took under ten minutes with a cordless drill and a step bit. Your mileage will vary based on whether your blade already has accessory holes at the corners.
- If your blade has factory holes near the 45-degree bend: you’ll likely bolt right up. Align the base, drop in the 5/16" bolts with a washer on each side, and snug the Nylocs. I like to leave a bit of flex in the rod at the base so it can pivot slightly under impact rather than transferring stress into the blade skin.
- If your blade doesn’t have holes: plan to drill two 5/16" holes, one at each blade corner. I recommend starting small (1/8"), then stepping up to a 5/16" or an 11/32" clearance. A step bit makes clean holes in thin steel and reduces grab.
The 45-degree base matched my blade profile well. If your blade edge is extremely square, you may need to position the base just inside the corner to get a flat mount surface. In a pinch, a slight tweak in position still gives good visibility as long as the rod tip sits proud of the blade end.
A few practical tips:
- Face the bolts so the threads are on the back side of the blade to avoid catching slush and debris in the bolt heads.
- Tighten the Nylocs until the washers seat; don’t crush the blade skin.
- Give the rods a firm pre-flex after mounting to ensure there’s no binding at the base.
Visibility and performance in the field
The value of these markers shows up the first time you plow at night or in blowing snow. The yellow rods are easy to pick up in peripheral vision, which matters when you’re watching traffic and your blade simultaneously. On my ATV and UTV, the 17.5-inch effective height is right in the sweet spot—tall enough to clear a modest snow curl off the blade but not so tall they whip wildly or interfere with front-mounted gear.
In daytime storm conditions, they remain legible even when coated with fine snow; a quick brush of the glove clears them. At night, they reflect enough dash and accessory lighting to be obvious without being distracting.
I’ve pushed them into snowbanks, dragged them along rock-edged driveways, and snagged the odd branch. The rods flex, fall back into line, and don’t hold a permanent bend. Importantly, they haven’t loosened at the mounts, which I credit to the Nyloc fasteners and the use of flat washers.
Fitment and sizing considerations
A few notes to consider before you buy and drill:
- Height: Although labeled 22 inches, expect about 17.5 inches above the blade once mounted. That’s ideal for ATV/UTV plows and compact tractor blades. If you’re running a full-size truck plow and sit higher from the blade, you may want taller markers.
- Blade geometry: These are intended to mount at a 45-degree bend. If your blade is flat at the corners, you’ll still be fine—you may just adjust placement slightly inward to keep the base fully seated.
- Hardware sizing: Kolpin’s supplied 5/16-inch hardware is a good universal fit. If your plow’s pre-drilled holes are smaller (common on some compact blades), you can either enlarge the holes quickly with a step bit or use slightly smaller hardware with your own nuts and washers.
Durability and cold-weather behavior
Cold snaps are the enemy of plastics and composites, so I paid close attention during sub-zero days. The rods remain flexible in the cold; they don’t get brittle or chalky. After a winter’s use, mine show cosmetic scuffing but no splits or frayed fibers at the tips. The hardware has held up well, with only light surface oxidation—nothing seized, and the nuts still spin freely by hand off the threads. If you wash your rig after salty runs, these will keep looking presentable.
Because the rods flex and return, they’re kinder to both the blade and your surroundings. When I misjudge a stone border or a mailbox post, the marker tells me “stop” without turning into shrapnel.
What could be better
No tool is perfect, and there are a few things I’d tweak:
- Clearer height expectations: The overall length vs. visible height can confuse buyers. A prominent note that you’ll see roughly 17.5 inches above the blade would help.
- Optional straight-base variant: Some blades would benefit from a straight base option in addition to the 45-degree style, just for fuss-free alignment on square-cornered plows.
- Stainless hardware upgrade: The included hardware is functional, but a stainless kit would make these essentially maintenance-free for those plowing in heavy salt regions.
None of these are dealbreakers, but they’re worth noting so you can plan your install and expectations.
Who they’re for
These are a great fit if:
- You run an ATV or UTV plow and want reliable edge visibility in all conditions.
- You prefer quick installation with included hardware and minimal modification.
- You want flexible, forgiving markers that won’t snap when they hit a snowbank.
You might want taller markers if:
- You sit high in a truck cab or on a larger tractor and need more height above the blade to clear tall windrows.
- You’re mounting on a blade where the corners sit unusually low relative to your line of sight.
Practical tips for best results
- Mock placement before drilling: Use painter’s tape to mark where the rods will sit and check visibility from the seat.
- Consider a step bit: It makes clean holes and reduces burrs on thin blade steel.
- Don’t overtighten: Let the rod and base flex. Crushing the base won’t add strength.
- Inspect mid-season: Give the bolts a quick recheck after the first few plows; vibration can settle hardware slightly.
Recommendation
I recommend the Kolpin blade markers for ATV and UTV plow users who want a simple, durable way to see blade edges. They install quickly with the included hardware, the bright yellow rods stand out in nasty weather, and the flexible design survives the inevitable bumps and brushes that come with snow work. The effective height is better suited to smaller plows than full-size truck blades, and some installations will require drilling, but those are reasonable trade-offs for the visibility and safety they deliver. If you’re outfitting a compact plow and value clear edge reference without fuss, these markers are an easy, worthwhile upgrade.
Project Ideas
Business
Plow Visibility Installation Service
Offer a seasonal service installing blade edge marker kits on homeowners', contractors' and municipal plows. Package inspections, hardware replacement and mounting into one flat-rate service—upsell reflective tape, LED beacons or maintenance contracts for recurring winter revenue.
Bulk Resale to Snow Contractors & Towns
Buy marker kits wholesale and resell them in bulk to landscaping firms, snow-removal contractors, HOAs and municipal garages. Create tiered pricing, pre-drilled retrofit packages for common plow models, and offer bundled shipping plus installation guides to make purchasing easy.
Branded Safety Kits for Fleets
Start a niche business customizing markers with company colors, logos and serialized ID tags for fleet managers. Sell ready-to-mount safety kits (markers + reflective tape + mounting hardware + simple instructions) that help businesses meet visibility and liability requirements.
Pop-up Winterization & Safety Booth
Operate a seasonal pop-up booth at parking lots, farmer's markets or hardware stores offering quick installs, replacements and safety upgrades (markers, lights, reflective flags). Combine sales with demonstrations and printable care guides—low overhead, high foot-traffic revenue during pre-winter months.
DIY Kit + Online Tutorial Product
Assemble value-add DIY kits that pair the marker pair with upgraded fasteners, reflective tape and a short how-to video. Sell the kits online or through local stores; monetize tutorials via a premium how-to bundle or subscription that covers multiple winter-safety upgrades for homeowners and small contractors.
Creative
Solar Path & Driveway Stakes
Convert the bright yellow blade markers into 22" solar pathway posts: mount a small solar LED puck or strip on top (or inside if hollow) and attach the original mounting plate to a short wooden or metal stake. Use them to line driveways, walkways or garden beds for high-visibility nighttime lighting with an industrial look.
Holiday & Event Yard Posts
Turn marker kits into tall, durable yard posts for seasonal décor. Bolt on removable brackets or hooks to hold wreaths, flags, banners or string lights. Their high visibility and yellow color are easy to paint/stencil for themed displays (Halloween, Christmas, graduation) and they stand up well to snow and wind.
Trailer/Cart Visibility Flags
Repurpose markers as visibility poles for trailers, ATVs, lawn carts or kids' wagons. Use the included hardware to fasten the marker to a bracket or clamp, add a small flag or reflective tape at the top, and create an inexpensive, removable safety mast that improves sightlines in low light.
Garden Row & Plant Support Markers
Use the markers as durable row/plant markers or light trellis supports in big gardens. Paint or attach write-on panels to label rows/varieties, or bolt on eye-hooks for twine to support vines. Their weather-resistant construction makes them longer lasting than wood stakes.
Garage Organization & Tool Hangers
Fix the markers vertically along a shop wall or bench edge as visual dividers and heavy-duty hanger posts: add welded or bolted peg hooks and holders to store hoses, extension cords, rakes and shovels. The bright color helps locate tool stations quickly in busy garages.