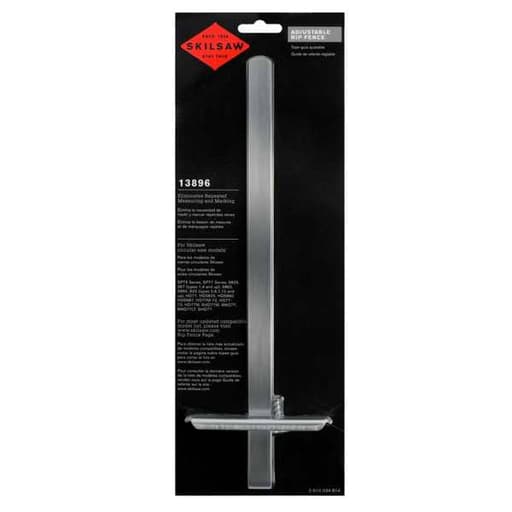
Features
- Easily installed on circular saw foot plate
- Guides rip cuts up to 5 inches from board edge
- Includes mounting screw and spring
- Compatible with multiple circular saw models
Specifications
| Maximum Rip Width | 5 in (from board edge) |
| Installation | Mounts to circular saw foot plate using included screw and spring |
| Compatible Models | SPT6 Series; SPT7 Series; 5825; 367 (types 1, 4 and up); 5860; 5865; 825 (types 5, 6, 7, 10 and up); HD77; HD5825; HD5860; HD5867; HD77M-72; DH77-72; HD77M; SHD77M; MAG77; MAG77LT; SHD77 |
| Sku | 13896 |
Related Tools

Related Articles

A rip fence that attaches to a circular saw foot plate to guide straight rip cuts. It installs using the supplied screw and spring and supports cuts up to 5 inches from the board edge.
Skil Adjustable Rip Fence Review
Why I reached for this rip fence
Some jobs call for full track saw precision; others just need a dependable way to make straight, repeatable rips without hauling out a lot of gear. That’s where this simple rip fence earns its keep. It bolts onto a circular saw’s foot plate with a screw and spring, sets a consistent offset from the board edge, and lets me push through narrow rips with confidence. It’s a modest accessory, but it can be a big time saver if you know its limits and set it up carefully.
Setup and compatibility
Installation is straightforward: the fence slides through the slot on the saw’s shoe and locks with the included fastener and spring. On my Skil worm-drive, it was a direct fit—no extra hardware, no fuss. Skil lists broad compatibility across popular models (SPT6 and SPT7 series and classics like HD77, SHD77/M, MAG77/MAG77LT, and more), and that tracks with my experience. Still, I always recommend checking your shoe’s fence slot for burrs, paint build-up, or non-standard dimensions—any of those can prevent the bar from sliding smoothly or locking square.
A quick note on orientation: depending on your saw, the fence can mount on either side of the shoe. The “right” choice is the one that puts the fence against the straightest reference edge of your stock and gives you good visibility of the blade line. I usually prefer the fence riding against the factory edge of sheet goods with the blade on the waste side.
Capacity and where it fits in a kit
This fence is limited to 5 inches of offset from the board edge. That’s perfect for:
- Narrow rips in sheet goods for backer strips, cleats, and trim
- Repeatable ripping of 2x stock for shims or custom widths
- Quick “production” cuts when I need several identical strips
For anything wider than 5 inches—or for crosscuts where the edge isn’t a reliable reference—I switch to a straightedge guide, track, or table saw. So I treat this fence as a nimble, small-capacity accessory, not a replacement for a track system.
First cuts and accuracy
I tested it ripping 1/2-inch plywood, 4 feet long, with the fence set a couple inches off the edge. After squaring the fence bar to the shoe, I made a test cut, measured the strip, adjusted the offset by a hair, and tried again. Once dialed in, I consistently landed within about 1/32 to 1/16 inch over four feet—more than accurate enough for framing, shop fixtures, and many cabinetry subcomponents that will be trimmed later.
Where I noticed variation was at maximum extension. When the bar is stretched toward the full 5 inches, any flex in the fence and any waviness in the board’s reference edge become more noticeable. That’s not a flaw of this model so much as the nature of these compact fences. If I needed dead-straight rips at full width on a finished panel, I’d move to a guided track.
Lock-up and creep
The fence locks with the included screw and spring. It’s a simple mechanism, and simplicity has pros and cons. On my saw, tightening with a firm hand prevented movement, but I could induce slight creep if I pushed the saw laterally into the fence instead of straight ahead. The fix was two-fold:
- Make sure the fastener is genuinely snug. A timid half turn isn’t enough.
- Adjust technique: maintain light, consistent pressure toward the fence with the hand guiding the saw, not a hard shove.
On long rips in sheet goods, I sometimes rest my off-hand fingers on the fence’s toe to keep it kissing the board edge without deflecting the saw. If your work demands absolute immunity to creep under heavy pressure, consider swapping the fastener to a higher-friction knob or adding a drop of medium-strength threadlocker to keep the screw from backing off.
Build quality and feel
The bar is straight, the edges are clean, and the fit through my shoe slot was free of play once tightened. I gave the bar a quick pass with fine sandpaper to break any sharp edges and hit it with paste wax so it glides in and out smoothly. The spring action is light but functional; it keeps tension during adjustments. Over a few weeks of use—ripping pine, plywood, and MDF—the fence hasn’t deformed or gone out of square.
One small caution: with painted or prefinished surfaces, any burr on the fence toe can leave a faint mark if you drag it under pressure. A minute of smoothing the toe and a strip of low-friction tape eliminated that risk for me.
Usability tips
A few habits improved my results:
- Calibrate once: Make a test cut at a known setting and mark that reference on the bar with a fine scribe. It speeds up repeats.
- Check square: With the saw unplugged, set the fence and lay a small square against the blade body and fence toe. Tiny misalignments translate into wandering cuts.
- Light pressure wins: Let the blade do the work. Heavy side pressure invites creep and deflection.
- Support the work: For sheet goods, pair of sacrificial foam sheets or a well-set cutting table prevents binding or closing kerfs.
- Wax the shoe: A slick base keeps the saw moving straight with less effort, improving cut quality.
Where it shines
- Speed: For narrow, repeatable rips, nothing sets up faster.
- Portability: It lives in the saw case and adds almost no bulk.
- Cost-to-value: It extends the capability of a circular saw without investing in a full guide rail system.
- Compatibility: If you run Skil worm-drives or SPT-series saws, it’s a near-universal fit.
Where it falls short
- Width limit: Five inches is the ceiling. You’ll need another method for wider panels.
- Locking robustness: The simple screw-and-spring design works, but it rewards careful technique. If you bear down laterally, slight movement is possible.
- Edge dependency: Accuracy hinges on the straightness of your reference edge. Wavy lumber in means wavy strip out.
Who it’s for
- Remodelers and framers who need fast, repeatable narrow rips on site.
- Shop users building jigs, cleats, and cabinet substructures where 1/32–1/16 inch accuracy is acceptable.
- Anyone with a compatible Skil saw who wants a more controlled alternative to “freehand following the line” for narrow cuts.
If you routinely break down full sheets to cabinet-grade accuracy or need rips wider than 5 inches, you’ll be happier with a track saw or a table saw setup.
Alternatives and complements
- Straightedge guide: A good aluminum straightedge with clamps covers the 6–24 inch range well, though setup time is longer.
- Track saw: Best for tear-out control and precision across full sheets, but at much higher cost.
- Edge guide with micro-adjust: Some aftermarket guides add screw micro-adjusters. They’re bulkier but can be more precise.
This rip fence can coexist with all of the above. I reach for it first for narrow work, then escalate when the task demands more width or precision.
Bottom line and recommendation
I recommend this rip fence for Skil circular saw owners who frequently make narrow, repeatable rips and want a compact, reliable guide that installs quickly. It’s easy to mount, broadly compatible, and accurate enough for most construction and shop tasks within its 5-inch capacity. The locking mechanism is simple and benefits from a firm hand and good technique; if you treat it like a precision tool and not a pry bar, it holds its setting and produces clean, straight cuts. For wide rips or furniture-grade accuracy, pair it with a straightedge or track system. As a small, inexpensive add-on that meaningfully expands a circular saw’s usefulness, it earns a spot in my kit.
Project Ideas
Business
Slat Wall Kit Microbusiness
Produce and sell ready-to-install slat wall kits: pre-ripped 1–2 inch slats, spacers, mounting cleats, and finish options. Offer standard panel sizes and custom lengths for home offices, media walls, and headboards.
Budget Shiplap Panel Kits
Rip 4–5 inch plywood strips and package them with gap spacers and install instructions. Market to DIYers, property managers, and stagers who want fast, affordable wall refreshes without specialty tools.
Garden Planter and Privacy Screen Kits
Sell flat-pack kits for slatted planters, window boxes, and balcony privacy screens. Uniform slats cut with the fence speed production and reduce waste. Offer raw wood, stained, or exterior-painted options.
On-Site Batten and Trim Ripping
Provide a mobile service to rip battens (1–3 inch), lattice, and edge trim from stock boards on remodeling sites. Painters and carpenters save time by outsourcing consistent, straight rips up to 5 inches wide.
Acoustic Slat Panel Supply for Creators
Pre-rip and finish slats in popular widths and species (oak, walnut, painted MDF) and sell bundles to interior designers, contractors, and content creators. Add SKU’d lengths, felt backers, and mounting hardware for turnkey ordering.
Creative
Modern Slat Wall or Headboard
Rip dozens of 1–2 inch strips from plywood or hardwood using the fence for uniform widths. Mount the slats with equal spacing on a plywood backer to create a clean, modern accent wall or headboard. Stain or paint contrasting colors for a designer look.
DIY Plywood Shiplap/Nickel-Gap
Turn a single sheet of plywood into budget-friendly 4–5 inch shiplap-style boards. Use the fence to keep every strip identical, then install with coins or spacers for consistent gaps. Paint for a classic cottage look.
Acoustic Slat Panels
Rip 1–2 inch slats from MDF or hardwood and mount them over felt or acoustic insulation on a thin backer panel. The fence ensures consistent slat widths and straight edges for professional-looking, sound-diffusing wall panels.
Slatted Planter Boxes and Lanterns
Rip uniform narrow slats to build lightweight planters, porch lanterns, or patio screens. The consistent slat width makes clean reveals and shadows. Finish with exterior oil for outdoor durability.
Shelf Edging and Trim
Rip 1/2–1 inch strips from hardwood to edge-band plywood shelves and make simple face frames or trim details. The fence keeps strips consistent so glue-ups are quick and clean.