Features
- Chrome Plated Window Lock/Sliding Door Lock Pin
- 3" Long Pin
- 8" Long Chain
- Comes With All Mounting Hardware
Specifications
| Color | Silver |
| Size | 5 Pack |
| Unit Count | 1 |

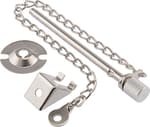
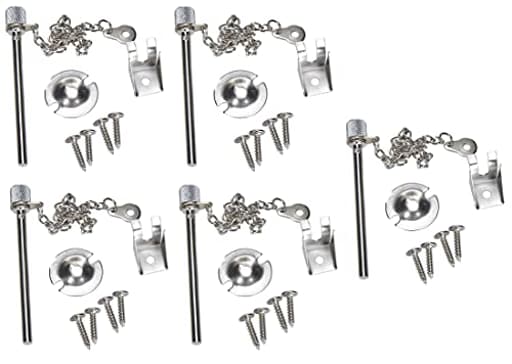
Chrome-plated sliding window and door lock pins serve as a physical stop to limit or secure the opening of sliding windows and doors. Each silver pin is 3 inches long with an 8-inch chain, includes mounting hardware, and is supplied as a pack of five.
Generic Chrome Plated Sliding Window/Door Lock Security Pin Review
Why I reached for a simple lock pin
After trying a mix of track clamps and bar locks over the years, I wanted something low profile, mechanical, and reliable for a set of sliding windows and a patio door. The lock pin checked those boxes. It’s a straightforward chrome-plated pin on an 8-inch chain with a small mounting plate and screws, sold in a five-pack. There’s no keyed cylinder to fuss with, no adhesive to fail, and no bulky bar cluttering the track. It’s a physical stop: either the pin is through both frames and nothing slides, or it isn’t.
What you get and how it’s built
Each unit consists of:
- A 3-inch chrome-plated steel pin with a tapered tip
- An 8-inch chain attached to a small mounting tab
- A matching keeper plate and basic mounting screws
The chrome finish on my set was even, with cleanly deburred edges on the pin and no rough burrs on the plates. The chain is light but not flimsy, and the included screws are general-purpose. As a five-pack, it’s practical—you can secure multiple openings and still have a spare.
This is a generic design used across countless residential setups: you mount the tab and chain to the fixed frame, drill an aligned hole through the moving panel into the fixed frame, and use the pin to lock the two together. It’s as simple as it sounds, which is a big part of its appeal.
Installation: easy if you plan your holes
My installation took longer to plan than to execute, and that’s a good thing. A few tips from my experience:
- Dry fit first. Close the window/door and identify solid material on both the moving and fixed frames. You want enough meat for the hole so the pin engages fully without hitting empty cavity.
- Mark carefully. I used painter’s tape and a fine marker to set a reference line across both frames, then marked the exact spot for the hole with the opening fully closed. For a ventilation setting, I made a second mark with the sash slid open about 4 inches—just ensure your local egress requirements are met.
- Drill in stages. Start with a small pilot bit to avoid wandering, then step up to the final size that matches the pin. Go slow, especially on vinyl or aluminum, to prevent cracking or burring. Back up thin vinyl with a wood block behind if accessible.
- Choose the right fasteners. The included screws worked perfectly in wood. For aluminum, I switched to self-tapping screws. For hollow vinyl, consider through-bolting with small machine screws and nyloc nuts if you can access the interior—if not, use appropriate length and avoid overtightening.
- Mind the glass. Keep clear of glazing channels, weatherstripping, and any embedded reinforcement. If you aren’t sure, consult your window/door documentation or a pro.
Once installed, alignment was spot-on: the pin slid smoothly in and out with no binding. The 8-inch chain gave enough reach to insert the pin comfortably without dangling into the track.
Daily use and security
In day-to-day use, the lock pin is satisfying in its simplicity. Slide the panel, insert the pin, and you’re done. It functions as a positive stop against forced sliding, which is the most common attack on a slider. On the patio door, the pin prevented movement more convincingly than the original latch. On the windows, I appreciated the ability to set a “vent position” using the second hole so I could crack a window without losing the security benefit.
It’s important to be realistic: a pin lock is a secondary security device, not a substitute for a robust factory lock or laminated glass. It won’t address prying at the edge of a flimsy sash, and it can’t stop an impact that breaks the glass. But against sliding attacks—and many opportunistic attempts—it’s effective. What you’re really buying is mechanical redundancy at a strategic point.
I also like that there’s no key to lose, and the attached chain keeps the pin from wandering off. The flip side is that a curious child could theoretically remove the pin, so this is not a childproof device. Position it thoughtfully.
Compatibility and fit
I fitted units to:
- Two vinyl-framed horizontal sliding windows
- One wood-framed patio door
On the vinyl windows, the frames were thick enough to accept a full-depth hole with good engagement; the pin seats cleanly without chewing up the material. On the wood patio door, the wood offered excellent bite for screws and a very solid stop. I would be more cautious with thin-walled aluminum frames—you’ll want to use the correct fasteners and keep the hole as tight as practical.
If you’re renting or trying to avoid permanent changes, this solution may not be ideal because it requires drilling. Track clamps or bar locks might be better for non-invasive setups. For owners, the permanence is a benefit: it doesn’t loosen like clamp-on devices can.
Durability and maintenance
After weeks of use through rain and coastal fog, the chrome plating on my pins held up with no rust spots or peeling. Chains and tabs stayed bright. I put a tiny dab of silicone grease on the pin to keep it sliding freely and to protect the bore in the frame; a dry Teflon spray works too. Check the mounting screws occasionally, particularly in softwood, and snug them up if needed.
The pin itself inspires confidence. Under load (I did some firm shoulder checks from the inside), the stop was firm, with no visible deformation of the hole or plate. Ultimately, the strength of the whole system is limited by the material you drill into—wood generally beats thin vinyl or aluminum in that respect.
Noise, look, and little quality-of-life tweaks
The chrome looks clean and neutral. It doesn’t draw attention, especially on lighter frames. The only nitpick is chain rattle: on one window, the chain tapped the frame on windy days. Two simple fixes worked well:
- Add a small felt pad under the chain’s resting spot.
- Slip a short piece of heat-shrink tubing over the chain near the pin as a bumper.
Both cut down on noise and also protect the finish.
Value and what sets it apart
Compared to track bars and latch reinforcers, the lock pin is:
- Lower profile: nothing in the way of blinds or curtains.
- Simpler: fewer parts to fail.
- More flexible: you can add multiple holes for different ventilation settings.
The five-pack price-to-coverage ratio is excellent. One purchase secured a patio door and several windows with consistent hardware, and I still had a spare for a basement slider. The included hardware means you can get started immediately, though swapping screws for material-specific ones is a cheap upgrade.
Limitations to be aware of
- Permanent modification: you’re drilling holes. Plan your location carefully.
- Not keyed: convenience is high, but there’s no controlled access.
- Material-dependent strength: thin, hollow frames provide less resistance under heavy force.
- Egress: on bedroom windows or primary exits, ensure you can remove the pin quickly, and keep it within reach.
These aren’t faults of this particular lock pin so much as the nature of the format, but they’re worth noting before you commit.
Tips for a cleaner install
- Use a center punch or awl to keep the bit from wandering.
- Deburr the hole lightly so the pin slides without catching.
- Angle the chain tab so the pin naturally rests in a consistent spot when not in use.
- If you want a ventilation stop, drill that second hole on a calm day and measure twice—small differences matter.
Recommendation
I recommend the lock pin for homeowners who want a discreet, mechanical way to secure sliding windows and patio doors without bulky add-ons. It’s cost-effective in a five-pack, installation is straightforward with basic tools, and day-to-day operation is quick and reliable. Security gains are meaningful against sliding attacks, and the ability to set a secure vent position is genuinely useful. Just be comfortable with drilling your frames and choose your fasteners wisely for the material you’re working with. If you need a non-invasive or keyed solution, look to clamp-on track locks or a lockable bar. For most residential sliders, though, this lock pin is a smart, tidy upgrade.
Project Ideas
Business
Landlord Security Retrofit Kit
Package the 5‑pack pins with a clear install guide, screws, and pre-drilled templates to sell as a 'rental security retrofit' kit for landlords. Market as an inexpensive way to add a physical stop to sliding doors/windows to reduce break‑ins and tenant complaints—bulk pricing for property managers.
Airbnb/Short‑Term Host Safety Service
Offer a service targeting short‑term rental hosts: inspect sliding windows/doors and install chrome lock pins where appropriate. Bundle the service with a branded kit left in the property and a certificate for guests to show the host has performed safety upgrades. Promote as a way to reduce liability and improve guest trust.
Branded Decorative Hardware Line
Rebrand the pins as a premium decorative hardware product—offer different chain lengths, finishes (antique bronze, matte black), and optional engraving on the pin head. Sell online with styling photos showing them as tie‑backs, display hooks, and modern security accents for lofts and studios.
Mobile Installation & Maintenance Contracts
Start a small contracting business providing on‑site installation, annual maintenance, and inspection of sliding door/window security across multi‑unit buildings. Charge per door or via subscription contracts with property managers; supply your own branded pin kits for consistent margins.
DIY Workshops + Kits
Run local workshops teaching homeowners how to childproof and secure sliding doors and windows using simple hardware like these pins. Sell take‑home kits (5‑pack plus hardware and guide) and upsell installation or follow‑up home‑safety assessments. Use workshops to build a customer list for services and product sales.
Creative
Industrial Curtain Tie‑Backs
Mount the chrome pin and chain beside windows or doors to create heavy-duty, industrial-style curtain tie‑backs. Use the 3" pin as the anchor and drape the chain for a decorative loop; multiple pins from the 5‑pack let you outfit a whole room. Great for thick drapes or shower curtains where a sturdy hold is needed.
Modular Jewelry & Earring Rack
Fix several pins inset into a reclaimed wood board to make a modern, modular jewelry organizer. The 3" length gives a stable hook for necklaces and bracelets; the small chains can hold earring cards or be used as tiers. Comes with mounting hardware so you can wall-mount or leave freestanding.
Miniature Sliding Door Mechanism
Use the pins as functional locks and stoppers for dollhouses, cabinet doors, or scale models. The compact 3" pin and attached chain act as both stop and security tether for tiny sliding doors—perfect for hobbyists building operational miniatures.
Contemporary Wind Chime / Mobile
Repurpose the chrome pins and chains into a reflective, modern wind chime or hanging mobile. Use the pin shafts as clappers or connectors between levels; the chrome finish catches light and the pre-attached chains simplify assembly. Weatherproof finish makes them suitable for covered porches.
Picture Frame Stop & Display System
Create an adjustable picture display: mount pins at different heights to act as stops for framed prints that slide or rest against the wall. The chains can group multiple frames together or act as spacing guides—useful for pop-up gallery walls or rotating displays.