Features
- Adjusts so you can easily maneuver into desire position.
- Tools required: marking pencil, power drill, 1/16" and 3/16" drill bit, and handheld screwdriver
- Made of a durable rust resistant steel material
- Packaging includes matching screws and mounting instructions
Specifications
| Color | Silver |
| Unit Count | 1 |

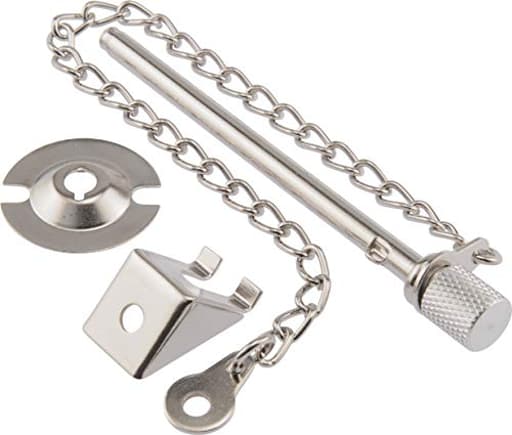
An adjustable patio door security pin that restricts the opening of sliding doors by anchoring the door in place. Made of rust‑resistant steel with a silver finish, it includes matching screws and mounting instructions; installation requires a marking pencil, power drill with 1/16" and 3/16" drill bits, and a handheld screwdriver.
Hardware Essentials 852224 Patio Door Security Pin, Silver Review
Why I tried this security pin
My sliding patio door’s latch has always felt a little unsure—fine on a good day, but not something I’d stake security on. I wanted a simple mechanical backup that couldn’t wiggle loose or fail when the weather changes. That’s what pushed me to try this patio door security pin. It’s old-school hardware—a piece of steel and a couple of screws—but that’s exactly the appeal. No key to lose, no moving parts to wear out, and no app required. Just a pin that positively locks the slider to the frame.
Design and build
The security pin is a straightforward, rust-resistant steel pin tethered by a small chain to a mounting plate. The finish is a subtle silver that blends in well with standard aluminum and vinyl sliders. It ships with matching screws and basic instructions. There’s nothing flashy here, and that’s a good thing. The entire concept relies on strength, alignment, and a snug fit.
Two small but thoughtful touches stand out. First, the chain and cradle keep the pin handy; you’re not pocketing it or setting it down on a sill where it will inevitably go missing. Second, the mounting plate allows some flexibility in how you position the assembly, so you can choose the top or bottom of the active door panel and tune the exact location to your door’s geometry. The hardware is compact and low-profile, which matters if you have tight clearances with blinds or a screen door.
Install experience
Plan on 20–30 minutes if you have a decent drill and a patient approach. The kit asks for a marking pencil, a drill with 1/16-inch and 3/16-inch bits, and a handheld screwdriver. I’d add painter’s tape and a vacuum to that list. Tape helps keep the bit from walking on smooth aluminum, and the vacuum keeps metal shavings from heading straight into the track.
Here’s how my install went:
- Positioning: I mounted mine near the top corner of the active panel, above eye level but accessible. Higher placements make it harder for curious kids to reach and help reduce potential prying leverage.
- Pilot hole: After marking both parts of the frame (the movable panel and the fixed jamb/frame it overlaps), I drilled a 1/16-inch pilot hole. Go slow, especially around vinyl frames, and double-check you’re clear of glass. If your door has a narrow metal wall, use a stop collar or wrap tape around the bit to limit depth.
- Final hole: I opened the passage with the 3/16-inch bit through the active panel and into the receiving frame. A tight, clean hole is what gives the pin a positive, rattle-free seat.
- Mounting the plate: The plate fastens with two screws. I recommend pre-drilling and driving by hand to avoid stripping.
- Test fit: Insert the pin with the door closed; it should slide in smoothly but snugly. If it binds, re-check alignment; a millimeter off at the pilot stage can show up here.
My only hiccup was with the included screws—one felt a touch soft and wanted to cam out under moderate torque. Switching to my own stainless pan-head screws solved that. If your door frame is particularly hard or you’re working in cold weather, a drop of wax on the threads helps.
Everyday use and performance
With the pin in place, the door doesn’t budge. There’s a satisfying certainty to it—no play, no rattle. The secondary benefit I noticed right away was reduced draft and track noise during windy weather. Locking the panel rigidly against the frame takes some load off the old latch and tightens the overall assembly.
From a security standpoint, this is nightly habit-level simple. Slide the door shut, drop the pin, done. Unlike stick-in-the-track solutions, the hole and pin also help prevent the panel from being forced off its track or lifted (though if lift is a big concern in your area, pairing the pin with anti-lift blocks at the head track is wise).
One nice trick: you can drill a second hole to allow a partial opening for ventilation while keeping the door pinned. I made a second stop about four inches open—useful for airflow without giving up the lock. Just ensure the opening is narrow enough to prevent reach-through access.
Compatibility and fit
The security pin works best on standard residential sliding glass doors with overlapping frames—aluminum, vinyl, or clad. It can also be used on many sliding windows. Doors with unusually narrow or hollow profiles may require careful placement to ensure the receiving hole lands on solid material. If your slider’s overlap is minimal or your interlock geometry is unconventional, dry-fit and measure twice before drilling.
It’s worth noting that this is not a no-drill solution. Renters should check their lease. You’re making permanent holes in the frame—small and tidy, but permanent.
What could be better
- Screws: The included screws are serviceable, but the heads can feel soft. If you have stainless or hardened replacements on hand, use them.
- Retention against vibration: On a door that sees frequent slams or in high-vibration environments, a pin without a detent can creep. I didn’t experience this with normal household use, but it’s something to consider in RVs or trailers. A light O-ring on the pin or a slightly undersized receiving hole can boost retention if needed.
- Precision matters: The device is only as good as your drilling accuracy. If you rush the pilot and blow the alignment, the pin can bind. Take your time on layout.
- Aesthetic options: The silver finish blends well with most frames, but having a dark bronze option would match more doors out there.
Durability and maintenance
The rust-resistant steel has held up fine so far. That said, the receiving hole is a raw edge in the door frame; a quick touch with a deburring tool or even a countersink improves feel and limits paint flake on coated frames. A drop of dry lube or silicone in the hole once in a while keeps the pin sliding smoothly. Inspect the chain occasionally; it’s not under load, but if you have pets that like to bat at dangling things, tuck the pin into its cradle so it’s not a toy.
Safety and usability notes
- Height: Mount it out of young children’s reach if you’re using it as a child-proofing aid.
- Emergency egress: Make sure everyone in the household who may need to exit quickly knows where the pin is and how to remove it. I keep mine tethered in its bracket so it’s always in the same spot.
- Screen doors: If you mount near the top, check that your screen door clears the pin and chain.
- Glass caution: Modern sliders often have glass close to the frame edge. Use a bit stop and measured care to avoid drilling too deep.
Value
It’s hard to beat the price-to-performance ratio of a properly placed steel pin. You get a robust secondary lock, a tighter seal, and an easy ventilation stop option without changing hardware or re-keying anything. If you’re dealing with a finicky latch or you want a layered security approach, this is a low-cost, high-confidence upgrade.
Practical tips
- Use painter’s tape as a drill guide and to catch shavings.
- Pre-drill every screw hole; drive by hand to avoid stripping.
- Consider your ventilation stop distances and drill a second hole while you’re set up.
- If the pin feels loose under vibration, add a small O-ring or slightly reduce the hole size with a metal bushing or by selecting a closer bit tolerance (metric 4.5 mm can be a hair tighter than 3/16-inch).
Bottom line
I recommend this security pin. It’s simple, sturdy, and effective, and it solves a common sliding-door weakness without complexity. Installation is easy with basic tools, the rust-resistant build should last, and the ability to add a “vented but locked” position is genuinely useful. My only caution is to bring your own quality screws if you’ve had issues with soft fasteners and to take the time to align the holes carefully. For homeowners looking for a reliable secondary lock and a little extra peace of mind, this is a smart, budget-friendly addition.
Project Ideas
Business
Landlord Safety Kit & Installation
Package a bulk kit of security pins with clear step-by-step instructions and offer a bundled installation service for rental properties. Market to landlords and property managers as an inexpensive safety upgrade for sliding doors and windows. Provide volume discounts and scheduled maintenance checks to create recurring revenue.
Branded DIY Safety Kits for Baby/Pet Stores
Create labeled retail-ready kits (pin, screws, template, mini screwdriver, instructions) targeted at parents and pet owners. Add decorative covers or color variation as upsells. Sell through baby boutiques, pet stores, and online marketplaces with instructional videos demonstrating quick DIY installation.
Mobile Door Security Installation Service
Offer an on-demand mobile service that installs, adjusts, and replaces sliding door security pins and other basic door hardware. Target neighborhoods with older homes or vacation rental owners who need fast turnaround. Charge per-door plus a callout fee; offer premium same-day service for higher margins.
Wholesale Supply to Contractors & Glaziers
Buy pins in volume and rebrand or White Label them for local contractors, window/door installers, and hardware stores. Provide packaged options (single, 4-pack, contractor bulk) and technical sheets for pros. Offer just-in-time delivery and credit terms to build long-term B2B relationships.
Custom Designer Hardware Line
Modify the basic pin with custom end-caps, plated finishes, or coordinated screw heads and sell as premium designer hardware on platforms like Etsy or at craft fairs. Pair the product with short how-to cards and offer installation add-ons or virtual consults. Market to homeowners renovating kitchens, bathrooms, and sliding-door areas who want a unique, functional accent.
Creative
Sliding Door Safety Stop
Mount the adjustable patio door security pin as a child- and pet-safety stop that limits how far a sliding door opens. Keep the pin’s silver finish for a sleek look or add a small decorative cap (wood, leather, or painted metal) to match your interior. Installation uses a power drill with 1/16" and 3/16" bits and the provided screws; the rust-resistant steel ensures long-term outdoor use.
Convertible Window Vent Lock
Repurpose the pin to create an adjustable vent lock for vertical or horizontal sliding windows. Install one or two pins at different positions so you can quickly set the window to several fixed ventilation widths. The adjustable mechanism makes it easy to change airflow without new hardware, and the rust-resistant construction works well on bathroom or kitchen windows.
Industrial Coat & Towel Hook
Turn the pin into a small industrial-style hook: mount the base to a reclaimed wood plank or directly to tile and let the pin function as a peg for towels, coats, or bags. The adjustable length creates a slight lip so items won’t slip off — great for mudrooms or near entry sliding doors. Finish the wood and add matching screws for a cohesive look.
Adjustable Art Hanger / Mobile Pivot
Use the security pin as a discreet adjustable pivot point for hanging lightweight mobiles or artwork that needs precise leveling. Because it fixes into place, you can dial in balance by sliding the pin position. The silver steel gives a minimal, modern aesthetic and resists corrosion if used in semi-outdoor spaces like covered porches.
Rustic Cabinet / Barn Door Latch
Integrate the pin into a farmhouse-style cabinet or small barn door as a simple latch: mount the adjustable pin on the frame and drill a shallow catch on the door. The result is a functional, low-profile latch with an industrial touch. Use the included screws and standard drill bits to install, and optionally distress or patina the silver finish for a vintage look.