Features
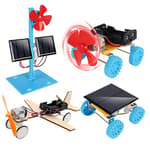
- This is a multi-functional learning kit,three power generation modes, energy conversion, circuit learning, and understanding of the conversion between sound, light and electricity.
- Solar power generation, using solar panels to convert the solar energy into electrical energy.
- Hand-cranked generator, kinetic energy is converted into electrical energy to light an LED or turn the fan
- The windmill generator,harness wind power and light an LED
- An excellent Family & Kids program,great for Primary and secondary schools projects,With Paper Instructions
Specifications
| Unit Count | 23 |
| Edition | Standard Edition |
Related Tools
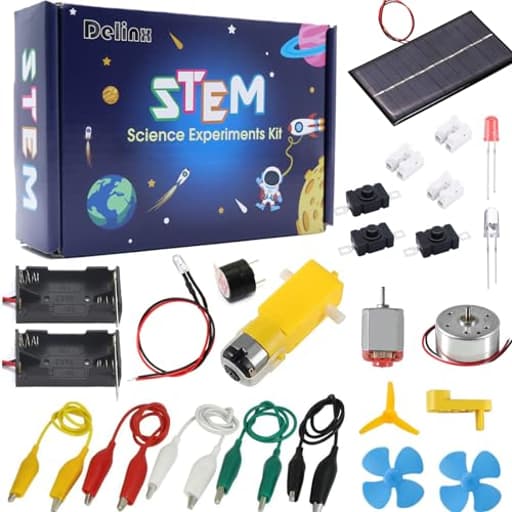
A DIY educational kit that demonstrates three methods of power generation—solar panel, hand-cranked generator, and windmill—to teach energy conversion and basic electric circuits. The 23-piece set lets users light LEDs, spin a fan, and explore conversions between sound, light, and electricity, and includes paper instructions for primary and secondary school projects.
Delinx Fun Physics Science Experiment Kit: Windmill & Hand-cranked Generator, Solar Power, Basic Electric Circuit Learning, DIY Educational STEM Project for Kids & Teens, Girls & Boys Review
A hands-on way to make electricity feel real
I’m a big believer that kids remember concepts best when they can see, feel, and tinker with them. The Delinx STEM Energy Kit hits that sweet spot: it’s a compact set that lets you make electricity three different ways—by hand, by wind, and by sunlight—and immediately use it to light an LED or spin a little fan. It’s not a fancy lab instrument, and it has some rough edges, but as a learning tool it’s surprisingly effective.
What’s in the box and first impressions
The kit arrives as a 23-piece set with a small solar panel, a hand-crank generator, a windmill hub and blades, a fan, LEDs, wires, and a few structural parts and connectors. The parts are lightweight, school-project grade plastic. The paper instructions are brief but serviceable: you get diagrams for basic setups and a couple of suggested circuits. The set is billed as “Standard Edition,” and that’s accurate—no unnecessary extras, just the essentials for demonstrating energy conversion.
A note on size and parts: most pieces are small, so I immediately repurposed a divided storage container to keep everything organized. That one step saved me a lot of “where did that wire go?” moments and made it easy for kids to set up and tear down independently.
Setup and build experience
There’s no soldering required. The wires are pre-stripped, and the parts use screw posts and press fits. Expect some fiddling: connections are friction-based, so you’ll want to twist wires firmly and check polarity on the LED before concluding something isn’t working. I added a few mini alligator clip leads from my own stash to make quick swaps between components; not required, but they make the kit much easier to use and reuse.
The only assembly hiccup I hit was the crank handle. It fit the generator shaft but could work itself loose if pushed sideways. Seating it fully and using gentler, steady rotations fixed the issue. If you’re working with younger kids, a wrap of painter’s tape on the joint can add grip without marring the part.
Three ways to make power
Hand-crank generator: This is the hero of the kit for immediate gratification. Connect the generator leads to an LED, give the handle a few smooth turns, and the LED pops on. That cause-and-effect moment is gold for teaching kinetic-to-electric conversion. You can also power the included fan; it spins happily with a bit of pace on the crank. It’s a nice way to demonstrate the trade-off between effort and output—turn faster and you get brighter light or a quicker fan.
Solar panel: The solar cell is small, so it needs real light. It worked reliably in direct sunlight and under a bright halogen desk lamp; under typical indoor LED lighting, not so much. That limitation becomes a teaching opportunity: angle, intensity, and distance matter. I had kids try to maximize brightness by adjusting the panel angle toward the sun and recording which orientation lit the LED best.
Windmill generator: Assembles in a couple of minutes. I got the best results placing it in front of a box fan at medium speed, which lit the LED consistently. In ambient outdoor breezes, the output was intermittent (again, a teachable moment: steady wind equals steady power). The hub is light and can wobble if blades aren’t seated evenly, so take your time pressing the blades in fully.
Across all three methods, the kit does exactly what it promises: show that different forms of energy can turn into electricity you can immediately use. That tangibility is the kit’s core strength.
Learning value and ways to extend it
If you’re using this at home or in a classroom, the kit supports several core concepts:
- Energy conversion: kinetic, wind, and solar to electrical, then electrical to light or motion.
- Polarity and simple circuits: LEDs have direction; motors don’t mind; switches open/close paths.
- Power and effort: hand-cranking faster brightens the LED; light intensity and wind speed affect output.
A few simple activities that worked well:
- Build-and-predict: Ask kids to predict whether the LED will light under different conditions (cloudy vs sunny, fan speed low vs high) and check their predictions.
- Angle optimization: Tape a protractor to a base, vary the solar panel angle, and note when the LED shines brightest.
- Load comparison: Power the LED vs the fan from each generator and discuss which seems “harder” to drive.
If you have a basic multimeter, you can add gentle measurement without getting lost in numbers. Measure voltage from the hand crank at slow vs fast speed, or compare the solar panel output in shade vs sun. Seeing numbers change alongside visible effects helps anchor understanding.
Ease of use and age range
With an adult’s five-minute orientation, most eight- to twelve-year-olds can operate this kit independently. Younger kids can absolutely participate but will need help with connections and blade assembly. The included instructions cover the basics; I supplemented with quick sketches to remind kids how to wire a simple series circuit and how to check LED polarity. The kit is flexible enough to support open-ended tinkering once the fundamentals click.
Safety-wise, everything runs at low voltage. The little fan and windmill blades are plastic; still, I coach kids to keep hair and fingers clear of spinning parts and to crank with steady motion rather than force.
Build quality and durability
This is an educational kit, not a toy you’d toss in a backpack. The plastic parts are adequate and surprisingly resilient for their weight, but they’re not designed for roughhousing. The friction-fit connections can loosen if handled aggressively; setting expectations and modeling careful assembly goes a long way. After a week of classroom-style use (multiple builds, many hands), all parts were intact. I did have to reinsert windmill blades a couple of times and snug down wire connections during enthusiastic cranking.
If you plan to use the kit repeatedly with groups, I’d suggest:
- Adding a small organizer for parts.
- Throwing in a few extra pre-stripped wires or alligator clip leads.
- Establishing a quick “connection check” routine before declaring a build broken.
What it does well
- Instant feedback: The hand crank to LED is a perfect, satisfying demo.
- Multiple energy sources: Solar, wind, and kinetic in one set makes comparison easy and memorable.
- Low barrier to entry: No soldering, simple wiring, and visible results keep frustration low.
- Classroom friendly: Short demos and small projects fit neatly into a lesson block or science fair prep.
Where it could improve
- Connection robustness: Friction-fit wiring works, but alligator clips or snap connectors would reduce fiddling and accidental disconnects.
- Crank handle fit: The handle can loosen if torqued sideways; a tighter coupling would improve durability.
- Instructions depth: More illustrated circuits (parallel vs series for LEDs, switch usage) would help educators and parents scaffold activities without improvising.
None of these points are deal-breakers, but they’re worth knowing so you can plan around them.
Who it’s for
- Parents and caregivers looking for a weekend STEM activity that goes beyond a one-and-done build.
- Homeschoolers and educators who want a compact kit to demonstrate energy and circuits without a big setup.
- Kids who like to tinker and see immediate results, roughly ages 8–12.
If your priority is polished, snap-together builds that look like finished toys, this kit might feel too bare-bones. If your goal is learning and exploration with real components, it’s right on target.
Bottom line
The Delinx STEM Energy Kit succeeds at making abstract ideas concrete. It invites kids to make electricity with their hands, feel the difference that light and wind intensity make, and wire up simple circuits that do something right now. The components are basic, and you’ll do a bit of tinkering to get connections just right, but that tinkering is part of the learning.
Recommendation: I recommend this kit for families, homeschoolers, and classrooms seeking an affordable, hands-on way to teach energy conversion and basic circuits. It shines as a demonstration tool and as a springboard for inquiry. Add a few alligator clip leads and a small organizer, and you’ll have a reliable, reusable setup that sparks curiosity without overwhelming beginners.
Project Ideas
Business
After-School STEM Workshop Series
Run a 4–6 week after-school program where each session focuses on one power mode and a project (solar nightlight, windmill mobile, hand-crank lamp, hybrid diorama). Price per student with materials included; offer teacher packs and bulk-discounted kits for schools. Market to parents via schools, community centers, and social media.
Birthday Party STEM Experience
Offer hosted birthday parties where kids build their own mini-project from the kit (decorate a nightlight or windmill mobile). Provide themed parties (space, pirates, eco-heroes) with a kit for each child, quick instruction, and take-home worksheets. Charge per child and upsell add-ons like customized decorations, photos, and extra kits as party favors.
Curriculum & Teacher Training Packs
Package the kits with detailed lesson plans, assessment rubrics, and hands-on lab sheets aligned to local STEM standards. Sell classroom bundles (sets of 10–30) and offer short teacher training workshops (online or in-person) so schools can integrate the kit into science units. This increases traction with institutional buyers and provides recurring sales.
Custom-Branded Corporate Workshops & Team-Building
Run corporate or nonprofit team-building events where participants collaborate to design hybrid-powered installations (e.g., branded mobiles or donation drives). Provide custom-branded kits and examples showing sustainability/innovation themes. Market to companies focused on STEM outreach or corporate social responsibility; price per team or event.
Subscription Project Box Expansion
Create a monthly subscription that builds on the core kit: each month sends new mini-projects and a small add-on component (piezo sensor, tiny capacitor, extra LEDs, mini solar calculators) with step-by-step guides. Subscribers keep getting fresh projects, increasing lifetime value and creating a community for sharing builds and competitions.
Creative
Solar Mason Jar Nightlight
Turn the solar panel and LED into a charming nightlight inside a mason jar. Mount the solar panel to the jar lid, wire it to the LED with a small switch, and diffuse the light with frosted glass paint or tissue paper. Add decorative elements—sand, small toy figures or faux plants—to make themed nightlights (ocean, forest, space). Great as a gift, bedside lamp, or craft-fair item.
Windmill Kinetic Mobile
Build a hanging kinetic mobile that uses the windmill generator as both a moving centerpiece and a power source for tiny LEDs. Attach lightweight blades, colorful streamers, and small recycled plastic or wooden ornaments on different lengths of string. Place the windmill at the top to spin in a breeze and light up the ornaments at dusk. Include a small on/off toggle to choose wind or solar mode.
Three-Mode Miniature Town Diorama
Create a tabletop diorama (village, space base, or eco-park) with three distinct power zones: solar panels powering streetlights, a windmill powering a fountain or spin-art, and a hand-crank generator that kids use to light up a centerpiece building. Use cardboard, foamboard, paint and the kit pieces to teach energy sources and conversions through play. Add simple labels and an activity sheet for teaching moments.
Hand-Crank Camping Lamp & Demonstrator
Make a rugged, portable hand-crank lamp with the generator and LED for use on camping trips or emergency kits. Build a small wooden or 3D-printed enclosure with a fold-out crank and a strap for hanging. Demonstrate charging small capacitors (or rechargeable AA battery pack) by cranking, then switching to stored power mode to run the LED fan. Market as an eco-friendly, no-battery emergency light.