Features
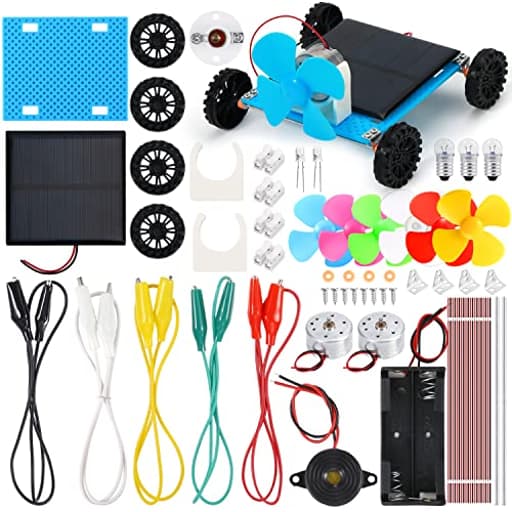
- 【Value Package】Comes with one instruction, 1 x AA size battery holder (2 x 1.5V), 1 x solar panel, 5 x crocodile clip leads, 2 x motors, 2 x motor holders, 6 x propeller with 4 vanes, 2 x LED lights, 3 x bulbs, 1 x bulb holder, 1 x buzzer sounder, 2 x push button switches, 20 x electronic wires (5.9"), 4 x wire connectors, 1 x plastic board, 2 x iron shafts, 4 x shaft sleeves, 4 x wheels, 4 x corner braces, 8 x screws, which are enough circuit accessories to easily complete scientific projects
- 【Science Experiment Kit】This popular and interesting electronic science experiment STEM toy can well inspire and encourage kids to learn about science. This Montessori learning toy is good for curious kids, turning your own new ideas and inventions into reality. Also perfect for children's school science STEM engineering projects
- 【Wide Applications】The circuit motor kit can well catch kids’ attention and let them try to build, experiment, and explore basic electrical simple circuits. Circuit board for kids can also be used in school in science, STEM, technology, and design courses, easy to meet your project needs, and properly educating some circuit knowledge would be a good interaction time with your kids together
- 【Notice】It is recommended that the voltage be 3V. Please control the time. The use time should not be too long, and the time should be controlled within 3 minutes. After 5-10 minutes, the circuit will generate heat and a short circuit. Solar panels need to be available in full sunlight to function
- 【Warning】Suitable for 8+ years. Be careful of scald caused by the short circuits. Do not mix old and new batteries. Do not mix alkaline, standard (carbon-zinc), or rechargeable batteries, the kids must use them under the supervision of adults
- Tip: Please connect all the circuits properly before switching on the power
Specifications
| Size | Moderate |
| Unit Count | 73 |
Related Tools
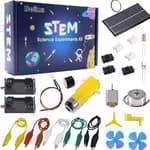
A kit of electrical and mechanical components—including a solar panel, AA battery holder (2×1.5V), two motors with holders, propellers, LEDs and bulbs, a buzzer, switches, crocodile clips, wires, wheels and assorted connectors—for constructing simple circuits and small motorized projects. Designed for hands-on STEM learning (recommended ages 8+), it supports battery- or solar-powered experiments at about 3 V and should be used with adult supervision and limited run times to avoid overheating.
Sntieecr Electric Circuit Motor Kit with Solar Panel, Solar Motor Kit for Kids Science Experiment Educational Montessori Learning Kits, DIY STEM Science Project for Boys and Girls Review
A hands-on STEM kit that rewards curiosity—and supervision
I spent a few afternoons building battery and solar projects with the Sntieecr kit, and it quickly became the kind of set that invites tinkering. It’s aimed at ages 8+ and it shows: the components are simple, forgiving, and sized for small hands, but there’s enough variety to explore real electrical concepts without getting bogged down in soldering or complex tools. It’s best as a guided learning kit—great for a parent or educator sitting alongside a young builder—rather than a solo “open and go” experience.
What you get and how it’s built
Inside the box is a generous mix of parts for basic circuits and motion:
- Two small DC motors with snap-in holders
- A 2×AA battery holder (3 V total) with leads
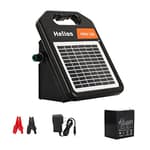
- A small solar panel
- LED diodes and miniature bulbs with a bulb holder
- A piezo-style buzzer
- Push-button switches
- Propellers, wheels, shafts, shaft sleeves, corner braces, and screws
- A plastic board that serves as a chassis
- Crocodile clip leads and a bundle of short hookup wires
- Simple wire connectors
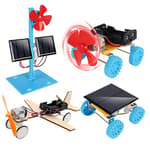
The kit totals 70+ pieces, enough to build a mini fan, a propeller car, light-and-sound circuits, and a handful of “what happens if…?” experiments.
Build quality is mixed but serviceable for the price. The motors are the common 3 V “toy motor” variety; they spin fast and will happily drive a small fan or propeller. The propellers press-fit onto the motor shafts tightly and stayed put during my tests. The wheels, axles, and sleeves are plastic and light; aligned carefully, they roll smoothly. The wiring is pre-stripped and flexible, and the crocodile clips bite well enough to hold contacts without constant readjustment. The solar panel is lightweight and unmarked; it needs bright sun to do real work.
A couple of notes from hands-on use:
- You’ll want extra AA batteries on hand (not included).
- The instructions are minimal. Expect a single sheet with a few pointers. Beginners benefit from an adult walking through polarity, series vs. parallel connections, and basic safety.
- There’s no breadboard or resistors. You can still do a lot, but you’ll be relying on clips, twisting wires, and the included connectors.
Setup and first builds
The simplest starting point is a closed circuit with the battery pack, a switch, and a bulb. From there, swap the bulb for an LED (pay attention to polarity) or add the buzzer for instant feedback. The push-button switches are perfect for demonstrating open/closed circuits and momentary actions.
My first motor build was a mini desk fan: motor + holder + propeller driven from the battery pack through a push-button. It worked immediately at 3 V. The motor spun quickly, the propeller stayed true, and the airflow was respectable for a toy. Reverse the leads and the propeller spins the other way—an easy way to introduce DC polarity and direction.
For motion, I mounted a motor and propeller at the rear of the plastic board, added wheels and axles, and created a simple “prop car.” It’s not a precision vehicle—the kit lacks gears or tires—but on smooth floors it scoots along and invites iteration: change the angle of the motor, move weight forward or back, experiment with different propellers.
One neat demonstration: use a motor as a generator. If you disconnect it from power, then blow firmly on the propeller or spin the shaft by hand, you can flash an LED across the leads. It’s a compelling way to show energy conversion without any math.
Power and performance
This is a 3 V world. The motors, buzzer, and bulbs are sized for two AA cells. At that voltage:
- Motors: lively at no-load and have enough torque to spin a prop or propel a lightweight car. They warm up if stalled, and they shouldn’t be run continuously for long stretches.
- LEDs: bright enough on the battery pack, provided you connect with correct polarity. The kit doesn’t include resistors; keep LED runs short to preserve longevity.
- Bulbs: forgiving and glow at 3 V, useful as both a load and a visual indicator.
- Buzzer: works reliably; great for simple alarm circuits or continuity tests.
The solar panel is more situational. In direct midday sun, it ran a single motor and propeller without complaint. On cloudy days or indoors—even under a bright desk lamp—the panel struggled. Expect solar success outdoors; indoors, treat it as a teaching aid for “voltage present, current limited” rather than a dependable power source.
A critical safety/performance note: keep run times short. After several minutes of continuous operation, the motor and wires can get warm. I treated activities as short sessions—one to three minutes—then let components cool. This also increases the life of the motors and LEDs.
Learning value
The kit hits several fundamentals well:
- Polarity and current direction are immediately visible through motor spin and LED behavior.
- Series vs. parallel can be illustrated by wiring two bulbs or two LEDs and observing brightness changes.
- Switches, as both latching and momentary controls, make cause-and-effect concrete.
- Energy sources and constraints are easy to compare: batteries provide steady current; solar is intermittent and highly dependent on light intensity.
To stretch the learning, I kept a multimeter nearby. Measuring voltage at the solar panel in sun vs. shade, or current draw of the motor with and without a propeller, adds a quantitative layer that older kids appreciate.
Where it comes up short
- Documentation: The included guide is sparse. If you’re new to circuits, plan to supplement with videos or simple diagrams. With guidance, the kit’s great; without it, some users will guess-and-check.
- Components: I would have loved a small assortment of resistors and a mini breadboard. Even a single 100 Ω and 330 Ω resistor would make LED work safer and more instructive.
- Connectors: You get a handful of crocodile clips and short wires. It’s enough for basic builds, but adding five more clips makes projects less fiddly.
- Durability: The plastic is fine for classroom/home use but not indestructible. Press-fit propellers are tight; align carefully to avoid bending shafts. As with all toy motors, stalling them frequently shortens their life.
Tips from testing
- Label polarity early. A sharpie dot on the motor’s positive side and a note on the battery pack save rework.
- Use a switch in every build. It’s safer, and it reinforces the concept of control.
- Mount motors so the propeller is unobstructed and the shaft is aligned; wobble adds noise and heat.
- Solar experiments belong outdoors, ideally at midday. Tilt the panel toward the sun. Don’t expect it to run multiple loads at once.
- Limit continuous runs to a few minutes. Let motors cool between trials.
- Organize parts. A small compartment box keeps wires, screws, and LEDs from disappearing.
Who it’s for
- Parents and educators who want a hands-on way to introduce electricity and motion—and can spend time guiding.
- Kids who like to experiment and iterate, not just follow instructions.
- Tinkerers who want a budget-friendly parts bin for quick demos.
It’s less ideal for completely independent learners who need step-by-step builds, or for advanced hobbyists who expect precision components, gears, or breadboards out of the box.
The bottom line
The Sntieecr kit is a strong value as a learning platform. It gives you the essential building blocks—motors, switches, lights, a buzzer, a solar panel—and enough mechanical bits to make things move. It’s happiest at 3 V, in short bursts, with an adult helping to connect the dots between “it spins” and “why it spins.” The solar panel adds a useful dimension about energy availability, even if its power is modest.
I recommend this kit for guided STEM exploration at home or in a classroom. Add a pack of AA batteries, a few extra crocodile clips, and, if possible, a basic multimeter and a couple of resistors. With those small additions and a bit of supervision, it becomes a reliable, engaging springboard into circuits and simple machines.
Project Ideas
Business
After-School STEM Workshop Series
Run 4–8 week workshops where students build a different project each week (solar racer, fan/lantern, alarm, circuit lab). Price per student to cover kits, instructor time and materials (typical margin 40–60%). Packages: drop-in single sessions, block bookings for schools, and holiday camps. Upsell: take-home mini-kits, branded safety goggles, printable worksheets and certificates of completion. Market via local schools, community centers and parent groups.
DIY Party & Event Boxes
Create themed build boxes (Birthday: make-your-own racer; Science party: team circuit challenges) that include a kit, step-by-step illustrated instructions, and simple competition rules. Offer add-ons: facilitator hire, extra kits for siblings, or branded stickers. Sell boxes through an online store or local toy shops; price to include 1.5–2× parts cost plus labor. Promote through social media ads targeted at parents and event planners.
Content & Course Creator (YouTube + Paid Plans)
Produce short tutorial videos demonstrating each project, troubleshooting tips, and experiment variations. Monetize via YouTube ads, affiliate links to buy the kit, and sell downloadable lesson plans or printable circuit worksheets on a small storefront (Gumroad/Shopify). Offer a membership for weekly builds and live Q&A. Use SEO-friendly titles (e.g., 'Build a Solar Racer for Kids') and collaborate with parenting/STEM influencers.
School & Camp Supplier with Curriculum
Package the kit with teacher-ready lesson plans aligned to common STEM standards and offer bulk pricing to schools, camps and homeschool co-ops. Provide optional teacher training sessions (virtual or in-person) and safety guides specifying run-time limits and supervision requirements. Differentiate by including assessment rubrics, student worksheets and suggested rubrics; offer replenishment packs (wires, bulbs, crocodile clips) as recurring revenue.
Creative
Solar-Powered Mini Fan + Lantern
Build a dual-function desk gadget that acts as a small fan and LED lantern. Mount one motor with a 4-vane propeller onto the plastic board and wire it to the solar panel and the AA battery holder through the push-button switch so it can run on sunlight or batteries. Add an LED (with resistor) in parallel with its own switch to act as a low-power lantern. Use corner braces to make a fold-down stand so the solar panel can angle toward the sun. Variations: swap the propeller for a blade with a cardboard shroud for higher airflow, or add a second LED for adjustable brightness.
Sun Racer (Solar-Powered Car)
Use the motors, wheels, shafts and shaft sleeves to build a lightweight 4-wheel racer driven directly by a motor and powered by the solar panel (or batteries). Keep the chassis minimal with the plastic board and corner braces, mount the motor(s) with the motor holders and secure wiring with crocodile clips. Optimize performance by reducing friction (loose wheel fit with shaft sleeves) and trimming weight. Make a series of racers with different wheel sizes or propeller-driven variants for friendly competitions on sunny days.
Interactive Alarm / Sound & Light Prop
Create a simple alarm prop that combines the buzzer and LEDs for a dramatic effect — ideal for classroom demos or a Halloween prop. Wire the buzzer and LED(s) in parallel to the battery holder with a push-button acting as the trigger. For a DIY 'pressure pad' trigger, sandwich aluminum foil and cardboard strips to make a contact switch. Mount everything on the plastic board and mark an on/off selector to teach kids how circuits open and close.
Hands-On Circuit Lab Board (Teaching Kit)
Assemble a modular demonstration board to teach series vs. parallel circuits, voltage drop, and power sources. Use the bulbs and LEDs to show brightness changes when components are added; swap between solar panel and batteries to demonstrate source characteristics. Label each test node on the board and include safe time limits (3 minutes on continuous motor runs). This makes a durable, reconfigurable classroom demo for small-group experiments.