Features
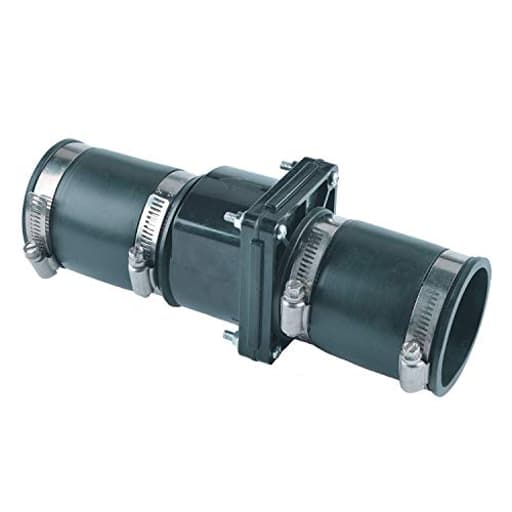
- 2" x 2" Slip-on check valve for most sump pumps
- Made of strong ABS body and EPDM rubber on both ends to prolong service life
- Stainless steel 301 clamps and fasteners for corrasion and rust resistance
- Can be installed vertical or horizontal, but vertical would be best
- Reducing water noice
Specifications
| Color | Black |
| Size | 2" |
Related Tools

A 2-inch slip-on check valve for sump pump discharge lines that prevents backflow. Constructed with an ABS body, EPDM rubber seals on both ends, and stainless steel 301 clamps and fasteners for corrosion resistance, it can be installed vertically or horizontally (vertical recommended) and helps reduce water noise.
HYDRO MASTER Plastic Sump Pump Check Valve with Stainless Steel Clamps 2 inch Review
Why I swapped my old check valve for this one
A few storm seasons ago, I discovered how much a sump system’s reliability hinges on a humble check valve. My old metal swing check had started to corrode, thump loudly on every cycle, and dribble just enough water back into the pit to make the pump short-cycle. I replaced it with the HYDRO MASTER check valve—a 2-inch, slip-on style with an ABS body, EPDM rubber ends, and stainless clamps—and it’s been the quiet, leak-free upgrade I was hoping for.
What drew me to this design is simple: no solvent welding, no threaded unions, and fewer parts that can rust. It’s a rubber-coupling style body with a check mechanism inside, so you cut the discharge line, slide it on, tighten the clamps, and you’re done. That simplicity matters when you’re working in a cramped pit or you want serviceability without cutting pipe again later.
Build and materials
- Body: ABS feels robust, with enough rigidity to keep its shape under clamp pressure, but not brittle. ABS also shrugs off the damp, occasionally humid environment around a sump basin better than painted steel.
- Seals: EPDM rubber on both ends handles cold basements, intermittent warm discharge, and typical household water without getting gummy or cracking. The ends are finished cleanly and grip pipe well.
- Hardware: The clamps and screws are stainless steel (301), which means they resist rust significantly better than the plated hardware you still see on some budget fittings. It’s not marine-grade 316, but after exposure to a basement environment with occasional condensation, my clamps still look good and adjust smoothly.
The valve is designed to be installed vertically or horizontally, with vertical orientation recommended. I installed mine vertical, directly above the pump’s union, which keeps the flapper closing under gravity and minimizes any chance of air entrapment.
Installation: genuinely straightforward
Tools I used:
- Tape measure and a marker
- PVC cutter (a fine-tooth saw works too)
- Deburring tool or utility knife
- 5/16-inch nut driver for the clamps
- Level (optional, but makes alignment cleaner)
Steps I followed:
1. Dry-fit and measure: I marked the discharge line so that the valve would sit a foot or so above the pump outlet. I double-checked the direction arrow on the valve body—easy to miss in low light.
2. Cut and clean: After cutting the pipe, I deburred and slightly chamfered the edges. This makes sliding the valve on effortless and protects the EPDM from sharp pipe edges.
3. Seat the valve: I slid one end fully over the lower pipe, then aligned the upper pipe and seated the top. Getting a consistent insertion depth on both sides helps prevent skewed clamping.
4. Tighten smartly: I snugged the clamps evenly, alternating between sides to keep pressure uniform. Hand-tight plus a firm quarter-turn with the nut driver was plenty—no need to crush the rubber.
Total time: under 15 minutes, most of that being careful measuring and cleanup.
Tip on sizing: this is sized for 2-inch nominal pipe. In PVC, that’s an outside diameter of about 2.375 inches. If your line is 1-1/2 inch, you’ll need reducers or to choose a valve that matches your pipe size. Don’t go by outside diameter alone—use the pipe’s nominal size.
Performance and noise
The first thing I noticed after installation was the sound—or rather, the lack of it. The old metal valve used to slam shut with a hard “clack” that echoed through the discharge line and floor joists. This check valve closes with a soft, controlled finish. The water hammer I had previously was all but gone.
Backflow prevention has been excellent. After a series of heavy cycles, the column of water above the valve stayed put between runs, and the pump didn’t immediately re-circulate what it just pushed out. Over time, that reduces short-cycling and wear on the pump. I checked the pit and discharge line a week later and found no seepage or slow drain-down. The rubber-to-pipe interface stayed dry around the clamps.
Flow restriction is minimal for a check valve. Any check mechanism adds some resistance, but I didn’t see a measurable change in pump runtime compared to a full-bore swing check. The pump’s duty cycle and discharge rate looked essentially the same as before—just without the noise.
Reliability in real use
A check valve’s job is repetitive and unglamorous: open, close, seal, repeat. After months in service, the hinge action still feels crisp when I test the line, and the flapper seats positively. The ABS body hasn’t deformed under clamp pressure, and the EPDM hasn’t crept or squeezed out at the edges.
I appreciate how service-friendly this style is. If I ever need to access the pump or replace the valve, two clamp screws and the line is apart—no cutting, no primer or cement cleanup. I retorqued the clamps once after the first week to account for any initial compression set in the rubber, and they haven’t needed attention since.
As for durability, plastic wins in a damp environment. My previous metal valve showed rust within a season. Here, the only metal exposed is the stainless hardware, and that’s held up nicely. If your sump pit sees salt-laden water (from water softener discharge) or coastal air, you’ll still want to keep an eye on any stainless, but for typical basement humidity this setup is a clear upgrade.
Where it fits—and where it doesn’t
- Ideal uses: residential sump and effluent pumps with 2-inch discharge, basements where noise reduction matters, installs where easy serviceability is a priority, and any place you want to avoid corrosion.
- Less ideal: systems moving hot water or harsh chemicals, lines with heavy solids, or outdoor installs exposed to road salt spray. It’s not a fix for undersized piping or a pump that’s already struggling with excessive head height.
A note on orientation: the valve can be installed horizontally, but vertical installation gives you the best sealing behavior and tends to be quieter. On horizontal runs, make sure the flapper can swing freely and that the valve sits level to avoid partial seating.
Practical tips after living with it
- Use a nut driver instead of a flat screwdriver. You’ll get even torque without cam-outs that can scratch the screws.
- Don’t overtighten. Crushing the rubber can deform the body or create a sealing ridge that’s actually harder to keep watertight. Even, firm pressure is the goal.
- Mark the flow direction on the pipe. It sounds basic, but it’s helpful when you’re servicing the system years later.
- Leave service space. Give yourself a few extra inches of straight pipe above and below for future removal or replacement.
Pros and cons
Pros:
- Fast, glue-free installation and easy future service
- Quiet closing that reduces water hammer
- Corrosion-resistant construction (ABS body, EPDM ends, stainless clamps)
- Reliable sealing that prevents short-cycling
- Works in vertical or horizontal runs (vertical preferred)
Cons:
- Only fits 2-inch nominal pipe without adapters
- 301 stainless is very good for basements, but not as corrosion-proof as 316 in harsh environments
- As with any check valve, there’s some inherent flow resistance (though minimal here)
Value
Given the build quality and the convenience of the slip-on design, the price feels fair—especially compared to metal valves that cost more and demand more maintenance. The noise reduction alone is a meaningful quality-of-life improvement, and fewer pump cycles can save wear on your equipment over time.
Recommendation
I recommend the HYDRO MASTER check valve for anyone upgrading or maintaining a residential sump system with 2-inch discharge. It installs quickly without glue, seals reliably, and meaningfully cuts down on noise and water hammer compared to typical metal swing checks. If you’re in a severe corrosion environment or need a different pipe size, plan accordingly or look for a model matched to your conditions. For standard basement duty, this has been a simple, robust, and low-maintenance fix that’s improved both performance and peace of mind.
Project Ideas
Business
Basement Sump Retrofit Service
Offer a local service retrofitting existing sump pump systems with slip-on check valves to prevent backflow, reduce noise, and stop recurring pump cycling. Market to homeowners and property managers; quick install (30–60 minutes) per job and potential for recurring maintenance contracts. Use stainless-clamp kits as upsell for corrosion-prone installations.
Preassembled Rain Barrel / Irrigation Kits
Sell DIY rain barrel or drip-irrigation kits that include the 2" check valve preinstalled to prevent backflow into downspouts or irrigation lines. Package with clear instructions, fittings, and marketing around 'no-siphon' reliability. Target gardeners, urban homesteaders, and big-box retail or online marketplaces.
Silent Water Feature Kits for Offices & Retail
Design compact, low-maintenance water feature packages for offices, hotels, and retail spaces that emphasize quiet operation using the check valve. Include pump, pre-plumbed valve, vibration isolation, and quick-install hardware. Sell installation plus monthly maintenance plans to create recurring revenue.
Wholesale Plumbing Retrofit Packs
Assemble and brand small retrofit packs (valve + clamps + instructions) for plumbers, property managers, and DIY retailers. Offer volume discounts and training videos showing optimal vertical installation and noise-reduction tips. Position as a cost-effective upgrade to extend pump life and reduce callbacks.
Creative
Quiet Indoor Tabletop Fountain
Build a small, stylish tabletop fountain using the check valve to stop backflow and reduce splash noise. Use a shallow basin, a submersible pump, decorative river stones, and a short vertical riser into which the 2" check valve is slip-fitted. The valve prevents water from siphoning back into the basin when the pump cycles off and the stainless clamps keep the assembly tidy. Good for offices or bedrooms — takes 1–3 hours and minimal plumbing skills.
Self-Watering Raised Planter Reservoir
Create a raised planter with a hidden water reservoir and overflow prevention. Mount the check valve between the reservoir outlet and the overflow/drain line so water can exit but not siphon back, keeping soil moisture steady while preventing backflow into the irrigation fill line. The ABS body resists soil acids and EPDM seals ensure long life. Great for edible gardens and weekend markets.
Mini Recirculating Pond / Water Feature
Use the valve in a backyard mini-pond kit to keep circulation one-way and reduce the noise of return flows. Install vertically on the return line of a small submersible pump to prevent night-time backflow when the pump stops, which reduces gurgling and extends pump life. Combine with decorative rocks, a small cascade, and LED accent lights for a polished look.
Industrial-Style Sculpture or Lamp Accent
Repurpose the check valve and stainless clamps as an industrial aesthetic element in a lamp base or wall sculpture. The valve's flanged ends and clamps can be integrated into piping assemblies or used as a unique joint/accent piece; functional versions can hide wiring or small tubing inside. Good for makers markets and interior decor that blends function and form.