Features
- 【Compatibility】Check Valve Rebuild Kit and Fuel Tool Kit Fits For 2001-2025 Newer Harley Davidsons
- 【Replace Part Numbers】For Harley Davidson Tool Kit Replace MC-400 and MC-300
- 【Durable Material】The Fuel Check Valve Rebuild Kit includes all necessary parts manufactured with high-quality DuPont Viton O-rings and premium stainless steel, ensuring perfect compatibility as an OEM replacement and delivering extended service life.
- 【Save Time】Fuel Tool Check valve Repair Tools allow you to quickly remove and replace the Check Valve O-Rings and Components with out having to remove the Fuel Tank. No longer do you need to replace the entire Check valve and Fuel line when only a simple and quick rebuild is needed.
- 【After-Sales Service】Buy with confidence! We will provide a repair manual and Harley Davidson Check Valve Rebuild Kit come with a 1-year replacement warranty and undergo strict inspection to ensure quality. We also offer a return and exchange service for your peace of mind
Specifications
| Color | Silver |
| Unit Count | 1 |
Related Tools

This kit provides tools and replacement components to rebuild and service fuel check valves on 2001–2025 model-year motorcycles that use the same fuel check valve design. It includes stainless steel components and DuPont Viton O-rings sized for OEM fit, and is designed to let you remove and replace check valve O-rings without removing the fuel tank. A repair manual is included and parts are covered by a one-year replacement warranty.
KOONDHEEND MC-400 Check Valve Repair Tools and MC-300 Fuel Tool Kit for Harley Davidson Tool kit Compatible with Harley Davidson 2001-2025 Models Review
What this kit is and who it’s for
Fuel leaks at the quick-disconnect are a rite of passage on fuel‑injected Harleys. The usual dealer fix is to replace the check valve and sometimes the internal line—effective, but not cheap and often overkill when the culprit is a pair of tired O‑rings. The KOONDHEEND check valve kit targets that exact problem: let you service the check valve in the tank bung without pulling the tank, and do it with tools that mimic the common MC‑400/MC‑300 combo. If you wrench on 2001–2025 fuel‑injected Harley-Davidsons and prefer to rebuild instead of replace, this kit is squarely in your lane.
Build quality and what’s in the box
Out of the box, the machining quality impressed me. The stainless components feel dense and properly finished—threads are clean, shoulders are square, and nothing rattles. The tolerances are tight enough to inspire confidence without feeling fussy in use. The included O‑rings are DuPont Viton, which is the right call for gasoline and ethanol‑blended fuels. They’re sized for OEM fit; I didn’t have to stretch, trim, or cajole them into place.
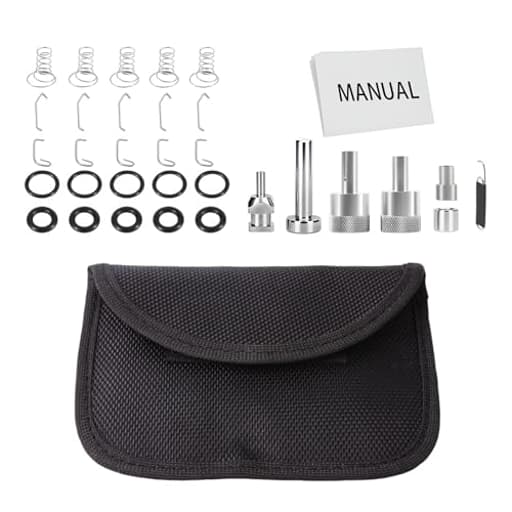
The kit I used included:
- The extraction/installation tools functionally equivalent to the MC‑400 and MC‑300
- Replacement Viton O‑rings for both positions
- Replacement check valve components
- A straightforward repair manual
It’s a single kit that covers the job end to end—nice not having to source seals separately.
Setup and safety
A couple of basics before you start:
- Work cold, ventilated, and spark‑free. Disconnect the battery.
- Relieve fuel pressure at the quick‑disconnect, and keep a catch rag handy.
- Have fuel‑compatible lubricant (silicone or a fuel‑safe assembly lube), a flashlight, and a pick set within reach.
The big promise here is not removing the tank. In practice, that held true on the bikes I worked on. I lifted the console/trim for access, but the tank stayed bolted down.
Using the KOONDHEEND kit
The workflow goes like this:
1. Disconnect the external fuel line at the quick‑disconnect and clean the bung area so you’re not dragging grit inside.
2. Thread the extraction tool into the tank bung. The threads engage positively—no gritty feel, no cross‑thread drama.
3. A controlled twist and pull seats the tool, and you can begin withdrawing the check valve internals. The tool supports the components so you’re not fighting spring pressure blindly.
4. With the assembly accessible, replace the lower O‑ring first. This one typically comes out cleanly with a pick.
5. The upper O‑ring and the check valve body are the patience test. A fuel‑safe lube on reassembly pays dividends here.
6. Reinstall with the installer tool, ensuring the valve seats squarely. Don’t force it; steady axial pressure works better than muscle.
My first pass took just under an hour, mostly because I took time with the upper O‑ring and inspected the seating surfaces. A second job, with the steps fresh in mind, was closer to 30–40 minutes. You can do it faster, but I’d argue accuracy matters more than speed with a sealed fuel component.
Performance and results
Post‑rebuild, the quick‑disconnect sealed immediately, with no residual weeping after priming the pump. After several heat cycles and a couple of tanks of fuel, the repair held as expected. The Viton O‑rings compress uniformly and don’t nick easily if you use a dab of lube and keep your angles straight.
On the tool side, the stainless hardware resisted galling and didn’t mark the bung threads. The alignment features are intuitive, and the handle offers enough purchase for controlled, incremental pressure rather than yanking. The whole operation felt like using a purpose‑built OE tool rather than a generic adapter.
Most importantly, I never had to pull the tank. That alone saved an afternoon, avoided the risk of scratching paint, and kept the job in the “driveway doable” category.
Fit and compatibility
I used the kit on a fuel‑injected Harley from the 2010s with the common check valve layout, and the fit was spot on. The tool engaged the bung perfectly, and the included seals matched the original profile. The manufacturer rates this for 2001–2025 models that use the same valve design, and that tracks with what I saw. If your bike is fuel injected and uses the quick‑disconnect at the tank bung, the geometry should line up.
A note for anyone with bikes spanning generations: tolerances and access vary slightly across models (Touring versus Dyna/Softail). You might have to move trim for better access, but the tank can stay.
Tips to make the job go smoothly
- Light and lube: A headlamp and a touch of fuel‑safe lubricant dramatically reduce the chance of nicking the upper O‑ring.
- Keep it clean: Use a lint‑free rag around the bung and blow away dust before threading the tool in.
- Don’t pry blindly: Let the extraction tool carry the load; use picks only to tease O‑rings out once the assembly is supported.
- Square pressure over force: If something hangs up during reassembly, back off and realign. Forcing it risks pinching a seal.
- Capture orientation: Snap a quick photo before you start pulling parts. It’s amazing how memory blurs when you’re mid‑job.
Where it comes up short
- Learning curve on the upper O‑ring: The lower seal is easy; the upper one can test your patience the first time. The manual explains the sequence, but a couple of close‑up diagrams showing exact pick points would shorten the learning curve.
- Not a cure‑all for neglected systems: If the internal fuel line is cracked or the valve seat is damaged, you’re outside rebuild territory. This kit is for O‑rings and check valve service, not a fix for every fuel issue.
- Space constraints: On some models, the area around the bung is tight, and you’ll work by feel at times. The tool helps, but it can still be fiddly.
None of these are dealbreakers, but they’re worth setting expectations: plan your workspace, work unhurried, and you’ll get a clean result.
Durability and service support
After several uses, the threads are still crisp and the tool faces show minimal marking. Stainless is the right material choice here, and it’s executed well. The included Viton seals are high quality and should outlast the nitrile alternatives that show up in cheaper kits. The repair manual is clear enough for a competent home mechanic, and the one‑year replacement warranty is a welcome safety net. I didn’t need support, but knowing there’s a structured warranty is reassuring.
Value and alternatives
There are pricier, brand‑name tools that accomplish the same task. The differentiator here is that the KOONDHEEND kit includes the rebuild components and O‑rings sized for OEM fit in the same box, at a lower overall cost than piecing everything together. If you maintain your own bike—or a few bikes over the years—this is one of those kits that pays for itself the first time you avoid tank removal or the cost of a new valve assembly.
The bottom line
The KOONDHEEND check valve kit does exactly what it promises: it lets you service a leaky check valve at the tank bung with the tank in place, using well‑made stainless tools and proper Viton seals. It isn’t magic—the upper O‑ring still requires a steady hand and a bit of patience—but the tool’s design minimizes the guesswork, protects the threads, and makes a fiddly job repeatable. Build quality is solid, the fit is precise, and the inclusion of replacement components and a clear manual makes this approachable for a careful home mechanic.
Recommendation: I recommend this kit. It offers OEM‑level function, quality materials, and a complete set of parts at a sensible price. If you’re comfortable working around fuel and willing to take your time on the upper seal, you’ll fix the common quick‑disconnect leak without pulling the tank and without buying a new valve assembly. For anyone maintaining a fuel‑injected Harley from the 2001–2025 era, it’s a smart addition to the toolbox.
Project Ideas
Business
Mobile Check-Valve Rebuild Service
Offer an on-site service that visits Harley owners at home or events to rebuild fuel check valves without removing the tank. Sell fixed-price rebuilds that highlight time savings vs full valve replacement. Startup needs: one full kit, basic diagnostics tools, marketing to local rider groups, and liability insurance. Pricing tip: charge 2–3x parts cost plus hourly labor; offer fleet or group discounts for bike-night partnerships.
Specialized Repair Kits with Video Course
Package the MC-400/MC-300 components into branded DIY kits (beginner and pro versions) sold online, and pair them with a paid step-by-step video course showing removal, inspection, and O-ring replacement without tank removal. Include printable checklists and troubleshooting guides. Channels: Etsy, eBay, Amazon, and a Shopify store. Upsell: tool rental, one-on-one virtual coaching sessions, and extended warranty registration.
B2B Supply & Training for Local Shops
Position the kit as a time-saving add-on for independent motorcycle shops and custom builders. Offer wholesale bundles, in-shop training sessions, and co-branded marketing materials that explain the OEM-fit Viton O-rings and stainless components. Benefits to shops: shorter job times and reduced parts waste. Structure: volume discounts, training fees, and a dealer warranty/resupply program.
Subscription Maintenance Program
Create a recurring maintenance plan for Harley owners that includes scheduled inspections and preventive check-valve rebuilds (e.g., every 2–4 years or per mileage). Offer tiered plans (basic inspection, rebuild included, premium with mobile service). Use the warranty and OEM-fit messaging to justify recurring fees and offer priority scheduling, discounted parts, and seasonal tune-up reminders.
Event Service Booth & Build Demonstrations
Set up a branded booth at bike rallies, swap meets, and dealer open days to demonstrate a live rebuild using the kit, sell on-the-spot rebuilds, and retail replacement O-rings/kits. Demonstrations create trust and drive immediate sales; bring printed manuals, before/after photos, and a small merch table with keychains and jewelry made from spare parts to boost margins. Collect leads for follow-up mobile service or online courses.
Creative
Steampunk Valve Sculptures
Use the stainless-steel check valve components and Viton O-rings as the building blocks for small steampunk-style sculptures. Combine with brass fittings, small gears, and patinated metal plates to make tabletop pieces or lamp bases. Steps: clean and polish parts, arrange into a composition, solder or epoxy where needed, add a base (wood or metal), and finish with a clear coat. Time: 2–6 hours per piece. Good for craft fairs or as unique gifts for riders who want a piece of motorcycle DNA in their home decor.
Functional Keychain / Zipper Pull
Turn a rebuilt check-valve component into a rugged keychain or zipper pull that visually references motorcycle parts. Use a single stainless body, a secure split ring, and a small Viton O-ring as a design accent. Optionally engrave or laser-etch model years or a short slogan. This is a fast weekend project that showcases the tool kit's authenticity and makes a practical keepsake for riders.
Upcycled Parts Jewelry
Craft bracelets, cufflinks, and pendants from small stainless parts and cut Viton O-rings. Mount portions of the valve body into bezels, polish and add leather or paracord bands. Include a small card explaining the OEM compatibility and materials (DuPont Viton O-rings, stainless). These pieces appeal to motorcycle enthusiasts who like subtle mechanical jewelry.
Hands-On Repair Art Installation
Create an exhibit-style shadowbox or wall display that shows a 'before and after' of a check-valve rebuild. Include an actual removed valve, the rebuilt unit using the kit, labeled O-rings, the repair manual, and a short printed timeline of the 2001–2025 Harley compatibility. This can be displayed in a garage, shop, or at events to tell the story of maintenance-as-craft.
Micro-Workshop Series for Friends
Host a small, social workshop where each participant practices removing and replacing check valve O-rings without tank removal. Use the included manual and demo tools, give each attendee a practice valve or spent part, and end with a group photo and a small take-home keychain made from the leftover hardware. It’s a fun, hands-on way to build community and pass on practical skills.