Features
- The product is manufactured in united states
Specifications
| Size | 7.2" x 33.5' |
| Unit Count | 1 |
Related Tools
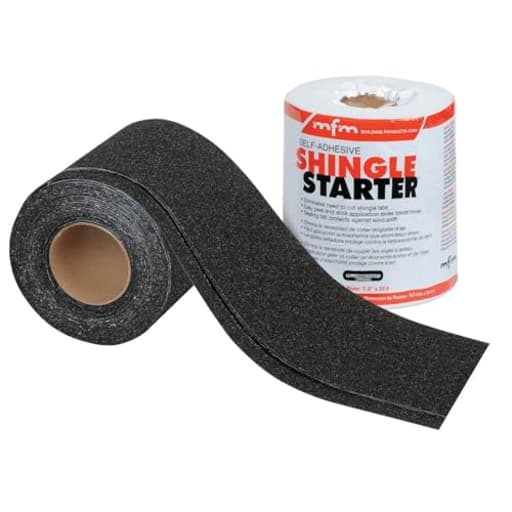
A roll-form starter strip designed to form the initial course for asphalt shingles along eaves and rakes. It measures 7.2 inches by 33.5 feet, is manufactured in the United States, and provides a uniform base that aids shingle alignment and helps secure shingle edges against wind uplift.
Mfm Building Product 47733 ShingleStarter 7.2 in x 33.5 ft Review
Why I Reached for This Starter Strip
On new shingle roofs and small repairs alike, a good starter course sets the tone for the whole job. I’ve cut plenty of starter shingles from three-tabs over the years, but I tried this starter strip to speed up layout and get a more uniform bond along the eaves and rakes. After several installs—from a small outbuilding to a modest residential re-roof—I’ve formed a clear opinion on where this strip shines and where you might want to plan around its quirks.
What It Is
This is a roll-form asphalt starter strip designed for asphalt shingle roofs. It measures 7.2 inches wide and comes in a 33.5-foot roll. It’s made in the United States. The idea is straightforward: the strip provides a clean, consistent starting edge that aligns the first shingle course and helps secure shingle edges against wind uplift via a factory-applied adhesive. If you’ve ever misaligned that first course or spent time chopping tabs, the time savings are immediate.
Build and Materials
The strip has an asphaltic, self-adhering backing with a release film. The top surface is compatible with standard asphalt shingles. The roll arrives compact and manageable—easy to carry up a ladder without feeling like you’re wrestling a roofing membrane. The adhesive is assertive in warm temperatures, which is what you want for a secure first row.
At 7.2 inches wide, it’s on the narrower side compared to some starter products. That’s not inherently a problem, but it does affect how much “safety margin” you have behind the first shingle course, especially at rakes. I’ll touch on that under sizing and coverage.
Installation Experience
The learning curve is minimal if you’ve used peel-and-stick products. My process:
- Prep: Sweep the deck, make sure the eaves are clean, dry, and flat. If there’s existing underlayment, I ensure it’s well-adhered and intact at the edges.
- Layout: Snap a chalk line parallel to the eave to keep the strip true. The strip’s straight edge makes it easy to follow a line without wandering.
- Drip edge coordination: I install eave metal first, then run the starter strip so it just kisses the hem, leaving a consistent 1/4"–3/4" shingle overhang beyond the drip edge once the first course goes on. Always follow your shingle manufacturer’s details and local code, particularly where ice barriers are required.
- Application: Unroll a manageable length, peel the release film, and tack the leading corner with a roofing nail to keep it aligned. Press the strip into place as you go. In warm weather, hand pressure or a laminate roller sets the adhesive nicely.
- Fastening: The primary mechanical hold comes when you nail the first shingle course through the strip and into the deck. I’ll add a few temporary tacking nails if wind is gusty or the deck has a slight crown.
Cutting is clean with a sharp utility knife. I was able to trim around valleys and returns without gummy build-up on the blade, though swapping blades sooner rather than later keeps edges crisp.
Adhesion and Weather Considerations
Adhesion performance tracks with temperature, humidity, and surface cleanliness—no surprises there. In hot weather the strip grabs quickly and bonds firmly; I’ve had to be deliberate about placement because it does not like to be repositioned once set. On mild days (around 60–65°F), it still bonds, but I spend more time pressing it in and occasionally warming it with my hands or a roller. On colder days, I rely more on mechanical fastening of the first course and don’t expect the adhesive to reach full tack until the roof sees sun.
Two practical notes:
- If the decking is dusty or granule-laden from tear-off, adhesion drops. A stiff broom or leaf blower before installation is worth the two-minute detour.
- If your schedule forces a cooler install, consider storing the roll indoors until use, or lightly warming the eave line. You don’t need a torch—just avoid installing stone-cold materials onto a cold substrate.
Once roofed over and warmed by the sun, the starter bond has remained intact for me, even after a few blustery days.
Speed and Alignment
The big win is speed. There’s no flipping of three-tabs, no cutting off noses, and no guesswork about where the sealant strip will fall relative to your first row. The consistent width and factory adhesive mean the first course goes down briskly and straight. On a small shed roof, I was able to go from bare deck to first course in under an hour working solo, including drip edge and underlayment touch-ups.
The uniform edge also helps rake lines look tidy. I run the strip up the rakes so the first field shingle has a clean bond and consistent reveal. The narrower width still provides sufficient backing for standard exposures; just be careful with chalk lines and overhang to keep everything square.
Sizing and Coverage
Each roll covers 33.5 linear feet. That math makes planning simple:
- Count your eave lengths and rake lengths in feet.
- Add them up.
- Divide by 33.5 to get how many rolls you’ll need (and round up).
For example, a small gable roof with 40 feet of eave and 40 feet of rake will need three rolls if you plan to run starters along both eaves and rakes. If you are only treating the eaves, two rolls will do with a little to spare.
The 7.2-inch width is adequate for most shingles with common exposures, but it’s narrower than some alternatives. If you prefer a more generous underlayment margin behind the first course or want extra coverage at rakes, plan your chalk lines carefully. The narrower profile is not a deal-breaker; it just demands slightly more precise placement.
Durability and Wind Resistance
A starter strip’s job is modest but critical: keep the first course anchored and aligned. In practice, I’ve found this strip provides a secure bond that helps resist wind uplift at the vulnerable edges. The combination of the adhesive and the nails through the first course is what does the heavy lifting. After installation, I’ve revisited projects to check the eave bond and haven’t seen lifting or edge flutter.
As always, long-term performance hinges on the whole system: proper underlayment, correct nailing, drip edge integration, and shingle manufacturer instructions. The strip won’t compensate for under-driven nails or an uneven deck, but it does its part reliably.
Where It Fits Best
- DIY and small projects: Sheds, lean-tos, and small additions benefit from the quick layout. Cutting to length is easy and clean.
- Standard asphalt shingle re-roofs: Faster starts on production work, especially when you want uniformity job to job.
- Jobs in warm to hot weather: The adhesive really shines in higher temperatures, making for rapid, confident installs.
Limitations and Practical Tips
- Temperature sensitivity: Below roughly 60°F, expect slower adhesion. Press it in and rely on the first course nails; plan for sun activation later.
- Narrower profile: At 7.2 inches, you’ll want accurate chalk lines. If you like an extra-wide starter for rakes, consider how this width fits your standard reveals.
- Surface prep matters: Dust, old granules, and uneven decking will diminish adhesion. Give the eaves an extra minute of prep.
- Release film management: Peel sections at a time instead of exposing the entire roll. It keeps the strip controllable in breeze.
A few installation tips that have served me well:
- Pre-mark your overhangs at the eaves and rakes with a pencil.
- Run a hand roller or the heel of your palm along the strip to seat it before shingling.
- Cap any small tears or overlaps with a dab of compatible roofing cement to keep edges neat.
Value
This starter strip’s value proposition is about time saved and consistency gained. If you’re accustomed to cutting your own starters, you’ll notice faster setup and more predictable sealant placement. The made-in-USA build quality and dependable adhesion in warm conditions round out the package. While wider options exist, I haven’t found the narrower width to be a barrier to a quality install as long as layout is deliberate.
Final Thoughts and Recommendation
I recommend this starter strip for anyone installing asphalt shingles who values speed, clean alignment, and a reliable bond—especially in moderate to warm temperatures. It streamlines the first course, keeps rake edges tidy, and integrates seamlessly with standard shingle methods. The 7.2-inch width requires a bit more attention to layout than wider rolls, and cooler-weather adhesion will benefit from additional pressure and the mechanical security of the first course, but neither issue is a deal-breaker.
If your priority is a straightforward, time-saving starter that delivers a uniform edge and dependable performance across typical residential work and small outbuildings, this starter strip earns a place on the roof.
Project Ideas
Business
Pre-cut Starter Kits for DIYers
Package the 7.2" x 33.5' starter strip into small pre-cut kits (e.g., eave and rake packs) aimed at homeowners doing partial roof repairs. Include simple instructions, a few starter nails, and marketing that highlights 'Made in the USA' quality — sell online, at local hardware stores, or as an add-on at home shows.
Hands-on Roofing Workshops
Run paid workshops teaching basic shingle roof repair and starter-strip installation for homeowners and property managers. Use the roll as the teaching material — charge per attendee, provide take-home starter-strip samples, and upsell tool kits or follow-on contracting services.
Upcycled Garden Product Line
Turn overstock or trimmed-off starter strip into finished garden products (edging kits, planter bands, weatherproof coasters) and brand them as durable, upcycled, American-made landscape accessories. Sell through farmers’ markets, Etsy, or garden centers; emphasize sustainability and practical longevity.
Contractor Supply Subscriptions
Offer a B2B subscription service supplying starter strips and related small-run roofing materials to independent contractors and handymen. Provide volume discounts, priority shipping, and occasional training/installation videos; position the program around reliability and U.S. manufacture to build recurring revenue.
Creative
Weatherproof Garden Edging
Use lengths of the 7.2" starter strip as a low-cost, flexible edging for flower beds and raised planters. Cut to length, pin or staple into place (or sink short stakes through the strip) to create a water-resistant border that helps direct runoff and resists soil washout — a neat, durable edge that weathers like roofing materials.
Mini Rooftop Birdhouses & Fairy Houses
Cut the roll into shingle-sized strips and layer them on small wooden birdhouses, fairy houses, or garden sheds to create realistic miniature roofs. The starter strip gives an authentic asphalt-shingle look and is weather-resistant, making outdoor decorative projects both attractive and long-lasting.
Rustic Planter Bands & Trims
Wrap strips around tin or wooden planters as decorative, waterproof bands that mimic roofing detail—use rivets, screws, or heavy-duty adhesive to fasten. Trim edges for geometric patterns or scallops to create an industrial-rustic aesthetic for indoor or outdoor pots.
Textured Wall or Accent Panels
Create small wall panels by overlapping starter-strip pieces in a shingle pattern on plywood or fiberboard, then seal and mount as weatherproof exterior accents or interior industrial-style art. Paint or distress edges for color variation; the roll’s uniform width makes quick, repeatable patterns.