Features
- 3/4 in. I.D. (1 in. O.D.) HDPE-coated aluminum tubing
- 100 ft continuous tubing length
- Compression-style fittings for leak‑resistant joints
- Corrosion-resistant HDPE coating to prevent internal rust
- Can be installed in-wall or mounted on wall
- Includes outlets, fittings and mounting hardware for multi-station distribution
Specifications
| Fitting Size (In.) | 0.75 in |
| Hose Length (Ft.) | 100 ft |
| Maximum Operating Pressure (Psi) | 200 PSI at 73°F (160 PSI at 140°F) |
| Product Weight | 24 lb |
| Color | Yellow |
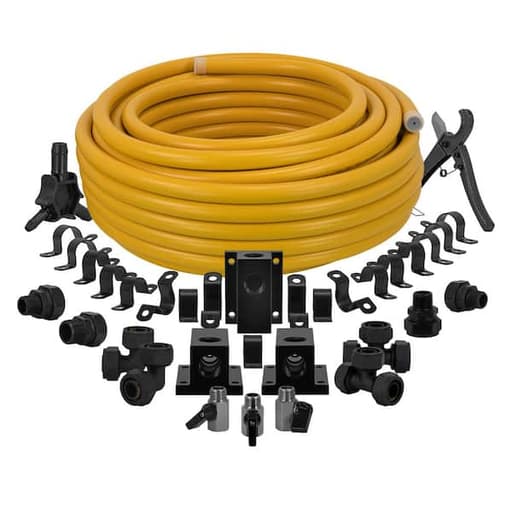
| Includes | 100 ft tubing; 3 aluminum outlet manifolds; 2 × 3/4 in. tee fittings; 2 × 3/4 in. 90° elbow fittings; 1 × 3/4 in. NPT straight fitting; 3 × 1/2 in. NPT straight fittings; 20 steel mounting brackets; 3 × 3/8 in. NPT drain valves; 1 deburring tool; 1 tube cutter |
| Manufacturer Warranty | 2 Year Limited |
A 100 ft kit of 3/4 in. I.D. (1 in. O.D.) HDPE-coated aluminum tubing and associated compression fittings for distributing compressed air in a shop. Tubing can be surface-mounted or run in-wall. Compression fittings provide a leak-resistant connection and the HDPE coating reduces corrosion and prevents rust contamination of the air stream.
DeWalt 3/4 in. x 100 ft. HDPE/Aluminum Air Piping System Review
What this kit is and who it’s for
I set up the DeWalt air piping kit to replace a mix of rubber hose and black iron runs in a two-bay shop. If you’re outfitting a new space or cleaning up an air system that’s grown messy over time, this kit aims to give you a clean, corrosion-resistant backbone with multiple drops and the fittings to tie it together. It’s a 3/4 in. I.D. (1 in. O.D.) HDPE‑coated aluminum tube in a 100 ft coil, with compression fittings and three outlet manifolds. The bright yellow tubing is easy to track across a wall, and the aluminum core keeps weight down while the HDPE coating prevents rust flakes from ever getting into your tools or paint.
What’s in the box
The kit is fairly complete for a three-station layout:
- 100 ft of 3/4 in. tubing (1 in. O.D.)
- Three aluminum outlet manifolds
- Tees, elbows, and NPT adapters (3/4 in. and 1/2 in.)
- Three 3/8 in. NPT drain valves
- A tube cutter and a deburring tool
- A pile of steel wall brackets
At 24 lb, the coil is manageable. The published pressure rating is 200 PSI at 73°F and 160 PSI at 140°F, which is plenty for typical shop pressures and a comfortable margin for compressors that cycle in the 90–140 PSI range.
Installation experience
My layout was a perimeter loop with three drops: one for general use, one near a lift, and one dedicated to paint. The included hardware covered the basics, though I added a couple of extra tees and a regulator/filter set at each drop. The tube cutter works cleanly, and the deburring tool does its job, but prepare for some muscle on first use. The tube’s wall is tough, and the coating doesn’t like to give up easily—good for durability, less fun for hands.
Compression fittings are straightforward: square cut, deburr/chamfer, seat the tube fully, and tighten the nut. Once everything was cinched and I pressure-tested to 120 PSI, the joints stayed quiet with no bubbling in a soapy water test. I left the system under pressure for a day; the needle didn’t move. That leak resistance was the highlight of the install.
Straightening the coil: reality and tips
The largest challenge is convincing a 100 ft coil to behave like a straight line. The tubing holds coil memory more stubbornly than copper or rigid pipe. Straight runs are possible, but you need to plan for it.
What worked for me:
- Unwind the coil fully in a sunny spot for an hour before the install. Warm tubing relaxes much faster.
- Pre-straighten sections on the floor: roll the coil back gently against itself while applying light pressure, working along the length.
- Use tighter bracket spacing than you’d assume. The supplied steel brackets are solid, and close spacing keeps the line looking professional and resists the tendency to spring back.
- Build long runs first, then cut in fittings. If you try to fit and tighten pieces while the tube is still trying to curl, you’ll fight alignment.
If you’re trying to get “laser straight” lines on exposed walls, consider a tubing straightener or plan longer continuous spans with fewer mid-run connections.
Getting fittings on without a wrestling match
Cold tubing makes both the deburring step and fitting insertion feel like a finger workout. Two things eased the process considerably:
- Warm water technique: I heated a bowl of water, dipped the tube end for 30–60 seconds, and then deburred/inserted the fitting while it was still warm. Night-and-day difference.
- Bench height: clamping the fitting body gently in a padded vise and pushing the warmed tube straight onto the fitting keeps everything aligned and reduces the need for mallet persuasion.
As always, follow the manufacturer’s guidance regarding lubricants. Warming the tube was enough in my case, and I avoided adding anything that might compromise O‑rings.
Layout and drops
The included aluminum outlet manifolds are a nice touch. Each drop got a shutoff, filtration, and a quick-connect. I placed the drains at the bottom of each drop and sloped the main line ever so slightly toward those points. With the aluminum core and smooth interior, pressure drop across the loop was minimal; my DA sander and HVLP gun both ran without starve at the far end.
For wall mounting, the yellow tube makes routing obvious and helps avoid accidental collisions with shelving or ladders. I spaced brackets at consistent intervals, doubled up near fittings, and kept the tubing away from heat sources and sharp edges. The elbows and tees thread in cleanly with pipe dope or tape (pick one and use it correctly), and the NPT transitions seated without drama.
Performance in use
Once live, the most immediate difference compared to steel pipe is the cleanliness. After the first week, I cracked a drain and didn’t see a speck of rust—just a bit of condensed moisture. The HDPE interior doesn’t shed, and the aluminum core doesn’t rust, so the air stays clean upstream of your filters. For painting and other finish-sensitive tasks, that’s a genuine upgrade.
Pressure-wise, the 3/4 in. I.D. gives a healthy flow reserve. I ran a 60-gal single-stage compressor feeding the loop and didn’t notice any lag at the last drop. If you run multiple high-demand tools simultaneously, upsizing wasn’t necessary here, though I could see supplementing with a secondary loop in a larger shop.
Noise and vibration were non-issues. The compression fittings didn’t rattle, and the lines didn’t buzz against the brackets. Temperature fluctuations didn’t produce noticeable creep or loosening during the first month; I still rechecked a few nuts after the initial pressure test as a precaution.
In-wall vs. on-wall
The kit is rated for in-wall or surface installs. I used it on-wall for visibility and easy modification, but I did tuck a short section in a chase. If you go in-wall, protect it at penetrations with sleeves and plan access to fittings wherever possible. Compression joints hidden behind drywall make troubleshooting a chore if you ever do have to revisit a connection.
Maintenance and future changes
One of the perks of this system is how easy it is to add a drop or re-route as your shop evolves. Cut, deburr, insert a tee, mount, pressure test—done. I labeled each drop and left a short service loop behind one manifold for future expansion. The included drains make purging moisture routine. After a month, I retested all joints; still tight.
What I’d change
- Coil memory: I’d like to see the tubing ship in a way that reduces set, or have the kit include clearer guidance on straightening techniques. A simple straightening tool or a recommendation would help.
- Deburring tool ergonomics: The included tool works, but it’s not particularly friendly on stiff, cold tubing. A wider handle or a bit of leverage would improve the experience.
- More brackets: I used nearly all the included brackets and still would have liked a few extras for very clean lines on long runs.
These aren’t dealbreakers, but they’re worth planning for so the install goes smoothly.
Buying considerations
- Capacity: 3/4 in. I.D. and 200 PSI at room temperature are ample for most small to mid-size shops.
- Cleanliness: No internal rust and smooth walls make it a good fit for painting and precision tools.
- Install time: Expect to spend time straightening, warming tube ends, and carefully mounting. It’s not “plug-and-play,” but it’s a one‑day project with thoughtful prep.
- Completeness: The kit gets you to three stations out of the box. If your layout is more complex, budget for extra tees, elbows, and brackets.
Recommendation
I recommend the DeWalt air piping kit for small to medium shops that want a clean, reliable, and corrosion‑resistant air backbone without sweating copper or threading steel. It holds pressure, keeps air clean, and includes enough hardware to get a three‑drop system online quickly. You’ll work a bit to tame the coil and seat fittings—warming the tubing and using generous bracket spacing make all the difference—but once installed, it’s a tidy, quiet, and dependable system that’s easy to expand as your needs grow.
Project Ideas
Business
Turnkey Shop Air Installations
Offer fixed-price installation packages for home garages and small shops. Use the 100 ft continuous tubing to minimize joints, add properly sloped runs, drip legs with the included drain valves, and code-conscious in-wall installs where allowed. Upsell regulators, filters, and quick-coupler kits at each of the three manifolds. Market to woodworkers, detailers, and makers who want a clean, leak-resistant setup.
Pre-Cut Drop Kits and Manifold Bundles
Sell mail-order custom-cut drop kits: customers submit wall measurements, you cut/deburr lengths, pre-assemble compression fittings, label each segment, and include a simple layout. Bundle optional add-ons like color-coded quick connects and moisture traps. This removes layout friction and reduces customer mistakes while leveraging the system’s compression fittings.
Compressed Air Leak Audit and Retrofit Service
Provide on-site audits using ultrasonic leak detection, then replace old black iron or PVC lines with this HDPE-coated aluminum system. Offer a savings report estimating compressor runtime reductions. Include moisture management by adding drip legs using the supplied valves and relocating outlets to logical tool stations for improved workflow.
Event and Pop-Up Pit Air Networks
Rent and set up temporary compressed air distribution for autocross days, maker fairs, or mobile detailing meets. Use the 100 ft kit to create a three-station hub for tire inflation, blow-off, and air tools. Fast compression fittings mean quick setup and teardown. Charge a day rate with optional compressors and hoses, plus branded safety signage and regulators.
Detailer and Body Shop Upgrade Packages
Target mobile detailers and small body shops with upgrade bundles: wall-mounted or van-mounted manifolds for blow-out, airbrush touch-up, and drying. Include moisture filtration and standard couplers. Offer installation plus a maintenance plan for annual inspections, leak checks, and fitting refreshes to maintain consistent air quality for finishes.
Creative
Kinetic Air Sculpture Line
Use the 100 ft HDPE/aluminum tubing to feed multiple small pneumatic cylinders and air jets that animate a wall-mounted sculpture. Surface-mount the bright yellow tubing in flowing patterns as part of the artwork, branch to the three included outlet manifolds, and use the 3/8 in. drain valves as simple on/off bleeds for timing effects. The corrosion-resistant, clean air path keeps mechanisms from gumming up over time.
Multi-Station Airbrush and Finishing Wall
Build a clean, organized air distribution wall for painting models, furniture touch-ups, and small automotive parts. Run the 100 ft line along the wall with the 20 mounting brackets and create three airbrush bays using the included outlet manifolds and 1/2 in. NPT fittings for regulators/moisture traps. Add quick-connects at each drop so two airbrushes and one mini HVLP gun can be used without dragging hoses across the shop.
Pneumatic Puzzle and Air-Logic Board
Create an interactive educational board that teaches air logic. Plumb the kit into a plywood panel with tee and elbow fittings to create branches for valves, whistles, and DIY air gates. Users can plug in small valves and blow-off nozzles to solve puzzles like lifting a ball, sounding a sequence of tones, or moving markers along tracks, all powered by the main line.
Inflatable Art Fill and Manifold Hub
Set up a manifolded inflation hub for large inflatable props or costumes. Use the three aluminum outlet manifolds to run separate regulated lines to different pieces for even inflation. The 200 PSI rating (derated at higher temps) gives plenty of headroom to control flow through needle valves and quick disconnects, while the HDPE coating helps keep particulates out of delicate inflatables.
Air-Curtain and Dust Blow-Off Stations
Install a perimeter air line with drop legs at tablesaws, sanders, and benches to create air-curtain nozzles and blow-off guns that keep dust from migrating. Use vertical drop legs with the 3/8 in. drain valves at the bottom to collect moisture and debris before it reaches tools, and mount short rigid stubs to position air knives or nozzles precisely.