Features
- 【Dimensions for Compatibility】Each window guides measures 1-13/16" in length, 13/16" in width, and 11/16" in height. These exacting dimensions ensure a perfect fit within standard window balance track systems commonly found in residential window assemblies, guaranteeing smooth operation without modifications to your existing window structure.
- 【Durable Nylon Construction】Window sash balance made of high-quality nylon material finished in white, these guides offer lightweight yet robust performance. Their sleek white finish ensures color coordination with most residential window sashes, providing both functionality and aesthetic appeal.
- 【Enhanced Window Sash Movement Support】Window top sash guide helps guide the sash smoothly during operation by aligning the top section of the window with the track system, supporting balance function in both single and double hung window setups.
- 【Component for Sash Balance Systems】 Window pgt top sash guide designed specifically for use with sash balance assemblies, these guides work seamlessly to maintain balance and prevent any unwanted tilting or shifting of the sash within the frame.
- 【Residential Window Repair Solution】Window sash balance top guide help restore smooth window operation without the need for invasive frame modifications, making them a practical and cost-efficient choice for homeowners looking to maintain or enhance their window functionality.
Specifications
| Color | Black |
| Unit Count | 10 |
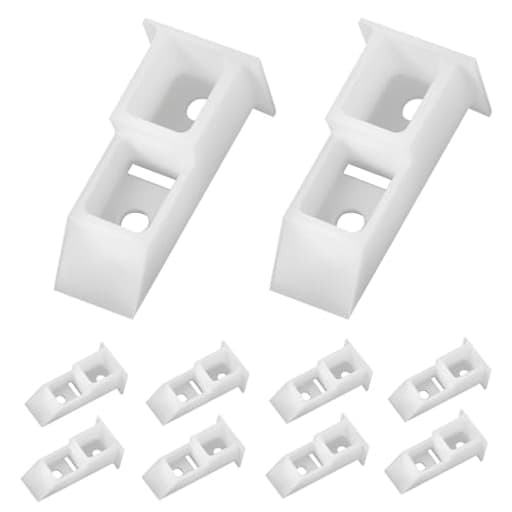
A top sash guide for single- and double-hung window balance assemblies that aligns and top section of the sash in the track to support smooth operation and prevent tilting. Each nylon guide measures 1-13/16" L x 13/16" W x 11/16" H, is black, and is sold in a pack of 10; it is sized to fit standard residential window balance tracks.
Batator Window Sash Balance Top Guide 60-617-XCP10, Window Track Guide Balancer Parts, Window Channel Balance Lock, Single or Double Hung Window Sash Cam, Top Mount(Pack of 10) Review
A sticky, sinking single-hung window finally pushed me to pull the sash, inspect the hardware, and replace the worn top guides. I used the Batator top sash guide, a pack of 10 molded nylon guides sized for standard residential balance tracks. After a few installs across different windows, here’s how they performed and what to watch for.
What this part does—and doesn’t do
Top sash guides aren’t glamorous. They sit at the top corners of the sash and do two jobs: keep the sash aligned in the channel and act as the interface for the channel balance so the sash tracks straight and stays put. If yours are cracked, chewed up, or missing, the window can bind, tilt forward, or drop unexpectedly. Replacing them is a small fix with outsized impact—provided you pick the right size and style.
This set is meant for single- and double-hung windows that use standard block-and-tackle (channel) balances. If your windows use spiral or coil balances, these aren’t the right parts.
Build quality and materials
The guides I received are molded from dense, black nylon. The material feels closer to a glass-filled or high-density nylon than the soft, chalky plastic you sometimes find in cheap replacement hardware. The molding is clean with minimal flashing, and the edges are crisp. There’s enough rigidity to prevent flex under load but a little give so the part won’t shatter if the sash takes a bump. For a small plastic component, they feel reassuringly substantial.
Each piece measured to spec: roughly 1-13/16 inch long, 13/16 inch wide, and 11/16 inch tall. Dimensions matter here because a few sixteenths is the difference between a guide that glides and one that grinds. Tolerances on my batch were consistent.
The pack-of-10 format is practical. You need two per window (one per top corner of the sash), so a single pack covers up to five windows and leaves a couple spares for the parts bin.
Fit and compatibility
Top sash guides are not universal. Before ordering, I removed an original guide and compared dimensions. This set is sized for common residential channels, but there are variations in profile from brand to brand and even across model years. If you can, bring the old part to the bench and verify:
- Overall length, width, and height
- How it nestles into the sash (screw holes vs. snap-in pocket)
- Interaction surface with your channel balance (shape and depth)
On two vinyl windows, these dropped in without fuss. On an older aluminum unit, I needed light fitting: a couple of passes with a file to ease a leading edge and knock down a molding line. After trimming, the guides seated square and aligned with the channel. That minor sanding is not unusual; older sashes can be slightly out-of-square or have paint and burrs inside the pocket.
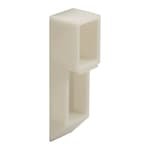
One note on aesthetics: mine arrived in black. If you’re expecting white hardware to match a bright sash, you’ll see the guides only if the sash is fully raised and you’re looking into the top corners. Functionally, the color doesn’t matter; visually, the black disappears in most channels anyway.
Installation experience
Installation is straightforward if you’re comfortable removing a sash. Here’s how my workflow went on a typical single-hung vinyl window:
1) Remove the sash. Unlock, raise slightly, depress the tilt latches, and tilt the sash in. Lift one side to free it from the balance shoes.
2) Remove the old guides. Typically one or two screws hold each guide in a routed pocket at the top corners. If the screws are corroded, a drop of penetrating oil helps.
3) Prep the pocket. Vacuum out dirt and paint chips. Scrape any raised burrs. A smooth pocket makes a big difference.
4) Test-fit the new guide. Slide it in without screws to check flushness and alignment. If it rubs, lightly file the high spots on the guide or the sash pocket—tiny, controlled adjustments are key.
5) Fasten securely. Reinstall the screws. Don’t over-torque; nylon will compress. The guide should sit square and flush with the sash edge.
6) Reinstall the sash and re-engage the balance shoes. Ensure both sides are even before closing.
Tools I used: a #2 Phillips, a small flat pry, a file, a vacuum, and silicone-safe dry lubricant. Each window took 10–20 minutes, depending on the state of the original hardware.
Performance and feel
With the new guides installed, operation improved immediately. The sash tracked straight without rubbing the jambs, and the balances engaged smoothly. On a vinyl unit that used to drift down, the sash now held position at mid-height without creeping. I also noticed fewer rattles; the guides reduce side-to-side play that can buzz in a breeze.
On one older aluminum frame, I initially got a clack and squeak as the sash moved. That turned out to be a combo of debris in the channel and a sharp edge on the guide’s leading corner. Cleaning the channels thoroughly, easing that corner with a couple passes of a file, and adding a light dry silicone lube solved it. If you do hear noise after installation:
- Clean the channels end-to-end; grit amplifies every movement.
- Break the edges of the guide’s leading contact surfaces with fine sandpaper.
- Use a dry silicone or PTFE spray; avoid petroleum oils that collect dust.
- Confirm the balance shoes are aligned and not twisted in the track.
After a few weeks of daily use, the bearing surfaces on the guides show only polished contact, no gouging or deformation. That’s what I want to see from nylon in this application.
What I like
- Solid, consistent molding with rigid, durable nylon
- Dimensions that match common residential channel systems
- Pack of 10 offers value and coverage for multiple windows
- Simple install with basic tools; no frame modifications required
- Restores straight tracking and reliable sash positioning
Where it can improve
- Not a drop-in universal: some sashes will require minor fitting
- No markings or documentation to help identify compatible balance series
- Black only in my set; a white option could better match bright sashes
- Edges could be slightly chamfered from the factory to reduce initial noise on tight channels
Tips for success
- Measure twice. Confirm length, width, and height against your originals before committing to a full install.
- Replace guides in pairs per sash. Mixing old and new can mask problems and create uneven tracking.
- Inspect the balance shoes while you’re in there. If the shoes are cracked or the springs are weak, replace those at the same time.
- Deburr and clean. A few minutes with a file and vacuum often makes the difference between smooth and scratchy.
Longevity and value
Nylon is the right choice for this part: it’s self-lubricating enough for sliding contact, resilient under repetitive loads, and forgiving in colder temperatures. Given the contact points and the observed wear pattern, I expect these to last years in typical residential use. The pack-of-10 pricing makes sense whether you’re tackling a single problem window and keeping spares, or refreshing several sashes during a weekend maintenance push.
The bottom line
The Batator top sash guide did what I needed: restore smooth, aligned operation to a set of aging single-hung windows without replacing the balances or the sash. It’s a small plastic part that quietly influences how the entire window feels. While you may need light fitting on older or out-of-spec sashes, the material quality and consistent molding make that process predictable.
Recommendation: I recommend this set to homeowners and pros who are servicing standard block-and-tackle hung windows and have verified the dimensions against their originals. It’s a cost-effective, durable fix that improves operation immediately. Just take the time to measure, clean the channels, and be prepared for minor trimming on finicky frames.
Project Ideas
Business
Window Repair Starter Kit (Retail)
Bundle these sash guides with common balance springs, installation screws, adhesive pads, and step-by-step instructions into a “Window Tune-Up Kit” for homeowners and landlords. Sell kits on marketplaces (Amazon, Etsy) and include short how-to videos showing replacement—position as an easy DIY fix to restore smooth sash action and avoid costly repairs.
Mobile Window Maintenance Service for Landlords
Launch a local service that performs quick on-site sash repairs and preventive maintenance for rental properties. Stock packs of these guides in your van to perform same-day fixes. Offer subscription contracts for property managers (quarterly checks, discounted parts) to create steady recurring revenue.
Wholesale & Custom Color Runs for Remodelers
Sell bulk packs to window installers, historic-restoration contractors, and cabinetmakers. Offer value-adds like custom-colored nylon, private-label packaging, or pre-kitted quantities for large renovation projects. Target building supply distributors and independent handymen with volume pricing and fast fulfillment.
DIY Miniatures Hardware Kits (Craft Market)
Create and sell small craft kits for dollhouse builders and model-makers that include these guides plus tiny tracks, glue, and instructions. Market to hobby shops, Etsy, and model-making forums. Add digital guides and video tutorials to increase perceived value and justify higher margins.
Workshops & Content: 'Fix Your Windows' Classes
Host in-person or online workshops teaching basic window sash repair and maintenance using the guides. Charge per attendee and sell the parts kits as a workshop add-on. Use video clips and social media how-tos to attract homeowners, DIYers, and local contractors—turning free content into leads for kit and service sales.
Creative
Dollhouse / Miniature Window Hardware
Use these scale-accurate nylon sash guides to make realistic working windows for dollhouses, architectural models or museum miniatures. Their small size and low-friction nylon surface let you assemble functional single- or double-hung miniature sashes that slide smoothly in model tracks. Glue or epoxy them into custom-made miniature frames and pair with tiny cords or springs to simulate real balance action.
Mini Sliding Drawer Mechanism
Turn the guides into low-friction slide supports for small handcrafted drawers (jewelry boxes, spice drawers, craft organizers). Mount a pair inside each side of the drawer cavity as discreet runners or anti-tilt guides; the nylon reduces wear on wood and enables a smooth gliding action without complex hardware.
Picture/Frame Stabilizer & Bumper
Use the guides as protective bumpers and tilt-prevention blocks on picture frames, mirrors or wall-mounted shelving. Glue them to the frame corners to keep glass away from the wall, damp vibration, and stop frames from shifting—especially useful for heavy frames or pictures hung in high-traffic areas.
Small-Scale Sliding Mechanisms for Kinetic Art
Incorporate the pieces as low-wear sliders or alignment blocks in desktop kinetic sculptures, moving mobiles, or mechanical art projects. The durable nylon makes them suitable where repeated linear movement is needed without metal-on-metal noise; they work well as hidden guides for subtle motion effects.
Upcycled Hardware Jewelry & Keychains
Transform the guides into minimalist tech/hardware jewelry or keychains: drill a small hole, polish edges, paint or enamel, then attach jump rings and cords. Their industrial look appeals to makers who sell urban/steampunk accessories—pack the 10-piece sets as craft supplies or finished items.