Features
- Sash cams are used in hung windows that use channel balances
- They mount to the top side edges of the moving vent, 2 per window
- They actually engage and push the channel balance top guide, moving the balance with the window
- They can become brittle with age and UV exposure and break, rendering the window channel balance disabled
- They are easy to replace
Specifications
| Color | White |
| Size | 2-3/16 in. |
| Unit Count | 2 |
Related Tools
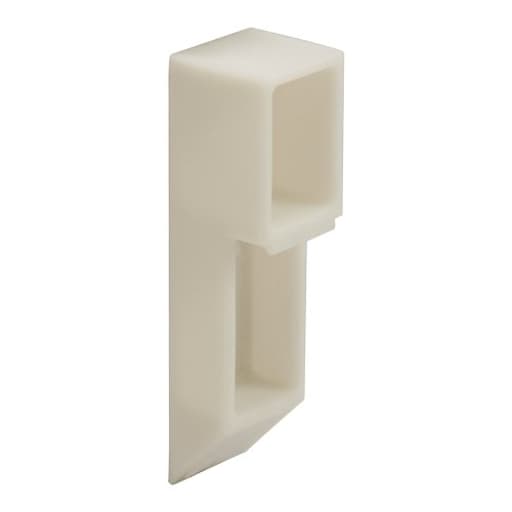
Sash cams are small plastic fittings that mount to the top side edges of a window sash in hung windows that use channel balances; two are used per sash. They engage the channel-balance top guide to transfer sash movement to the balance and can become brittle with age or UV exposure, but are easy to replace.
PRIME-LINE H 3837 2-3/16 In. White Plastic Window Channel Balance Sash Cams Review
Why I reached for these sash cams
A stubborn double-hung window in my spare room wouldn’t stay up more than a few inches before slamming shut. The balances were fine; the real culprit was a cracked sash cam—one of the small plastic blocks that bridge the window sash to the channel balance. I picked up the H 3837 sash cams to see if a quick swap could bring the sash back to life. It did, and the process confirmed a few things that are worth knowing before you buy.
What these cams do
Sash cams sit at the top edges of a sash and interface with the channel balance’s top guide. As the sash moves, the cam pushes the balance into motion, keeping the sash supported and aligned. When a cam breaks or goes missing, the sash no longer engages the balance correctly—hence the sudden “guillotine” behavior.
This pair is sized at 2-3/16 inches and molded in white plastic. Two cams are used per sash (one left, one right), so a single pack is enough to service one sash.
Design and build quality
These cams are simple, tidy castings with clean edges and consistent dimensions. The plastic is firm, with just enough give to absorb some load without feeling gummy. They don’t look or feel brittle out of the box—something I appreciate, because brittle cams are often the reason you’re replacing them in the first place.
The mounting slot on the H 3837 sits horizontally near the top edge of the cam. This will be important later, because the orientation and height of that slot determines whether your existing screw lines up without fuss.
Fit and compatibility
The headline measurement—2-3/16 inches—matched my originals closely, and the overall profile slotted into the sash corner channel without obstruction. The engagement face that bears on the balance’s top guide was also a close match, which is the more critical fit feature for smooth operation.
Where I ran into a mismatch was the screw slot. My original cams used a vertical slotted hole lower down the body. The H 3837 uses a horizontal slot at the very top. That meant my screw was indexed a bit lower than the new cam allowed. The fix was simple: I extended the slot slightly with a small round file so the screw could sit exactly where the sash wanted it. It took a minute per cam and didn’t compromise strength. If you aren’t comfortable modifying parts, check your original cam first and make sure the slot orientation and location match.
A few quick checks before ordering:
- Measure the overall length of your old cam and compare to 2-3/16 inches.
- Note the slot orientation (horizontal vs. vertical) and height relative to the top.
- Compare the engagement face profile to ensure it’s close to your balance’s top guide.
- Confirm you have channel balances, not spiral or block-and-tackle setups with different hardware.
Installation experience
With the sash tilted in and removed, access was straightforward. I supported the balances to avoid snapping them back up, then removed the single screw holding each cam. The new cams slid into place easily. On the side with the slot misalignment, a little careful filing made the screw land perfectly. I reused the original screws; they seated cleanly without stripping the plastic.
Total time, including a careful cleanout of the sash corners and a dab of dry silicone on the channels, was under 20 minutes. If your old cams are fully intact, use one as a guide to mark screw placement before you remove it—that helps if your screw hole lands near the edge of the new slot.
In use
Once installed, the sash finally behaved like it should. Movement felt smooth, with no chatter at the start of travel and no hitching near the top. The balance engaged immediately and held the sash steady at any height I set. More importantly, closing the window didn’t feel sloppy; the cams kept the sash aligned with the jambs, which can reduce wear on weatherstripping.
Noise was minimal—just the expected soft glide of the balances. No rubbing, no clicks. That’s what I want from cams: invisibility in operation.
Durability considerations
These cams are plastic, and plastics near windows live in a tough environment—UV, temperature swings, and mechanical load. The material here feels adequate for the job and comparable to OEM parts I’ve handled. Still, I treat these as consumables with a long service life rather than lifetime components. If your windows bake in direct sun, expect eventual embrittlement. A smart move is to install them in pairs on a sash so load and wear are balanced, and to keep a spare set in a drawer. At this price point, that’s an easy insurance policy.
If you’re replacing in winter, do the install indoors and let the cams warm to room temperature first—cold plastic is more prone to cracking under screw pressure.
Value
They’re inexpensive, and the improvement in function is immediate. The only caveat is that small replacement parts can be disproportionately affected by shipping cost. If you’re placing an order, consider grabbing a couple of sets so you’re not paying to ship air. The cams themselves deliver good value: accurate molding, a clean finish, and a fit that either drops right in or needs only minor adjustment.
Tips for success
- Match before you buy: length, slot orientation, and engagement face are the big three.
- Reuse your original screws if possible; they’re already sized for your sash.
- Do a test fit before tightening fully. You want the cam seated square with no twist.
- After installation, slowly raise and lower the sash a few times to confirm the balance engages smoothly and the sash stops at any height.
- Replace both cams on a sash together, even if only one is broken. It keeps the sash aligned and avoids uneven wear.
Pros
- Restores proper engagement between sash and channel balance
- Accurate molding and consistent dimensions
- Easy installation; basic tools only
- Affordable, with two cams per pack (enough for one sash)
- Clean, unobtrusive white finish
Cons
- Mounting slot orientation may not match some originals, requiring a minor modification
- Plastic will eventually age under UV exposure
- Shipping can overshadow the part cost if you need just one pack
Who it’s for
If you have a double-hung window with channel balances that won’t stay up, or a sash that feels loose at the top corners, these cams are a likely fix. They’re suited to most builder-grade and midrange vinyl or aluminum windows that use this cam form factor. If your window uses a different balance system or a different slot orientation you can’t accommodate, look for a direct-match cam instead.
Recommendation
I recommend the H 3837 sash cams. They’re well made, sized accurately, and—in my case—restored a misbehaving sash to smooth, predictable operation with minimal effort. The only wrinkle was the screw slot orientation, which took a couple of minutes to adjust and didn’t affect performance. Given the low cost, straightforward install, and the immediate improvement in window function, these are a practical, no-drama replacement for worn or broken cams—just be sure to verify the slot style and overall length against your originals before you click buy.
Project Ideas
Business
DIY sash-cam replacement kits
Assemble and sell ready-to-use kits containing two replacement sash cams (white, 2-3/16"), matching screws, adhesive pads, and a clear step-by-step instruction sheet + short video link. Market on Amazon, Etsy and local hardware stores to homeowners and landlords looking for a quick, inexpensive fix.
Mobile window cam replacement service
Offer an on-site, same-day service for multi-unit buildings and older homes: inspect channel balances, replace broken sash cams, and provide a simple maintenance check. Charge per-window with discounts for bulk jobs; partner with property managers and real-estate agents for recurring contracts.
Bulk supply & private-label parts for restorers
Source sash cams in bulk and offer private-label packaging to window restoration shops, glaziers and historic-home contractors. Include matching color options, specialized sizing, and quick-ship inventory for urgent repair jobs—position yourself as the go-to parts supplier for local trades.
Workshops & digital guides (repair + upcycle)
Run paid workshops or online classes teaching both practical sash-cam replacement and creative upcycling projects (e.g., mosaics, desk clips). Monetize through ticket sales, downloadable project plans, and a small e-commerce store selling upcycle kits made from surplus cams.
Creative
Dollhouse hardware & mini latches
Use the 2-3/16" sash cams as tiny functional latches, knobs or hinge anchors for dollhouses and scale models. Trim or file them to size, paint or patina them, and fasten with a small screw or epoxy to create realistic, durable hardware for cabinet doors, windows and tiny shutters.
Textured mosaic panels
Create modern, tactile wall art by mounting multiple white sash cams in repeating patterns on a wooden panel. Paint them in contrasting colors or metallics, grout between pieces for depth, and combine with LED backlighting to emphasize the cam shapes as a repeating industrial motif.
Edge-mounted cable clips
Exploit the cam's profile and mounting hole to make low-profile cable guides for desks, workbenches and media cabinets. Screw a cam to the edge of furniture and route charging cables or headphone wires through the groove; use two cams as a small clamp for lightweight tubing or hose.
Micro-trellis connectors & plant tags
Use sash cams as connectors to build mini trellises for potted plants: mount cams to short stakes and join with thin dowels or wire threaded through their grooves. Paint or label each cam to hold plant tags or to act as adjustable stem supports for vines or seedlings.