
Features
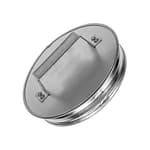
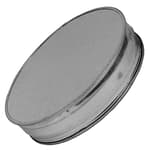
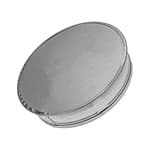
- End cap is manufactured with the purpose of covering end of tubings, vents or ducts and stopping the air movement. It is made out of galvanized steel - corrosion resistant material that can be used both indoors and outdoors.
- Diameter: 12.40" Inches. Flange depth: 2.2" Inches. Material: Galvanized steel, C2 class corrosion resistance.
- Easy to install - End cap has groove on the side to ensure smooth insertion into the duct. Installation is not permanent and cap can be removed if required. We suggest that additional sealant is applied to ensure leakproof installation.
- Can be used with HVAC systems: seal off your ventilation system to prevent air leakage. Increase the efficiency of your ducting system and reduce your utility bills. Ducting systems that are not properly sealed can cause significant heat loss in your home or office.
- Vent Systems products are made to be used for home improvement, office improvement. They are portable and possess high quality and long durability characteristics.
Specifications
| Color | Gray |
| Size | 12" Inch |
Related Tools
Galvanized steel round duct end cap (12.4-inch diameter, 2.2-inch flange depth) designed to cover and seal open tubing, vents, or ducts to stop air movement. It has a side groove for easy, removable insertion, C2-class corrosion resistance for indoor/outdoor use, and can be sealed with additional sealant for a leakproof fit.
Vent Systems 12" Galvanized Steel Duct End Cap - Dryer Vent Cap - Round Metal Plug - Metal Duct Fitting - Reusable Tee Cap Review
Why I reached for this duct cap
Capping an unused duct run shouldn’t take a whole afternoon or a bag of specialty hardware. I picked up the Vent Systems 12-inch duct cap to shutter an abandoned branch on a basement trunk line and later used a second one to temporarily seal a dryer stub during a remodel. In both cases, I wanted something that seated cleanly, held snugly without fuss, and could be made airtight without having to wrestle with oddball fittings. This cap did the job with minimal drama.
Build and materials
The cap is galvanized steel with a shallow, 2.2-inch flange that acts like a tapered plug. It feels appropriately rigid for its size—not flimsy, not overly heavy—and the bead/groove around the side adds a bit of stiffness and helps guide insertion. Galvanizing is to a C2 corrosion-resistance class, which in practice means it’s fine for indoor HVAC and sheltered outdoor spots in mild environments. It’s not a marine-grade part and it’s not a chimney cap; it’s made for air ducts.
Edges are typical for stamped sheet metal: not razor sharp, but you’ll still want gloves during install. Mine arrived true and round with no obvious warping or out-of-round issues.
Fit and sizing: the part most people trip over
Here’s the key: this is a plug-style cap designed to insert into a female duct end of nominal 12 inches. The listed diameter is about 12.4 inches, which corresponds to the real-world fit of 12-inch ductwork and fittings. If your duct terminates in a male (crimped) end, this cap won’t slip over it; it needs to go into a female end.
How I check fit:
- Identify the duct end. If it’s crimped, that’s male. If the opening is smooth and meant to receive, that’s female.
- Measure the inside diameter of the female end (for 12-inch nominal, you should be right around that size).
- If you only have a male end, add a short female coupling, or expand the duct with a hand seamer. You can also cut back to the nearest female fitting if accessible.
On a straight, female 12-inch takeoff, the cap seated snugly without modification. On a different run that ended male, I slipped a short female coupling over the duct and the cap then inserted as expected. Trying to force the cap over a male end is where frustration starts; it’s not designed for that.
Installation in practice
The actual install took minutes:
1. Clean the duct lip. Dust or paint overspray can make insertion sloppy or gritty.
2. Test-fit the cap. The side groove helps align and start the flange. A gentle twist rocks it past any tight spots.
3. Seal. For a removable but airtight seal, I used water-based duct mastic around the seam and smoothed it with a gloved finger. Foil tape also works; just clean the surface first. For a permanent cap, a trio of 1/2-inch sheet-metal screws around the circumference is overkill but absolutely secure.
4. Verify. With the system running, I checked for whistling or measurable air loss. With mastic, it was silent and tight.
On the dryer stub, I used foil tape alone because I knew I’d remove the cap in a few weeks. No screws were needed; the friction fit held fine.
Note: there’s no rubber gasket included. If you want a compressible seal, bring your own high-temp foam gasket or rely on mastic/tape.
Performance and sealing
Once seated, the cap behaves like a factory plug. In a simple pressure test on the HVAC branch (static pressure under 0.5 in. w.c.), there was no detectable leakage with mastic. Even dry-fit without sealant, the friction fit was decent, but you’ll want either mastic or tape for long-term air sealing and efficiency.
The 2.2-inch flange depth offers enough engagement to feel secure without protruding far into the airflow when used on active systems (for example, if you’re temporarily balancing a run during commissioning). For long-term abandonment of a branch, I prefer to seal at the takeoff, and this cap makes that straightforward.
Durability and corrosion
C2-class galvanizing is appropriate for most basements, attics, and conditioned spaces. I also tested one on an exterior wall stub under an overhang for a couple of rainy weeks; no discoloration or surface oxidation showed up. If you’re near the coast or in an industrial environment with corrosive atmospheres, I’d step up to a heavier coating or stainless where feasible. For typical residential HVAC, this finish is fine.
The cap handled light handling knocks without bending out of round. If you do distort it, a hand seamer or gentle rebend gets it back into shape easily.
Where it shines—and where it doesn’t
Best uses I’ve found:
- Capping an abandoned or seasonal branch to stop energy losses.
- Temporarily sealing stubs during remodeling to keep dust and odors out of the system.
- Blocking rodent or insect access through unused interior duct ports (paired with proper exterior terminations).
What it’s not for:
- Active combustion appliances or chimneys. Don’t use this in place of a listed flue termination or on hot flue piping.
- Going over male duct ends. If your line ends in a crimp, plan on a female coupler or rework the end.
A quick safety note: never cap an active exhaust like a dryer or fuel-fired appliance. Only seal unused lines or do temporary closures with the appliance disconnected.
Tips for a clean install
- Dry-fit before sealing. If it feels too tight, check that the duct isn’t out-of-round. A few squeezes with a hand seamer can true it.
- Use mastic for invisible, long-term sealing. Foil tape is fine for temporary work or when you plan to remove the cap later.
- If you need the cap removable, run a thin bead of mastic and skip screws. If you want it permanent, three short screws plus mastic is airtight and rock solid.
- Label the cap with a marker so future you (or the next owner) knows what was capped and why.
Build quality odds and ends
- The side groove does help guide insertion; it’s not a locking feature, but it prevents the edge from catching.
- No fasteners or gasket are included. That’s normal for this category, but plan ahead.
- Roundness was excellent on the unit I used; cheaper caps can arrive ovalized. This one didn’t.
Value and alternatives
There are two basic styles for this job: inside plug caps like this one, and outside slip-on caps that go over the duct. Inside plugs are cleaner and typically seal better with mastic, but they demand a female duct end. If all you have is a male crimp and you don’t want to add a coupling, an outside cap may be simpler. For coastal installs or exposed rooftops, I’d consider a heavier-gauge or stainless option.
Pros
- Snug, reliable friction fit on female 12-inch duct
- Galvanized steel with sensible stiffness and a clean stamp
- Quick install; removable if you use tape or a small bead of mastic
- Easy to seal fully airtight
- Suitable for indoor and mild outdoor conditions
Cons
- No gasket included
- Won’t slip over male (crimped) duct ends; may require a coupling
- C2 corrosion class isn’t ideal for harsh or coastal environments
Recommendation
I recommend the Vent Systems 12-inch duct cap for anyone needing a straightforward, durable plug for unused HVAC runs or temporary closures during remodels. It seats cleanly in a proper female duct end, seals up airtight with mastic or foil tape, and stays put without resorting to an array of screws. Just be mindful of the fitment: if your duct ends male, plan on adding a short female coupling or reworking the end. For typical residential use, the build quality, ease of install, and dependable seal make this a solid, no-nonsense choice. If you’re working in a coastal environment or on hot flues, look to more specialized materials—but for standard HVAC air handling, this cap does exactly what it should with minimal hassle.
Project Ideas
Business
Upcycled Home-Decor Product Line
Create a small product line (clocks, pendant lights, planters, trays) using the duct caps as the base. Market them as industrial/upcycled home decor on Etsy, local craft fairs, and Instagram. Offer finishes (raw galvanized, painted, distressed), quick customization (initials, logos), and bundles to increase average order value.
DIY Kits & Workshops
Package the cap with hardware and instructions as DIY kits (lamp kit, clock kit, planter kit) and sell online or through local craft stores. Host hands-on workshops at makerspaces or community centers teaching participants to assemble and finish projects — charge per seat and sell take-home kits as an upsell.
HVAC Retrofit & Sealing Service
Offer targeted HVAC sealing services to homeowners and small businesses using these caps to temporarily or permanently seal unused ducts and vents. Position it as an energy-efficiency upgrade (reduce drafts, lower bills) and sell caps in bulk to contractors for quick installs; include optional sealing compound and inspection services.
Event & Prop Rentals
Build a fleet of themed decor items (metal trays, pendant lights, birdbath displays) using caps and rent them to event planners for weddings, pop-ups, and photo shoots. The durable galvanized finish is easy to clean and reuse; create distinctive packages for industrial, rustic, or urban-chic events.
Branded Promotional Merchandise
Offer small-batch custom-branded items for local businesses—logoed tray centers, engraved clock faces, or painted signage using the cap as a base. Sell to cafes, breweries, and retail shops as unique merchandise or in-store decor that doubles as a marketing piece.
Creative
Industrial Wall Clock
Turn the cap into a 12" industrial-style wall clock. Drill a center hole for a standard clock movement, paint or stencil numbers and hour marks on the face, and use the flanged edge as a built-in rim. The galvanized finish gives an authentic metal look; you can distress or patina it for a vintage appearance. The groove and flange let you mount it flush against a wall or on a shallow backing board.
Pendant Light Shade
Make a hanging pendant lamp: cut or drill a hole in the center sized for the lamp socket, secure a porcelain or metal socket to the cap, paint the interior white or reflective silver to boost light output, and suspend with braided cord or a chain attached to the flange. The corrosion-resistant galvanized steel is suitable for covered outdoor porches as well as indoor use.
Succulent Planter / Hanging Garden
Convert the cap into a shallow planter for succulents or herbs. Punch several drainage holes in the bottom, line with landscaping fabric, add soil and plants. Use the side groove or flange to fasten hanging hardware or brackets for a wall-mounted planter. The galvanized material makes an attractive, durable outdoor planter for patios.
Birdbath or Feeder Basin
Mount the cap on a pedestal or post to create a small birdbath or feeder. Seal the inner seams for a water-holding basin (or leave porous for a feeder), and anchor to a stout post using a galvanized bracket or welded tab on the flange. The cap’s corrosion resistance means it stands up to weather.
Serving Tray / Decorative Mirror Frame
Flip the cap face-up, fill the center with wood, resin, tile mosaic, or a round mirror, and attach handles through the flange to make a rustic serving tray or framed wall mirror. The raised rim keeps items in place and gives a bold industrial edge for farmhouse or modern decor.