Features
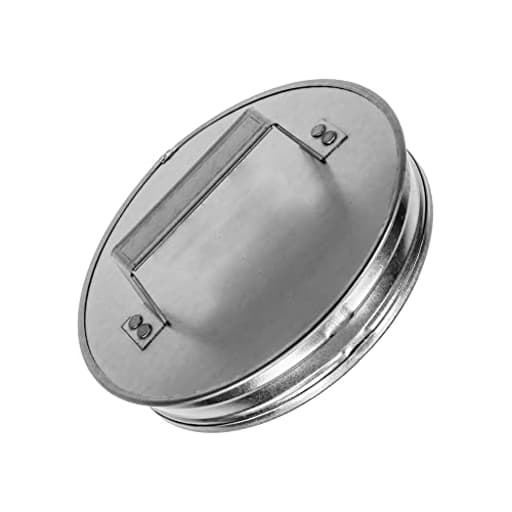
- 8" inch duct end cap with handle. 1.33" inch depth.
- The cap is used at the end of tubing as a cover to fit over pipe fittings
- Easy to install - push-fit end plug/cap in the duct. Fix with clamp, aluminium-tape or rivets.
- Durable Material: Made of High Quality galvanized steel and is rust free. Fits perfectly with other Vent Systems HVAC products.
- Vent Systems products are made to be used for home improvement, office improvement. They are portable, high quality and long durability.
Specifications
| Color | Silver |
| Size | 8 Inch |
Related Tools
An 8-inch galvanized steel tee cap with a 1.33-inch depth that serves as a push-fit end plug to close off round ducts, dryer vents, exhaust pipes and other HVAC tubing. It features a handle for removal and can be secured with a clamp, aluminum tape, or rivets; the galvanized finish offers corrosion resistance for indoor or outdoor use.
Vent Systems 8" Inch Galvanized Steel Tee Cap with Handle – Heavy-Duty HVAC End Plug for Dryer Ducts, Exhaust Pipes, and Round Metal Vents – Indoor and Outdoor Use – Closure Fitting for HVAC Systems Review
Why I reached for this tee cap
I had an 8-inch branch off a supply trunk that was no longer in service after a zoning rework. Leaving it open was an invitation for energy loss, dust, and the occasional insect parade. I wanted a closure that was solid, removable, and weather-tolerant in case I ever repurposed that branch. Vent Systems’ 8-inch tee cap checked those boxes on paper: galvanized steel, push-fit design, a simple handle, and a form factor suited to round duct ends, tees, and wyes.
After using it across a couple of scenarios—capping a dormant tee in the basement and temporarily sealing an 8-inch exhaust line during a fan replacement—I came away impressed with the practicality and small but thoughtful details.
Build and design
The tee cap is a straightforward piece of galvanized steel sized for 8-inch round duct, with a depth of about 1.33 inches. That shallow depth matters; it’s enough to grab and seal but not so long that it interferes with nearby fittings. The standout feature is the handle fixed to the face. It’s not a fancy mechanism, just a robust tab you can actually get your fingers on, which makes a huge difference when you’re reaching into a joist cavity or behind equipment.
The galvanization is even and clean, and the edges on my unit were formed well—not razor-sharp like some punched sheet metal. It’s still sheet metal, so gloves are sensible, but I didn’t need to do any deburring. The cap has just enough spring to accommodate minor out-of-round ducts, and the face sits flush enough that finishing tape lies flat.
Installation experience
Installation is as low-drama as these things get. On the basement tee, the cap pushed into a crimped 8-inch branch with a snug, interference fit. I seated it by hand, then finished the job with a worm-drive clamp and foil HVAC tape around the perimeter. On the exhaust line, I used aluminum tape only because I knew I’d be pulling it again within a week.
A few notes from the field:
- Measure the inside diameter you’re capping. “8-inch” is nominal; real-world ID can drift. The cap’s springiness helps, but if your duct is badly ovalized, round it out first with pliers.
- The 1.33-inch depth is enough to hold, but you’ll want mechanical retention (clamp or rivets) for ducts that see higher static pressure or vibration. Tape aids sealing; it’s not the primary retainer.
- The handle is more than a convenience; it’s a safety. I could retract the cap without prying tools near the duct edge, which avoided damage to the duct lip.
On an outdoor-facing termination I tested, I ran a small bead of exterior-grade sealant under the tape for weatherproofing. The galvanized finish is corrosion-resistant, but joints are still joints; sealing the seam keeps water out and extends life.
Sealing, performance, and practicality
Out of the box, this is a cap, not a valve. Expect a good fit that becomes properly tight once you add tape, a clamp, or rivets. With tape and a clamp on the basement tee, I was able to get a smoke pencil to show zero visible leakage at the seam. That’s plenty for an unused branch and a big step up from makeshift closures like stuffed insulation or a tape-only “lid” over the opening.
As a physical barrier, it’s solid. The cap is rigid enough that it doesn’t drum or oil-can easily, and it completely blocks a round opening, preventing airflow, dust exchange, and pest intrusion. The handle makes seasonal changes practical: if you’re capping a line temporarily (say, during renovation or equipment swap), you won’t dread removal.
Where it shines
- Closing off dormant branches on round metal ducts (tees and wyes) without having to cut and redesign the trunk.
- Temporarily sealing exhaust or intake lines during maintenance or pressure testing.
- Tidying up unused penetrations where you want a removable closure with proper rigidity and a clean finish.
Because the cap is meant to be pushed into the duct, it works best on female ends or crimped male ends where there’s a clean interior lip. It plays nicely with conventional clamps and takes rivets if you want permanence.
Limitations and cautions
No tool does everything. Here’s what to keep in mind:
- Not a backdraft damper. It’s a plug. If your application requires airflow control or code-mandated dampers, this isn’t a substitute.
- Not insulated. For ducts passing through conditioned/exterior boundaries, consider adding insulation behind the cap or around the duct to avoid condensation and thermal bridging.
- Depth is deliberately short. That’s great for clearance, but on rough or damaged duct ends you’ll rely more on your clamp/tape technique for airtightness.
- Handle clearance. The handle protrudes a bit. In tight chases, check that it won’t foul against framing or finishes.
- Not for combustion vents or flue gases. Galvanized steel and push-fit closures don’t belong in those systems. This is for HVAC air and similar low-temperature exhaust applications.
- Fit is for round metal duct. It can work with some rigid adapters on slightly irregular openings, but if your “8-inch” is flex duct or crushed oval, expect extra coaxing or add a short rigid collar first.
Durability
Galvanized steel is the right choice here. It resists rust in typical indoor environments and fares well outdoors when the seam is taped or sealed properly. After some exposure, mine shows no discoloration or flaking. The handle is fixed firmly; I yanked on it repeatedly without loosening. If you anticipate constant removal, consider swapping tape for a clamp-only approach or using a couple of rivets and leaving a tab of tape as a pull—repeated tape cycles leave residue.
Compared to alternatives
I’ve tried three common approaches to capping: foil-tape-only over the opening, plastic plugs, and shop-made sheet-metal discs with screws. Tape-only is fast but fragile and leaks under pressure. Plastic plugs are easy but often lack a good grip and can loosen with temperature swings. DIY discs work fine but take time and leave sharp corners unless you’re meticulous.
This tee cap hits a useful middle ground. It’s purpose-made, has the right stiffness, installs quickly, and the handle sounds trivial until you have to reach it with one hand across a ceiling bay. It’s not the cheapest path, but the minutes it saves and the serviceability it adds are worth it on any job where you might revisit the closure.
Tips for best results
- Measure the duct ID and check roundness before ordering. If your end is beat up, add a short rigid collar to restore a true circle.
- For semi-permanent installs, use a worm-drive clamp plus foil HVAC tape. For permanent, add three short rivets equally spaced and then tape.
- For outdoor terminations, seal the seam with exterior-grade sealant before taping to keep water out.
- If the closure crosses a thermal boundary, add insulation behind the cap or around the adjacent duct to prevent condensation.
- Label the cap with a marker (e.g., “East bath future branch”) so future you knows what it is.
Verdict
The Vent Systems 8-inch tee cap is a simple, well-executed solution for closing off round metal ducts. It fits securely, the galvanized build is durable, and the integrated handle turns an annoying task into a manageable one. It’s not a fancy part, but the details—clean edges, appropriate depth, and removable-friendly design—make it one I’m happy to keep in the kit.
Recommendation: I recommend this tee cap if you need a reliable, removable closure for 8-inch round ducts or large exhaust lines. It seals well with basic HVAC supplies, resists corrosion, and the handle alone is worth the small premium when access is tight. If you require a code-listed damper, insulation, or a solution for irregular or non-round openings, look elsewhere. Otherwise, this is the right kind of simple: it just works and keeps working.
Project Ideas
Business
Upcycled Home-Decor Product Line
Design a small line of industrial home decor (planters, pendant lamps, bowls, clocks) made from the 8" caps. Keep production simple: clean, optionally powder-coat or paint, add hardware and packaging. Sell through Etsy, Shopify or local boutiques—low material cost means good margins on handcrafted, branded pieces.
DIY Kits & Digital Guides
Package the cap with a few consumables (pre-cut cord, socket, mounting hardware, instructions) as a turn-key DIY lamp or planter kit. Offer companion video tutorials or downloadable step-by-step guides. Market to crafters and gift buyers—kits increase perceived value and simplify scaling.
Event Rental & Staging Props
Create a collection of finished pieces (lanterns, planters, shallow risers) to rent to photographers, event planners and venues seeking an industrial aesthetic. Rentals generate recurring revenue and help build a portfolio of styled photos for marketing sales items.
Local Contractor / Renovation Supply
Partner with HVAC contractors, renovators and property managers to supply finished end caps as clean, pre-sealed vent terminations or aesthetic closures for unused ducts. Offer bulk pricing, pre-painted options and quick delivery—this targets a B2B channel with steady orders.
Workshops & Classes
Run paid workshops (in-person maker nights or online Zoom classes) teaching people how to make lamps, planters and concrete pieces from the caps. Charge a materials fee and offer take-home kits. Workshops build community, create repeat customers and let you upsell finished products and kits.
Creative
Succulent / Mini Planter
Turn the 8" cap into a shallow industrial planter for succulents or air plants. Drill 2–3 small drainage holes in the bottom, line with a bit of gravel or landscape fabric, add cactus mix and plants. Leave the handle as a hanging point or mount the cap rim to reclaimed wood for a wall garden with an industrial look.
Pendant / Hanging Lamp Shade
Use the cap as an industrial pendant shade: cut a central hole for a bulb socket (or use the handle opening), fit an Edison-style socket and cord, and hang. The galvanized interior gives a subtle reflective sheen; paint the exterior for a custom finish. Great for single fixtures or a cluster over a table.
Concrete Mold for Bowls & Bases
Use the cap as a reusable mold to cast shallow concrete bowls, lamp bases, or paperweights. Line with plastic or apply mold release, pour a cement mix and embed accents (river stones, metal flakes). Once cured, demold, sand the rim and seal for durable decor pieces.
Wall Hook / Catch-All Shelf
Mount the cap rim against a plank of wood to create a scooped catch-all for keys, wallets and mail or flip it and install a row of caps as decorative coat hooks. The handle can act as an accent hook; finish the wood with stain to contrast the galvanized metal for a rustic-industrial entryway organizer.
Industrial Clock or Art Piece
Convert the cap into an oversized wall clock by installing a clock mechanism through the center and adding numerals or stenciling around the rim. Alternatively, assemble several caps in a pattern and paint each differently for a striking, modular wall sculpture.