Features
- Mallet‑actuated pneumatic operation for faster staple driving vs. manual methods
- Extra‑wide composite base plate for stability (includes 1/2" (13 mm) and 3/4" (19 mm) base plates)
- Long‑reach handle for improved comfort and control (short handle optional)
- Includes a pre‑finished flooring adapter foot for use with prefinished boards
- Kit includes stapler, mallet, and interchangeable base plates
Specifications
| Color | Yellow, Black |
| Fastener Type / Gauge | 15.5 GA (1/2" crown) staples |
| Power Source | Pneumatic |
| Maximum Fastener Size | 2 in |
| Minimum Fastener Size | 1-1/2 in |
| Minimum Recommended Air Delivery (Scfm @ 90 Psi) | 4.2 |
| Minimum Recommended Operating Pressure (Psi) | 70 PSI |
| Air Inlet Size (In.) | 1/4 in |
| Loading Type | Strip |
| Nail/Staple Angle | Straight |
| Product Depth (In.) | 15.9 in |
| Product Height (In.) | 17.91 in |
| Product Width (In.) | 14.3 in |
| Product Weight (Lbs) | 11.2 |
| Product Weight (Oz) | 179.2 |
| Tool Weight (Per Retailer Listing) | 16.5 lb |
| Included | Stapler, mallet, interchangeable base plates, pre‑finished flooring adapter foot |
| Applications | Solid hardwood flooring, engineered hardwood flooring |
| Warranty | 7 Year Limited Warranty; 1 Year Free Service; 90 Days Satisfaction Guaranteed |
| Returnable | 90‑Day |
Related Tools
Related Articles

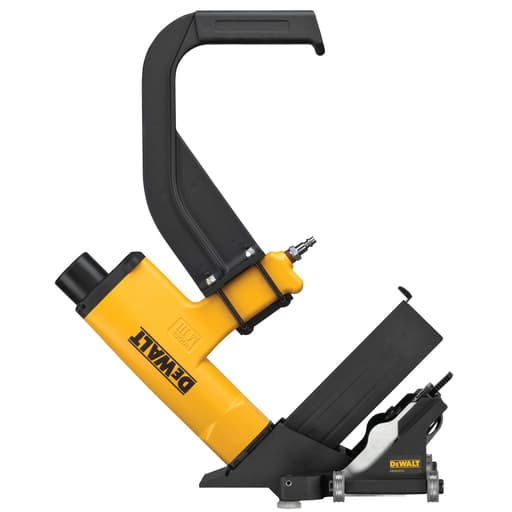
Pneumatic flooring stapler designed to install solid and engineered hardwood flooring. The tool is mallet‑actuated and drives 15.5‑gauge staples into the flooring material. It includes interchangeable base plates to accommodate different board thicknesses and a handle for user control.
DeWalt 15-1/2ga Flooring Stapler Review
Why I reached for this stapler
On a recent pair of hardwood installs—3/4-inch red oak in a living room and 1/2-inch engineered hickory in a hallway—I ran the DeWalt flooring stapler for several long days. I chose it because it’s mallet‑actuated, runs on shop air, and takes common 15.5‑gauge, 1/2-inch crown flooring staples from 1-1/2 to 2 inches long. In short, it’s built for the two flooring types I tackle most often.
What stood out immediately was how easy it is to position and how predictable it is once you dial in your pressure. It’s not flashy; it’s a straightforward, jobsite-ready tool that rewards careful setup.
Setup and first impressions
- Weight and balance: At a bit over 11 pounds, it feels substantial without being unwieldy. Most of that mass stays low, thanks to the wide composite base, so it plants on the board without rocking.
- Handle and stance: The long‑reach handle lets me work upright without hunching. It’s enough leverage to set staples consistently with a firm mallet strike. If you prefer a more compact stance, DeWalt offers an optional short handle.
- Base plates and adapter: It ships with interchangeable base plates for 1/2-inch and 3/4-inch flooring. Swapping them is quick and sets the shoe height to hit the tongue perfectly. There’s also a prefinished flooring adapter foot, which I used on the hickory; it protected the factory finish when indexing the tool against the board edge.
I connected it to a 1/4-inch NPT quick coupler and ran it on a 3/8-inch hose. Air needs are modest—DeWalt specs 4.2 SCFM at 90 PSI—so any mid‑size jobsite compressor handled it without cycling constantly.
In use: Consistent, tight boards
The mallet‑actuated design is familiar to anyone who’s laid nail‑down hardwood. You slide the stapler against the board tongue, check your alignment, and drive with a firm strike. With pressure set between 80–95 PSI (wood-dependent), the stapler seated 2-inch staples flush in 3/4-inch oak and 1-1/2-inch staples in the engineered hickory with zero partial sets or proud crowns.
What I noticed:
- Excellent stability: The extra‑wide composite base keeps the tool flat, which matters most near board ends where rocking can misdirect the fastener.
- Clean driving: Staples set just below the tongue surface without crushing it. The shoe height and PSI are the key variables; once set, results were repeatable across the room.
- No surface scuffing: With the adapter foot fitted, I didn’t pick up any witness marks on prefinished boards.
- Predictable rhythm: Mallet‑actuated staplers live or die by feel, and this one gives you a firm, positive feedback when the fastener seats. The included mallet has enough head weight to drive without extra effort.
Reloading is straightforward with the strip‑loading magazine. I had no jams during either install. That said, as with any pneumatic flooring stapler, a quick test on scrap any time you change wood species, substrate, or staple length is worth the minute it takes.
Dialing in air and staples
- Pressure range: Although the tool will operate down to 70 PSI, I found 85–95 PSI ideal for oak into plywood. Engineered flooring over plywood or OSB sometimes preferred 80–85 PSI to avoid overdriving. Always test on offcuts before starting a run.
- Staple length: For 3/4-inch solid flooring into 3/4-inch plywood, 2-inch staples gave excellent hold. For 1/2-inch engineered on a similar subfloor, 1-1/2-inch was appropriate. The 15.5‑ga, 1/2-inch crown format is common and easy to source.
- Hose and fittings: A 3/8-inch hose minimizes pressure drop on long runs. Keep a few drops of pneumatic oil in the inlet at the start of the day and after breaks to keep the driver cycling smoothly.
If you’re working with very hard exotics or unusually brittle stock, be mindful of tongue splitting. Back off pressure, confirm the correct base plate, and keep your mallet strike crisp rather than heavy.
Ergonomics over a long day
The long handle and stable base kept fatigue in check, especially on the larger room where I was stapling for hours. The stance encourages you to keep your back straight, and the mallet that ships with the kit has enough heft to do the work without repeated hard blows. It’s still a physical job, but this stapler doesn’t fight you.
Noise is typical for pneumatics: compressor cycling and exhaust pulses. Use ear and eye protection. The exhaust direction is not adjustable, but it wasn’t bothersome in practice.
Fit and finish
DeWalt’s build quality shows up in the small things: the machined contact surfaces, the durable composite base, and hardware that doesn’t loosen as you work. The anodizing and fastener channel stayed free of scuffs and burrs after two installs. The tool’s footprint is generous without being bulky, so navigating near walls and doorways wasn’t an issue.
I appreciate that the kit includes the mallet and the prefinished adapter foot. The essentials are in the box; I didn’t have to scramble for accessories before starting.
What could be better
No tool is perfect, and a few notes stood out:
- It’s staples only. If you prefer 16‑ga cleats for certain species or substrates, you’ll need a separate nailer. Staples hold very well, but cleats can be more forgiving in some hard exotics.
- Weight is noticeable if you’re frequently moving the tool across a room. It’s not excessive, but you’ll feel it by day’s end.
- There’s no carry case in the kit I used. A molded case would keep the base plates and adapter organized between jobs.
None of these are deal‑breakers, but they’re worth knowing as you plan your kit.
Maintenance and reliability
Daily oiling, a quick blow‑out of dust, and keeping the base plate clean were all it needed. I didn’t encounter jams or double‑feeds. The composite base resisted grit scratches that can mar finished boards. If you do hit a jam with any flooring stapler, stop and clear it immediately—forcing a cycle is a recipe for a bent driver.
DeWalt backs the tool with a 7‑year limited warranty, 1‑year free service, and a 90‑day satisfaction guarantee. That’s a solid safety net for a tool that will see intermittent but demanding use.
Who it’s for
- Flooring contractors who want a stable, predictable stapler for solid and engineered hardwood.
- Remodelers and serious DIYers taking on whole‑room or whole‑house installations.
- Anyone who values a mallet‑actuated rhythm and the tight board seams that come with it.
If you primarily install prefinished engineered flooring, the included adapter foot is a meaningful plus. If you split time between staples and cleats, plan on owning both tool types.
Practical tips from the installs
- Start with the correct base plate and verify on scrap that the staple crown sits just right relative to the tongue.
- Set pressure with the hardest section of your material in mind; don’t tune to a soft board and then crush tongues when you hit denser pieces.
- Keep a spare box of staples within reach to avoid stopping mid‑run; momentum matters in flooring.
- Protect the mallet face and the stapler shoe from grit—wipe them regularly to avoid micro‑scratches on prefinished stock.
Recommendation
I recommend the DeWalt flooring stapler for both pros and dedicated DIYers installing solid or engineered hardwood. It’s stable, drives consistently, and comes with the right accessories—interchangeable base plates and a prefinished adapter—to handle common flooring scenarios. Air demands are modest, setup is straightforward, and ergonomics are good for long days. While it won’t replace a cleat nailer for every species and it could use a carry case, the overall package is dependable and well thought out. If staples are your fastener of choice, this stapler earns a spot on the floor from the first row to the last.
Project Ideas
Business
Weekend Flooring Install Packages
Offer fixed‑price installations for rooms under a set square footage (e.g., bedrooms, hallways). The 15.5 GA flooring stapler with interchangeable base plates lets you cover common 1/2–3/4 in solid and engineered floors quickly with clean, hidden fasteners. Market as a rapid, dust‑controlled upgrade completed in 1–2 days.
DIY Rental Kit + Concierge Support
Rent a turnkey kit: stapler, mallet, compressor (≥4.2 SCFM @ 90 PSI), hoses, starter staples, and a quick‑start guide with troubleshooting. Upsell premium staples and underlayment. Add optional on‑site setup or a 30‑minute virtual consult to boost DIY success and reduce tool returns.
Prefinished Floor Repair & Board Replacement
Specialize in targeted repairs of gapped, squeaky, or damaged boards. The pre‑finished adapter foot prevents surface marring while you remove and replace individual planks, re‑secure loose tongues, and blend repairs seamlessly. Bill per board or per hour with a minimum service call fee.
Wood Accent Walls and Ceilings
Install engineered flooring as decorative wall and ceiling treatments for residential and boutique commercial spaces. Hidden stapling into the tongues yields a clean look with fast install times vs. face‑nailing. Offer curated finish palettes and moisture‑appropriate assemblies for baths and kitchens.
Hands‑On Flooring Workshops
Host paid clinics where homeowners practice layout, racking, and stapling on demo rigs. Provide tool handling tips, compressor setup, and finishing techniques. Monetize via class fees, accessory sales (staples, underlayment), and leads for full‑service installs or tool rentals.
Creative
Herringbone Wall Panel Art
Build framed wall panels by laying engineered flooring in a herringbone or chevron pattern onto 1/2–3/4 in plywood backers. Use the stapler to drive 15.5 GA staples through the tongues at 45° into the backer for hidden fasteners, then hang the panels like large art. The pre‑finished adapter foot protects factory finishes while the mallet actuation keeps assembly quick and consistent.
Planked Ceiling Makeover
Install lightweight engineered planks over furring strips to create a warm, continuous wood ceiling. The long‑reach handle improves control overhead, and the wide base plate stabilizes the tool along each tongue. Hidden staples into the tongues keep the look clean; use the prefinished adapter foot to avoid marring during tight overhead angles.
Custom Headboard/Feature Wall
Create a bedroom feature by mounting mixed‑width or color‑blocked planks to a wall frame. Build it like a vertical micro‑floor: adhesive plus angled staples into the tongues. Integrate LED backlighting around the perimeter for a floating effect. The interchangeable base plates help match plank thickness for consistent seating.
Rolling Photo Backdrop Divider
Make a double‑sided, castered room divider sheathed in wood flooring for studios or events. Staple planks to a rigid frame on both faces using hidden tongue fasteners. The pneumatic, mallet‑actuated action speeds production and yields a durable, premium backdrop that photographers can reposition easily.
Coffee Table or Bench Top Inlay
Laminate a plywood substrate and lay leftover prefinished flooring in patterns (herringbone, basketweave, or parquet). Use the stapler to lock tongues into the substrate, then edge‑band and add a clear coat. The hidden fastening keeps the surface smooth and the prefinished adapter foot preserves factory finishes during assembly.