Features
- VACUUM BREAKER REPAIR KIT: This outdoor faucet repair kit is specifically designed for seamless compatibility with ASSE 1019-A models, this outside faucet repair kit includes essential parts like a vacuum breaker and valve handle replacements
- COMPATIBILITY: The vacuum breaker repair kit effectively prevents backflow by creating an air gap between the water outlet and hose, ensuring clean and safe water delivery for various outdoor applications
- PRECISE MATCHING: The vacuum breaker outside faucet repair kit is a replacement for VACVBKX1B fit for traditional anti-siphon frost-free sillcock valves
- SIMPLE INSTALLATION: No tools needed,with easy-to-use outdoor faucet repair kit, you can easily replace your existing vacuum breaker and restore the anti-siphon protection, it will only take a few minutes to easily install
- SERVICES: Please feel free to contact us if you have any question about on our products
Specifications
| Color | Yellow |
| Unit Count | 2 |
Related Tools
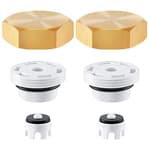
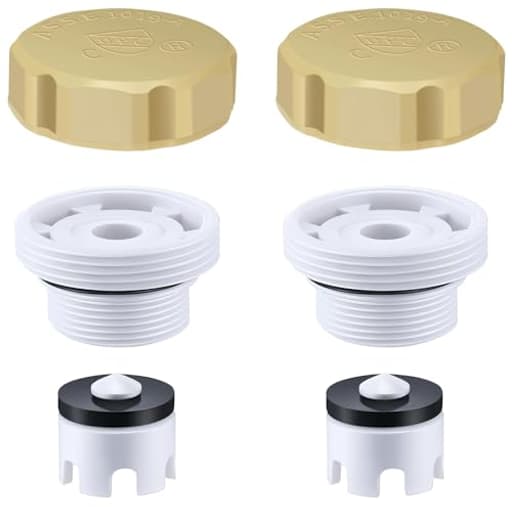
Two yellow vacuum breaker repair kits designed to replace the vacuum breaker and valve handle on traditional anti-siphon frost‑free sillcock valves. They restore anti‑siphon protection by creating an air gap at the faucet outlet to prevent backflow and hose siphoning. Installation is tool‑free and intended for outdoor faucet/hose applications.
KISYONGUS 2 Pack Vacuum Breaker Repair Kit Replacement for VACVBKX1B, Outdoor Faucet Repair Kit, ASSE 1019-A Vacuum Breaker for Traditional Anti Siphon Frost Free Sillcock Valves Anti Siphon Valve Repair Kit Review
Why I reached for this kit
A leaky vacuum breaker at a hose bib is one of those small annoyances that wastes water and can undermine the backflow protection you actually want on a frost‑free spigot. I keep a few repair kits on hand for quick fixes, so I tried the Kisyongus vacuum breaker repair kit on two frost‑free, anti‑siphon sillcocks at my place to see if it could be a straightforward, tool‑free solution.
This kit is a two‑pack of yellow vacuum breaker assemblies marketed as compatible with ASSE 1019‑A frost‑free valves and positioned as a replacement for the VACVBKX1B pattern. The value proposition is clear: screw out the old, screw in the new, restore anti‑siphon function and stop the drip—all without tools. That’s exactly what I wanted.
Design and build
Each unit arrives neatly packaged and visually well made. The molding on the yellow cap and body is clean with no flashing, the threads feel crisp, and the internal moving parts operate smoothly. The O‑rings are properly sized and pliable, not the plasticky kind that crack the moment you stretch them. Overall, it looks and feels like a decent OE‑style assembly rather than a flimsy universal.
There are no exotic materials advertised here—this is very much a standard vacuum breaker assembly for a frost‑free hose bib with a vented cap, a central plunger, spring, and sealing O‑rings. That’s the architecture you want: simple, serviceable, and easy to diagnose if something goes wrong later. The bright yellow color makes it easy to spot and identify at a glance, which I appreciated during installation and testing.
Installation experience
The promise is tool‑free installation, and in many cases that’s how these should go. You remove the hose, back out the old vacuum breaker cap/assembly by hand, check that the sealing surface is clean, and thread in the new unit until it seats. A little silicone plumber’s grease on the O‑rings is always a good idea to prevent tearing and help the assembly seat smoothly.
Here’s where my experience diverged by fixture:
- On my newer frost‑free sillcock, the Kisyongus assembly would not start in the threads. The male thread on the kit was larger than the female threads on my hydrant’s breaker pocket. I stopped before forcing anything; cross‑threading is a good way to buy yourself a new hydrant.
- On my older wall hydrant, the story was the same—the kit’s threads were just a touch too large to bite. No amount of gentle persuasion would get it to start.
In both cases, the leak I was addressing was minor weeping at the vacuum breaker cap during flow. Since the kit’s O‑rings were a match for the ones in my existing assemblies, I transplanted the O‑rings into my original caps, lubricated them, reassembled, and the leaks stopped immediately. So while I couldn’t install the entire Kisyongus assembly on either of my fixtures, the included seals were directly useful and solved my immediate problem.
I want to underscore that vacuum breaker assemblies for ASSE 1019‑A wall hydrants are not universal. The ASSE standard defines performance, not a single thread or geometry. Many manufacturers use different diameters and thread forms for the breaker pocket, and even a small difference will prevent a new cap from threading. That’s not a knock on this kit specifically—it’s a reality of the category.
Performance and anti‑siphon function
On a correctly matched hydrant, a replacement vacuum breaker should do three things well:
- Seal under pressure so water doesn’t weep from the cap.
- Open its air vent when the faucet is shut to break any vacuum and prevent back‑siphonage.
- Survive seasonal use outdoors without binding up.
I did verify the performance of the O‑rings from this kit on my existing caps: no more weeping under full house pressure and a proper gulp of air when the faucet is shut, which is what you want to see and hear. The spring and plunger action in the Kisyongus assemblies I handled felt smooth and appropriately sprung, so I don’t have concerns about the mechanism itself. The caveat is simple: you need to be sure the whole assembly actually fits your hydrant.
Compatibility: the make‑or‑break detail
The packaging and listing call out compatibility with ASSE 1019‑A and replacement for VACVBKX1B. In practice, here’s how I recommend checking before you buy:
- Identify your hydrant. Look for a brand and model tag or stamping on the wall plate, handle, or body of the spigot. Many manufacturers publish exploded parts diagrams that list their specific vacuum breaker kit by number.
- Measure the existing cap. If you have calipers, measure the outside diameter of the male thread on your old cap, and compare it to the replacement you’re considering. Even a couple of millimeters’ difference will be a no‑go.
- Inspect the thread form. Some hydrants use fine, shallow threads; others use coarser profiles. Visual comparison helps if you have the part in hand.
- Bring the old cap if buying locally. Matching by eye with the physical part avoids returns.
- Don’t assume ASSE 1019‑A means “universal fit.” It doesn’t.
If your hydrant explicitly calls for a VACVBKX1B‑style replacement, this Kisyongus kit should be a good match. If you’re guessing based on the standard alone, you’re rolling the dice.
What I liked
- Two‑pack value: Having a spare on hand is practical. Outdoor fixtures seem to pick the least convenient moment to start dripping.
- Clean molding and smooth action: The assemblies feel like quality replacements, not generic throwaways.
- O‑ring usefulness: Even without a perfect thread match, the seals solved my leak on two hydrants. Keeping a pair of fresh O‑rings in the shop is never a bad idea.
- Tool‑free concept: When it fits, this is a five‑minute fix with no need to shut off water to the house.
What could be better
- Clearer sizing information: A simple dimensional diagram (major thread diameter, pitch, cap height) would save a lot of guesswork and returns.
- Broader compatibility guidance: A cross‑reference list of popular hydrant brands/models that use the VACVBKX1B style would help homeowners quickly confirm fit.
- Labeling by size family: Color‑coding or a visible size code on the packaging would make it easier to distinguish among similar kits.
Who it’s for
- Homeowners and maintenance staff who know their hydrant model or have confirmed a VACVBKX1B‑style breaker.
- Anyone comfortable swapping out small plumbing assemblies on outdoor fixtures.
- People troubleshooting minor weeping from the top of a frost‑free hydrant and looking for a quick, tool‑free fix.
Tips for a smooth install
- Shut off the water to the spigot if your hydrant doesn’t isolate cleanly.
- Clean the breaker pocket threads with a soft brush before installing the new cap.
- Lightly lubricate the O‑rings with silicone plumber’s grease.
- Hand‑tighten only. The cap needs to vent; don’t over‑torque or use thread sealant.
- Test with a hose attached and under full pressure, then shut the valve and listen for the vent to admit air.
The bottom line
The Kisyongus vacuum breaker repair kit is a well‑made, budget‑friendly replacement that delivers exactly what it promises—provided your hydrant matches the VACVBKX1B pattern. In my case, the assemblies didn’t thread into either of my frost‑free sillcocks, which highlights the biggest challenge in this category: fitment varies more than most people expect. Even so, the included O‑rings were worth the price of admission by themselves; they cured small leaks and restored proper function on my existing caps.
Recommendation: Conditional. I recommend this kit if you’ve verified compatibility with your specific hydrant (ideally by model number or by matching the old cap). If you cannot confirm fit, I’d steer you to a local plumbing supply where you can compare parts in person, or to a replacement kit explicitly listed for your hydrant’s brand and model. When it fits, this is an easy win; when it doesn’t, it’s still a handy source of seals—but that’s not the best way to buy a repair kit.
Project Ideas
Business
DIY Faucet Tune‑Up Kit Retail Bundle
Package the two‑pack vacuum breaker with a short, laminated installation guide, QR code to a how‑to video, and a small tube of plumber’s grease. Market as a seasonal 'spring‑prep' or winterization add‑on for garden centers, hardware stores, and online marketplaces. Price with a healthy margin and offer multi‑pack discounts for contractors and property managers.
Plumber/Contractor Branded Giveaway
Offer custom‑labelled vacuum breaker kits as low‑cost promotional items for plumbing companies. Include the company logo, contact info, and a reminder to schedule annual maintenance. These make effective leave‑behind items after service calls and can generate repeat business when customers recognize the brand next season.
Service Package for Property Managers
Create a recurring maintenance subscription where you supply and install vacuum breaker replacements each year (two per unit as needed) and inspect outdoor faucets for leaks and frost protection. Target landlords, HOA boards, and rental complexes. Charge a per‑unit annual fee that bundles parts, labor, and a seasonal checklist for predictable recurring revenue.
Craft Kit + Workshop Sales
Develop craft kits that use the vacuum breakers (e.g., succulent planters, wind chimes) and run paid workshops in maker spaces or at farmer’s markets. Sell both finished products and DIY kits online with step‑by‑step instructions and supply lists. This leverages the part as a creative raw material and opens additional margins beyond commodity part sales.
Content + Affiliate Revenue Funnel
Produce short, practical video tutorials: how to replace a vacuum breaker (tool‑free), common faucet winterization tips, and creative upcycle projects. Post on YouTube/Instagram, optimize for local SEO (e.g., 'replace vacuum breaker [city]'), and link to the two‑pack product via affiliate programs or your own store. Monetize with ads, affiliate sales, and local service bookings generated from tutorial viewers.
Creative
Mini Succulent Faucet Planters
Turn each yellow vacuum breaker into a tiny hanging planter for succulents or air plants. Drill or file a few small drainage holes in the bottom, fill with a bit of well-draining mix, glue a short piece of wire or small chain to the handle for hanging, and mount on a fence or pallet garden. The bright yellow parts create a cheerful modular display and use the hollow cavity for soil — great for craft fairs or backyard decor.
Backflow Demonstration Kit (Education)
Build a hands‑on teaching kit that demonstrates anti‑siphon/backflow principles. Combine a vacuum breaker with clear tubing, a small water reservoir, and colored water to show how the vacuum breaker creates an air gap and prevents reverse flow. Use the included two‑pack so students can compare a working vs. removed unit. Sell or present these to schools, makerspaces, or community workshops focused on plumbing safety and water conservation.
Upcycled Outdoor Wind Chime
Make a rain‑and‑wind chime using several yellow vacuum breakers as visual accents and resonators. String multiple pieces on varying lengths of cord, add recycled metal or wooden chimes between them, and paint/embellish the handles for contrast. The bright yellow plastic adds a pop of color and the kits are light and weather resistant for porch or garden art.
Micro‑Drip Emitter for Container Gardens
Convert the vacuum breaker into a low‑flow emitter for potted plants and window boxes. Drill a small, calibrated hole through the outlet and attach to 1/4" micro tubing; the internal valve body diffuses flow and can be tuned to drip or trickle. Use the two pieces for alternating flow patterns. This gives a simple DIY micro‑irrigation solution that’s tool‑light and inexpensive.
Plumbing Mosaic Wall Art
Collect many yellow vacuum breakers (and other small plumbing parts) to create a textured mosaic or relief mural for an industrial‑style décor piece. Glue parts onto a backing board in a repeating pattern or create a water‑themed image, then seal with clear epoxy for outdoor durability. Offer as custom commissions for cafes, breweries, or plumbing shops.